The PIM prune mechanism works a bit different on multi-access links compared to point-to-point links.
On point to point links there is only one other router on the other end so when we receive a prune message, it’s safe to stop forwarding the traffic. On multi-access links however it’s possible that we have more than one downstream router that is interested in receiving the multicast traffic. When we receive a prune on a multi-access link, we need to make sure that nobody else still wants to receive it. This is done with the prune override mechanism and it applies to both PIM dense and sparse mode.
Here’s an example:
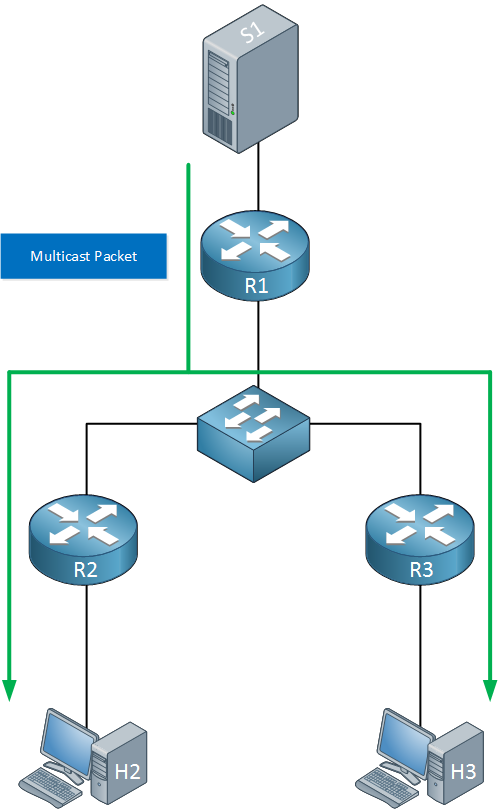
Above we have a source (S1) sending multicast traffic to R1. At the bottom are two receivers (H2 and H3) so R2/R3 are both forwarding the traffic. After a few minutes, H2 doesn’t want to receive this traffic anymore:
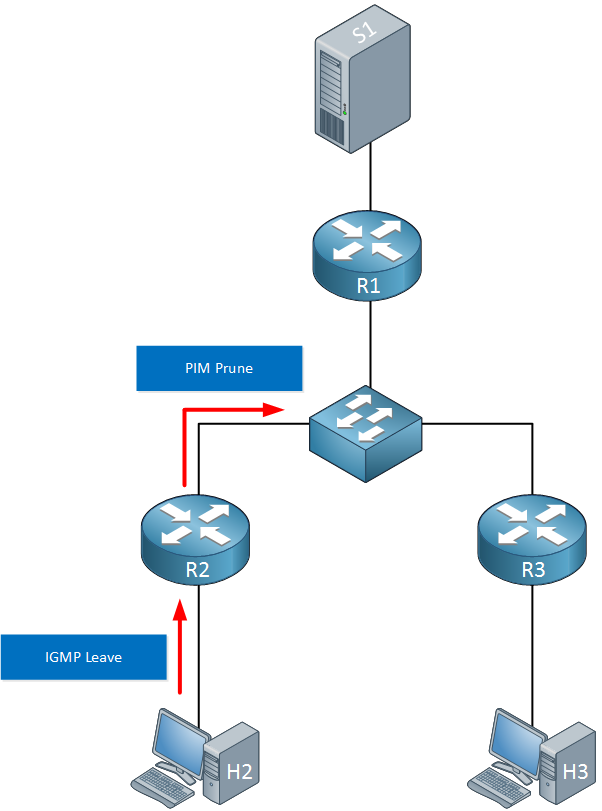
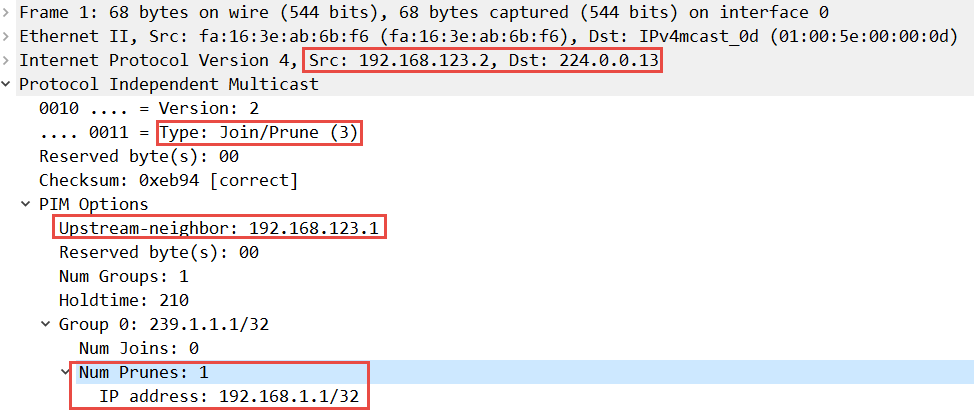
H2 will send an IGMP leave towards R2 who will send a PIM prune to its upstream neighbor, R1. This PIM prune message is destined to 224.0.0.13 so R1 and R3 will both receive it. Here’s what happens next:
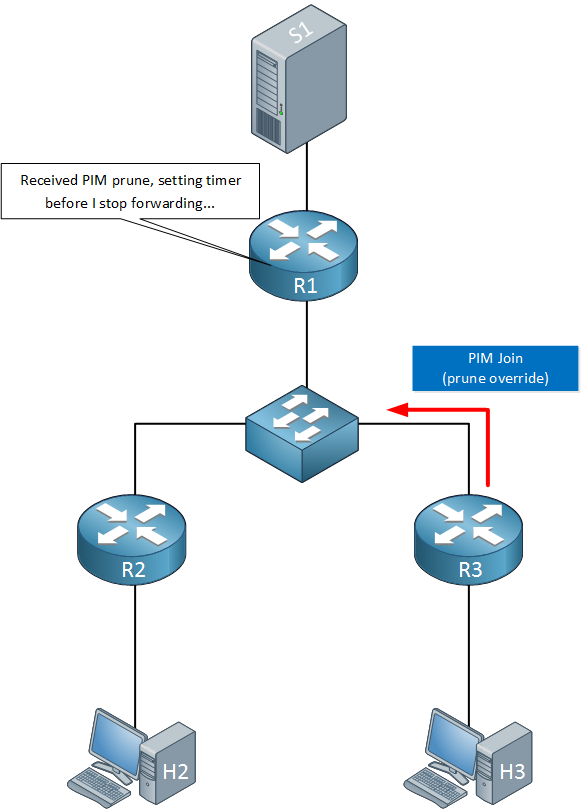
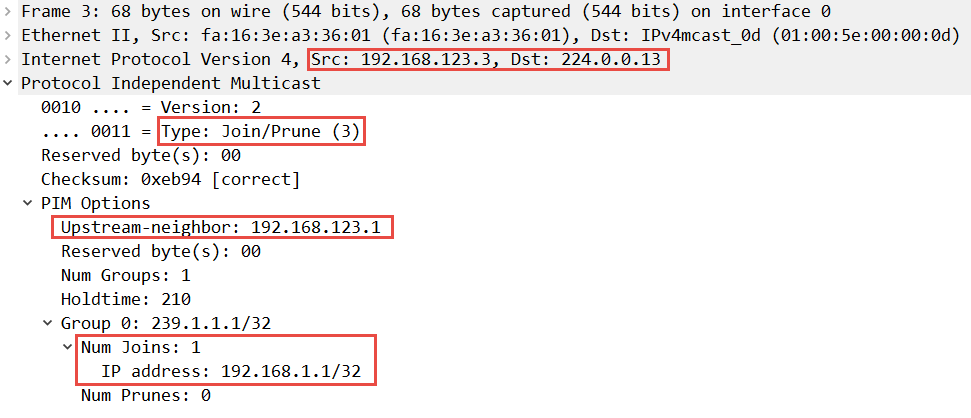
R1 receives the prune message but it won’t stop forwarding right away. It will wait for a few seconds to see if other routers are still interested. R3 is still interested so it will send a PIM join. Since this PIM join overrides the prune, we call it a prune override but the packet is a regular PIM join.. R1 now knows what to do:
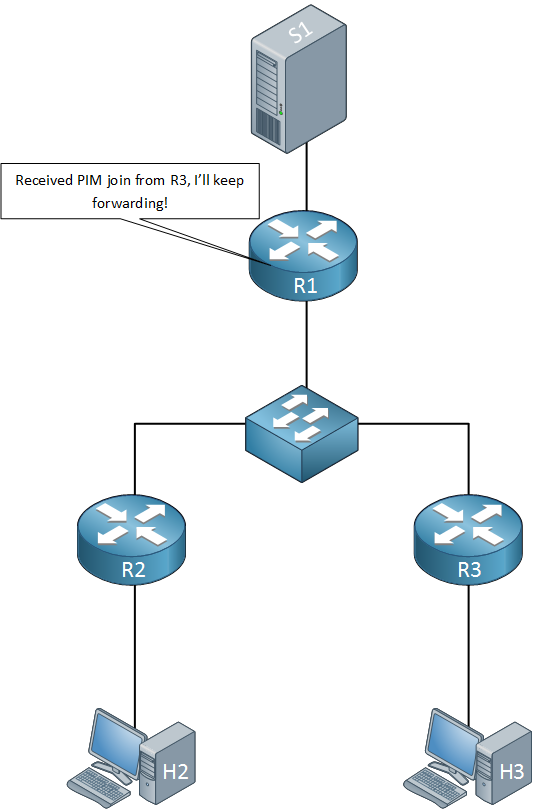
Since R3 is still interested, R1 will ignore the prune message from R2 and will keep forwarding the multicast traffic.
Let’s take a look at some real routers to see how this works in action!
Configuration
Here’s the topology I will use:
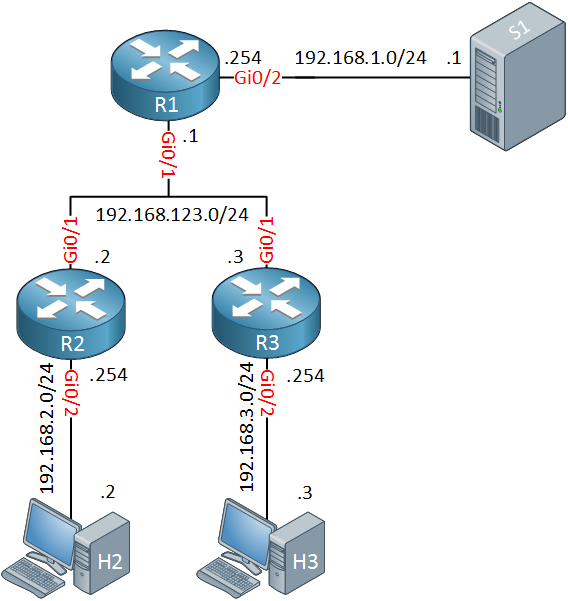
Above we have a small network with three routers. S1 will send multicast packets and H2/H3 will be the receivers. OSPF has been configured as the unicast routing protocol and PIM dense mode for multicast routing. If you want to test this example yourself, you can find the startup configurations below:
hostname R1
!
ip multicast-routing
ip cef
!
interface GigabitEthernet0/1
 ip address 192.168.123.1 255.255.255.0
 ip pim dense-mode
 duplex auto
 speed auto
 media-type rj45
!
interface GigabitEthernet0/2
 ip address 192.168.1.254 255.255.255.0
 ip pim dense-mode
 duplex auto
 speed auto
 media-type rj45
!
router ospf 1
 network 192.168.1.0 0.0.0.255 area 0
 network 192.168.123.0 0.0.0.255 area 0
!
end
hostname R2
!
ip multicast-routing
ip cef
!
interface GigabitEthernet0/1
ip address 192.168.123.2 255.255.255.0
ip pim dense-mode
duplex auto
speed auto
media-type rj45
!
interface GigabitEthernet0/2
ip address 192.168.2.254 255.255.255.0
ip pim dense-mode
duplex auto
speed auto
media-type rj45
!
router ospf 1
network 192.168.2.0 0.0.0.255 area 0
network 192.168.123.0 0.0.0.255 area 0
!
endhostname R3
!
ip multicast-routing
ip cef
!
interface GigabitEthernet0/1
ip address 192.168.123.3 255.255.255.0
ip pim dense-mode
duplex auto
speed auto
media-type rj45
!
interface GigabitEthernet0/2
ip address 192.168.3.254 255.255.255.0
ip pim dense-mode
duplex auto
speed auto
media-type rj45
!
router ospf 1
network 192.168.3.0 0.0.0.255 area 0
network 192.168.123.0 0.0.0.255 area 0
!
endhostname H2
!
no ip routing
!
interface GigabitEthernet0/1
ip address 192.168.2.2 255.255.255.0
no ip route-cache
duplex auto
speed auto
media-type rj45
!
ip default-gateway 192.168.2.254
!
endhostname H3
!
no ip routing
!
interface GigabitEthernet0/1
ip address 192.168.3.3 255.255.255.0
no ip route-cache
duplex auto
speed auto
media-type rj45
!
ip default-gateway 192.168.3.254
!
endhostname S1
!
no ip routing
!
interface GigabitEthernet0/1
ip address 192.168.1.1 255.255.255.0
no ip route-cache
duplex auto
speed auto
media-type rj45
!
ip default-gateway 192.168.1.254
!
end
Let’s configure the hosts to receive our multicast traffic:
H2 & H3
(config)#interface GigabitEthernet 0/1
(config-if)#ip igmp join-group 239.1.1.1
And generate some traffic from S1:
S1#ping 239.1.1.1 repeat 1000
Type escape sequence to abort.
Sending 1000, 100-byte ICMP Echos to 239.1.1.1, timeout is 2 seconds:
.
Reply to request 1 from 192.168.2.2, 20 ms
Reply to request 2 from 192.168.3.3, 5 ms
S1 is receiving replies from H2 and H3. Let’s check the multicast routing tables of R2 and R3:
R2#show ip mroute 239.1.1.1 192.168.1.1

(192.168.1.1, 239.1.1.1), 01:51:50/00:01:33, flags: T
  Incoming interface: GigabitEthernet0/1, RPF nbr 192.168.123.1
  Outgoing interface list:
GigabitEthernet0/2, Forward/Dense, 00:00:36/stoppedR3#show ip mroute 239.1.1.1 192.168.1.1
(192.168.1.1, 239.1.1.1), 01:52:29/00:01:55, flags: T
Incoming interface: GigabitEthernet0/1, RPF nbr 192.168.123.1
Outgoing interface list:
GigabitEthernet0/2, Forward/Dense, 01:52:29/stopped
Both router are forwarding traffic to the hosts. Before we configure H2 to stop listening, let’s enable a debug:
R1, R2 & R3
#debug ip pim
PIM debugging is on
Let’s configure H2 to stop listening:
H2(config)#interface GigabitEthernet 0/1
H2(config-if)#no ip igmp join-group 239.1.1.1
Here’s what we we will see on R2:
R2#
PIM(0): Insert (192.168.1.1,239.1.1.1) prune in nbr 192.168.123.1's queue
PIM(0): Building Join/Prune packet for nbr 192.168.123.1
PIM(0):  Adding v2 (192.168.1.1/32, 239.1.1.1) Prune
PIM(0): Send v2 join/prune to 192.168.123.1 (GigabitEthernet0/1)
PIM(0): Received v2 Join/Prune on GigabitEthernet0/1 from 192.168.123.1, not to us
PIM(0): Prune-list: (192.168.1.1/32, 239.1.1.1)
PIM(0): Received v2 Join/Prune on GigabitEthernet0/1 from 192.168.123.3, not to us
PIM(0): Join-list: (192.168.1.1/32, 239.1.1.1)
R2 sends the prune message to its upstream neighbor, R1. Here’s what R1 thinks of it:
R1#
PIM(0): Received v2 Join/Prune on GigabitEthernet0/1 from 192.168.123.2, to us
PIM(0): Prune-list: (192.168.1.1/32, 239.1.1.1)
PIM(0): Schedule to prune GigabitEthernet0/1 for (192.168.1.1/32, 239.1.1.1)
PIM(0): Received v2 Join/Prune on GigabitEthernet0/1 from 192.168.123.3, to us
PIM(0): Join-list: (192.168.1.1/32, 239.1.1.1)
PIM(0): Update GigabitEthernet0/1/192.168.123.3 to (192.168.1.1, 239.1.1.1), Forward state, by PIM SG Join
R1 receives the prune from R2 and is ready to stop forwarding, you can see it schedules the pruning. A bit later it receives the PIM join (prune override) from R3 and decides to keep forwarding.
Here’s what it looks like on R3:
R3#
PIM(0): Received v2 Join/Prune on GigabitEthernet0/1 from 192.168.123.2, not to us
PIM(0): Prune-list: (192.168.1.1/32, 239.1.1.1)
PIM(0): Set join delay timer to 600 msec for (192.168.1.1/32, 239.1.1.1) on GigabitEthernet0/1
PIM(0): Received v2 Join/Prune on GigabitEthernet0/1 from 192.168.123.1, not to us
PIM(0): Prune-list: (192.168.1.1/32, 239.1.1.1)
PIM(0): Join delay timer running at 500 for (192.168.1.1, 239.1.1.1) on GigabitEthernet0/1
PIM(0): Insert (192.168.1.1,239.1.1.1) join in nbr 192.168.123.1's queue
PIM(0): Building Join/Prune packet for nbr 192.168.123.1
PIM(0):  Adding v2 (192.168.1.1/32, 239.1.1.1) Join
PIM(0): Send v2 join/prune to 192.168.123.1 (GigabitEthernet0/1)
Above we can see that R3 receives the prune message from R2. Since R3 still has a receiver, it will send a PIM join to R1.
R3 is using a delay timer before sending the PIM join. When there are multiple multicast routers on the multi-access segment that still want to receive traffic then only one of them has to inform R1 to keep forwarding. By using a random delay timer, one router will send the PIM join (prune override) first. Other routers will see it and will cancel their own PIM join message.
Below you can see the packet captures of the PIM prune override mechanism. First we have the prune message from R2:
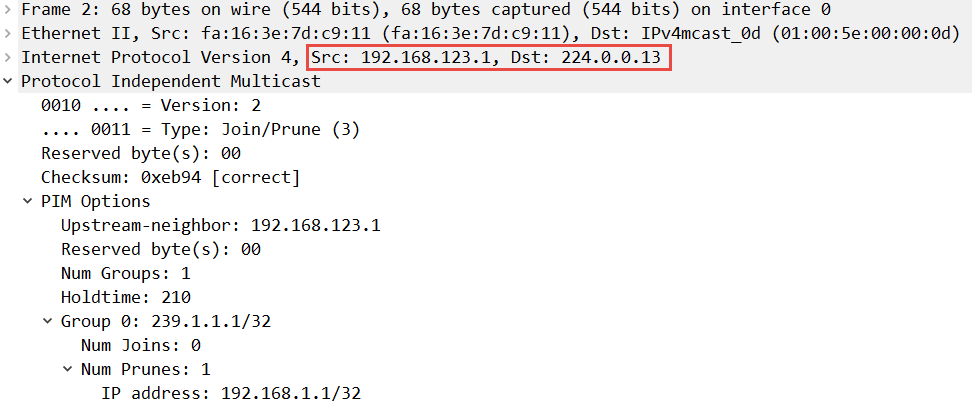
R1 will “relay” the prune message which we can see below:
And finally R3 will send the PIM join (prune override) to R1:
We can verify that R2 has stopped forwarding traffic to H2 by checking the multicast routing tables again:
R2#show ip mroute 239.1.1.1 192.168.1.1
IP Multicast Routing Table
Flags: D - Dense, S - Sparse, B - Bidir Group, s - SSM Group, C - Connected,
       L - Local, P - Pruned, R - RP-bit set, F - Register flag,
       T - SPT-bit set, J - Join SPT, M - MSDP created entry, E - Extranet,
       X - Proxy Join Timer Running, A - Candidate for MSDP Advertisement,
       U - URD, I - Received Source Specific Host Report,
       Z - Multicast Tunnel, z - MDT-data group sender,
       Y - Joined MDT-data group, y - Sending to MDT-data group,
       G - Received BGP C-Mroute, g - Sent BGP C-Mroute,
       N - Received BGP Shared-Tree Prune, n - BGP C-Mroute suppressed,
       Q - Received BGP S-A Route, q - Sent BGP S-A Route,
       V - RD & Vector, v - Vector, p - PIM Joins on route,
       x - VxLAN group
Outgoing interface flags: H - Hardware switched, A - Assert winner, p - PIM Join
 Timers: Uptime/Expires
 Interface state: Interface, Next-Hop or VCD, State/Mode

(192.168.1.1, 239.1.1.1), 02:02:13/00:01:13, flags: PT
  Incoming interface: GigabitEthernet0/1, RPF nbr 192.168.123.1
  Outgoing interface list: Null
Above you can see that R2 is still receiving the multicast traffic but that it has been pruned (note the P flag). The outgoing interface is now null.
R3 is still forwarding it:
R3#show ip mroute 239.1.1.1 192.168.1.1

(192.168.1.1, 239.1.1.1), 02:01:46/00:02:53, flags: T
  Incoming interface: GigabitEthernet0/1, RPF nbr 192.168.123.1
  Outgoing interface list:
    GigabitEthernet0/2, Forward/Dense, 02:01:46/stopped
That’s all there is to it. This is how PIM prune override works on multi-access networks. Do you want to take a look these packet captures yourself? Click on the button below.
I hope you enjoyed this lesson, if you have any questions feel free to leave a comment.
No comments:
Post a Comment