Showing posts with label AAA. Show all posts

Saturday, February 22, 2020

AAA Local Command Authorization

Cisco IOS allows authorization of commands without using an external TACACS+ server. Cisco routers and switches work with privilege levels, by default there are 16 privilege levels and even without thinking about it you are probably already familiar with 3 of them:
  • Level 0: Only a few commands are available, the most used command is probably ‘enable’.
  • Level 1: This is the default exec user level. You can use some of the show commands but you won’t be able to configure anything.
  • Level 15: The highest privilege level, also known as “enable mode” or “privileged mode“.
Higher privilege levels will support all the commands of the lower privilege levels. For example, privilege level 8 will include all the commands of level 0 – 7.
Privilege level 15 will have all the commands of level 0 – 14 and so on.
Creating different privilege levels is a good idea if you work with different user groups. You probably only want your senior network engineers to have privilege level 15 and your junior network engineers a lower privilege level so they don’t have access to all commands.
If you want to assign commands to a certain privilege level, you have a couple of options:
  • You can assign some privilege level 15 commands to level 1 so that all users that are allowed to log in to the router can use them.
  • You can move some commands from level 1 to a higher level so that you can disallow some commands for level 1 users.
  • You can create a new privilege level and assign some level 15 commands to it.
When you are going to assign commands to different privilege levels you need to understand that IOS has two modes:
  • Exec Mode
  • Configuration Mode
Exec mode will look like this:
Router#
And configuration mode looks like this:
Router(config)#
Each “mode” also has different “sub-modes” like the interface configuration:
Router(config-if)#
Commands also have a certain structure that you need to understand. Basically commands look like this:
command sub-command [arguments] [arguments-values] [options]
To give you an example, think about configuring an IP address:
Rack1SW1(config-if)#ip address 192.168.1.1 255.255.255.0
We can break it down like this:
  • ip = command.
  • address = sub-command.
  • 192.168.1.1 255.255.255.0 = arguments.
  • secondary = options (not shown in my example)
When I assign a command to a privilege level, I can select the entire “ip” command or only the “ip address” sub-command. If I give someone the entire “ip” command they can also configure things like “ip unreachables” or “ip arp” and so on.
Let’s take a look at a couple of examples of moving commands and creating new privilege levels shall we?

Configuration

First we’ll check what our privilege level is, you can do it like this:
Router>show privilege
Current privilege level is 1
Use the show privilege command to check your privilege level. By default once you are logged in you will be in level 1. Let’s go to enable mode now:
Router>enable
Router#show privilege 
Current privilege level is 15
And as you can see enable has privilege level 15.
We’ll start with a simple example. I’m going to give privilege level 1 users the power to use the show running-configuration command. This is how we do it:
Router(config)#privilege exec level 1 show running-config
All level 1 users now are able to use the show running-config command. Not a very wise idea but it’ll work:
Router>show running-config 
Building configuration...

Current configuration : 53 bytes
!
boot-start-marker
boot-end-marker
!
We can also take commands away from the level 1 users. Let’s say I don’t want them to use “show ip arp”. We’ll do it like this:
Router(config)#privilege exec level 15 show ip arp 
Level 1 users will discover that they can’t use show ip arp anymore:
Router>show ip arp
        ^
% Invalid input detected at '^' marker.
Now you have seen how to add or remove commands to a certain privilege level. How about we create a user with a new privilege level that has access only to a couple commands? We’ll create a new user account that is allowed to do these things:
  • Shutdown or no shutdown an interface.
  • Use the debug ip routing command.
  • Disable all debugging
  • Use the show running-configuration command.
I will create a new username for this with a new privilege level, here’s how to do it:
Router(config)#username JUNIOR privilege 8 password CISCO
First we’ll create a new user account called JUNIOR. I’ll assign this user privilege level 8. Now we’ll add some commands to it:
Router(config)#privilege exec level 8 configure terminal
Router(config)#privilege exec level 8 debug ip routing  
Router(config)#privilege exec level 8 undebug all     
Router(config)#privilege exec level 8 show running-config
The commands above are for exec mode. I still have to add some commands for the configuration mode:
Router(config)#privilege configure level 8 interface
Router(config)#privilege interface level 8 shutdown
Router(config)#privilege interface level 8 no shutdown
The commands above will allow the user to go into the interface configuration and use the shutdown and no shutdown command.
Let’s test our new user account:
Router(config)#line con 0
Router(config-line)#login local
Don’t forget to enable local authentication or we won’t get a username/password prompt…
Router con0 is now available

Press RETURN to get started.

User Access Verification

Username: JUNIOR
Password:
After entering the credentials we can check the privilege level:
Router#show privilege 
Current privilege level is 8
The level is looking good. Let’s try some debug commands:
Router#debug ?  
  all  Enable all debugging
  ip   IP information

Router#debug ip ?
  routing  Routing table events
The only debug we can use is debug ip routing. What about the configuration commands?
Router#configure terminal 
Router(config)#interface fastEthernet 0/1
Router(config-if)#?
Interface configuration commands:
  default   Set a command to its defaults
  exit      Exit from interface configuration mode
  help      Description of the interactive help system
  no        Negate a command or set its defaults
  shutdown  Shutdown the selected interface
These are the only commands available. Let’s shut the interface:
Router(config)#interface fastEthernet 0/1
Router(config-if)#shutdown
If this user tries the show running-configuration command it won’t see the entire configuration but only the commands that the privilege level is allowed to use:
Router#show running-config 
Building configuration...

Current configuration : 930 bytes
!
boot-start-marker
boot-end-marker
!
!
interface Loopback0
!
interface FastEthernet0/1
 shutdown
There’s more in the configuration but this user is only allowed to see the shutdown command.
That’s all I wanted to show for now, I hope this is helpful to you! If you have any questions just leave a comment…

AAA Configuration on Cisco Switch

In this lesson we will take a look how to configure a Cisco Catalyst Switch to use AAA and 802.1X for port based authentication. If you have no idea what AAA (Authentication, Authorization and Accounting) or 802.1X are about then you should look at my AAA and 802.1X Introduction first. Having said that, let’s look at the configuration. I will use the following topology:
aaa cisco switch elektron radius
I will show you an example of 802.1X with a RADIUS server. I am going to use Elektron RADIUS server as the authentication server because it’s easy to install and has a nice GUI.

RADIUS Server Configuration

Elektron Radius Wizard
Using a RADIUS server like Elektron will save you the time of hassling with installing Windows Server, configuring Active Directory and checking many checkboxes or messing around with Freeradius on Linux. When you configure a RADIUS server you will need to create a shared password:
Elektron Radius Server
I’m going to use “radiuspass” to keep things simple. Hit Next and you will see this:
Elektron Digital Certificate
There are different methods for authentication, for example:
  • Only username and password.
  • Username, password and a digital certificate on the server.
  • Username, password, digital certificate on the server AND on the clients.
In a production network you might already have a certificate authority within your network. I don’t care about certificates for this demonstration but we’ll generate them anyway in case you want to play with them sometime in the future. The next steps will let you configure a name for your RADIUS server and if you want the digital certificate, you will get some questions about it. Once you are done you will be in the main screen of Elektron:
Elektron Main Screen
By default everything should work out of the box so we don’t have to touch anything. Let’s start and add a user account:
Elektron Accounts
I want to create a new user account. Click on authentication, Elektron accounts and then on the big green plus symbol in the menu.
Elektron Add User Account
My new user account will be for Alice. My password will be “safe” and I don’t need her to be member of any groups. Click on OK.
Elektron Authentication Domains
By default Elektron will check Windows usernames instead of its own database. We need to configure it so the local database is used. Click on “Authentication Domains” and then on “Default Authentication Domain”.
Elektron Accounts Authentication
Change it to “Elektron Accounts” and click on OK. That’s all you have to do on the Elektron RADIUS server, we’ll look at the switch now!

Switch Configuration

First I need to make sure SW1 and the Elektron RADIUS server can reach each other. We’ll use the management interface (VLAN 1) and configure an IP address on it:
SW1(config)#interface vlan 1
SW1(config-if)#ip address 192.168.1.100 255.255.255.0
Now we should enable AAA:
SW1(config)#aaa new-model
This is an important command. Use aaa new-model to unlock all the different AAA commands that we need. Let’s configure the RADIUS server:
SW1(config)#radius-server host 192.168.1.101 auth-port 1812 acct-port 1646 key radiuspass
We configure SW1 with the IP address of the Elektron RADIUS server. I also have to specify the shared secret “radiuspass” that I configured previously here. Make sure to use the correct port number.
SW1(config)#aaa authentication dot1x default group radius
This is how we configure SW1 to use the RADIUS server for authentication for 802.1X enabled interfaces. You can create multiple groups with RADIUS servers if you want. Besides 802.1X you can use AAA for many things:
SW1(config)#aaa authentication ?                   
  arap             Set authentication lists for arap.
  attempts         Set the maximum number of authentication attempts
  banner           Message to use when starting login/authentication.
  dot1x            Set authentication lists for IEEE 802.1x.
  enable           Set authentication list for enable.
  eou              Set authentication lists for EAPoUDP
  fail-message     Message to use for failed login/authentication.
  login            Set authentication lists for logins.
  nasi             Set authentication lists for NASI.
  password-prompt  Text to use when prompting for a password
  ppp              Set authentication lists for ppp.
  sgbp             Set authentication lists for sgbp.
  username-prompt  Text to use when prompting for a username
For example:
  • Privileged mode (enable): Instead of using a enable password/secret on your device your credentials will be checked at the authentication server.
  • Login: You can also check credentials for telnet or SSH access.
Our last step on the switch is to enable 802.1X on the interface that connects to the computer:
SW1(config)#dot1x system-auth-control 
SW1(config)#interface fa0/1
SW1(config-if)#dot1x port-control auto
We need to use the dot1x system-auth-control command globally before 802.1X works. On the interface level we need to use the dot1x port-control auto command.
SW1#
%LINEPROTO-5-UPDOWN: Line protocol on Interface FastEthernet0/1, changed state to down
After typing in those 802.1X commands you’ll see that the interface to H1 will go down. It’s time for some authentication! I will use Windows XP as an example for the client.

Client Configuration

I’m using a Windows XP machine to test this. First you need to enable AAA authentication:
Windows XP Services.msc
802.1X doesn’t always work out of the box so we need to check if a certain service is running. Press “start”, click on “run” and type “services.msc”.
Windows XP Services
Look for the “Wired Autoconfig” service and start it if it’s not running.
Windows XP Network Properties
Now go to Network connections and open the properties of your network card.
Windows XP Network Authentication
By default it will have 802.1X authentication enabled and PEAP is selected. Press “Settings” to continue.
Windows XP PEAP Settings
Disable the checkbox for “Validate server certificate”. Normally you can use this so the client can check the authenticity of the RADIUS server. Click on the “Configure” button to continue.
Windows XP PEAP MSCHAP Properties
Disable the checkbox here or it will use your Windows credentials by default to authenticate. Click on OK on all windows until they all disappear.
Windows XP AAA Popup
Click on the pop-up and you’ll be asked for your credentials.
Windows XP Enter Credentials
Type in the username and password that you configured in Elektron RADIUS server and press OK. You should now be connected!
Windows XP LAN ConnectedThat’s all you have to do to configure AAA and 802.1X Authentication on a Cisco Catalyst Switch for client authentication. I hope this lesson was useful to you!

AAA and 802.1X Authentication

When it comes to securing the network, AAA and 802.1X authentication are two powerful tools we can use. Let me show you an example why you might want this for your switches:
Switch Connected to RouterNetwork users might bring their own wireless router from home and connect it to the switch so they can share wireless internet with all their colleagues. An access point like this is called a rogue access point and this is something you DON’T want to see on your network. It’s hard to detect because on the switch you’ll only see one MAC address. The router is doing NAT so you will only see one IP address, this is something you can’t prevent with port security.
One way of dealing with issues like this is to use AAA.
AAA stands for AuthenticationAuthorization and Accounting:
  • Authentication: Verify the identity of the user, who are you?
  • Authorization: What is the user allowed to do? what resources can he/she access?
  • Accounting: Used for billing and auditing.
aaa switch authenticator
The idea behind AAA is that a user has to authenticate before getting access to the network. The fa0/1 interface on SW1 will be blocked and you are not even getting an IP address. The only thing the user is allowed to do is send his/her credentials which will be forwarded to the AAA server. If your credentials are OK the port will be unblocked and you will be granted access to the network.
802.1x port control
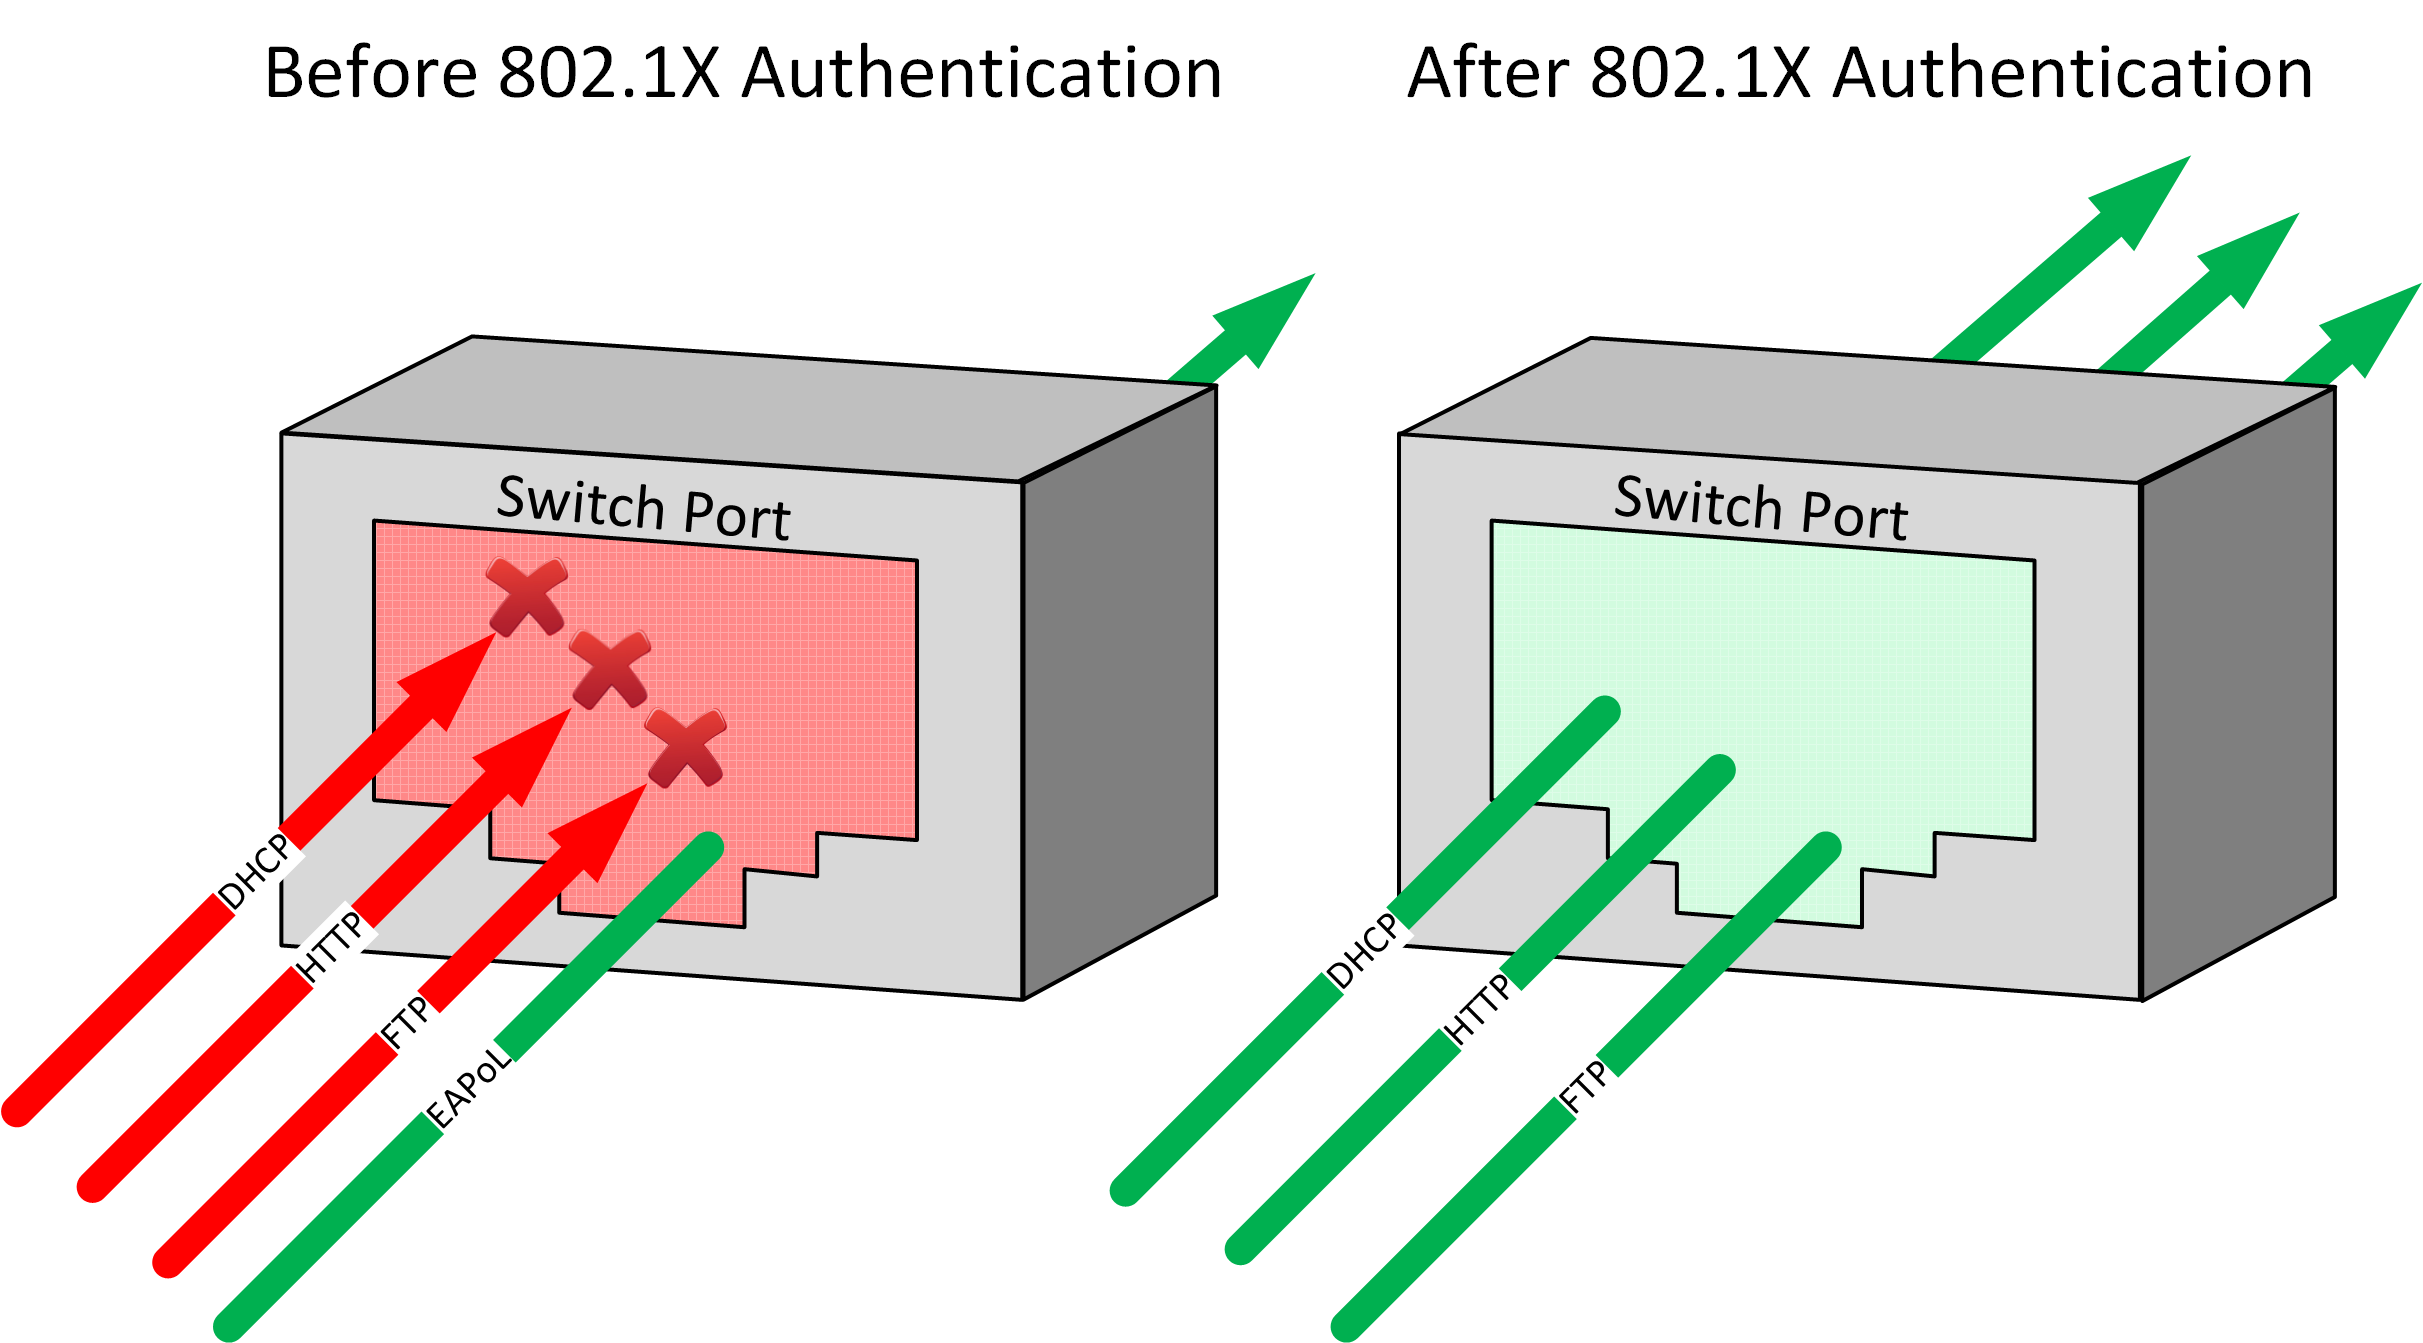
802.1X is the mechanism that will block or unblock the interface. It’s called port-based control. In the picture above an unknown user plugged in a cable to the switch.

All traffic is being dropped with the exception of EAPoL (Extensible Authentication Protocol over LAN). EAP is what we use to exchange authentication information. Once the user has authenticated and everything is OK she is granted access to the network.
Supplicant Authenticator Authentication ServerIn the picture above you see the terminology that 802.1X uses. The user device is called the supplicant; it “supplies” authentication information. The switch is called the authenticator because it accepts the authentication information and passes it along to the authentication server. User information is stored on the authentication server.
There are two types of authentication servers:
  • RADIUS
  • TACACS+
The most common authentication server is RADIUS (Remote Authentication Dial In User Service). It’s a protocol that has been standardized by the IETF. TACACS+ (Terminal Access Controller Access-Control System) does a similar job but its Cisco proprietary.
There are many different RADIUS servers you can use, for example:
  • Cisco ACS (Cisco’s RADIUS and TACACS+ server software)
  • Microsoft IAS (you can install it on Windows server 2003 or 2008).
  • Freeradius (very powerful and free)
  • Integrated in network devices (Cisco’s Wireless LAN controller have RADIUS server software for example).
You now have an idea what the components are in a AAA 802.1X authentication setup. In the next lesson I will give you a configuration example how to implement this on a Cisco Catalyst Switch.