Showing posts with label RIP. Show all posts

Thursday, February 20, 2020

RIP Reliable Default Route with IP SLA

RIP is a fairly simple protocol and most CCIE R&S students don’t worry about it too much. There are however a number of ‘pitfalls’ that you need to be aware of. One of them is configuring RIP to advertise a default route in combination with IP SLA and object tracking. I will show you how to do this with the following three routers:
rip reliable default route topology
The topology above is simple enough. Three routers connected to each other and we will configure RIP on R1 and R2. The idea is to advertise a default route on R2 towards R1 but only when it can reach the IP address of R3. Let’s start by enabling RIP on R1 and R2:
R1(config)#router rip
R1(config-router)#version 2
R1(config-router)#network 192.168.12.0
R2(config)#router rip
R2(config-router)#version 2
R2(config-router)#no auto-summary 
R2(config-router)#network 192.168.12.0
Next step is to enable IP SLA on R2 so that it will ping the IP address of R3:
R2(config)#ip sla 1
R2(config-ip-sla)#icmp-echo 192.168.23.3 
R2(config-ip-sla-echo)#timeout 100
R2(config-ip-sla-echo)#frequency 1
R2(config-ip-sla-echo)#exit
R2(config)#ip sla schedule 1 start-time now life forever
We will use IP SLA to ping R3 and make it run forever. Just to be sure we’ll verify that it is working:
R2#show ip sla statistics 

Round Trip Time (RTT) for Index 1
 Latest RTT: 24 milliseconds
Latest operation start time: *00:17:09.647 UTC Fri Mar 1 2002
Latest operation return code: OK
Number of successes: 87
Number of failures: 0
Operation time to live: Forever
IP SLA is working as it should. We are receiving replies to our ping requests. Now let’s see if we can configure that default route for RIP on R2:
R2(config-router)#default-information originate ?
  route-map  Route-map reference
  <cr>
The only option we have is to use a route-map in combination with our default route. Let’s use a route-map:
R2(config-router)#default-information originate route-map TRACK_LINK
I’ll use a route-map called TRACK_LINK. Now we’ll take a look at the options for our route-map:
R2(config-route-map)#match ?
  as-path           Match BGP AS path list
  clns              CLNS information
  community         Match BGP community list
  extcommunity      Match BGP/VPN extended community list
  interface         Match first hop interface of route
  ip                IP specific information
  ipv6              IPv6 specific information
  length            Packet length
  local-preference  Local preference for route
  metric            Match metric of route
  mpls-label        Match routes which have MPLS labels
  nlri              BGP NLRI type
  policy-list       Match IP policy list
  route-type        Match route-type of route
  source-protocol   Match source-protocol of route
  tag               Match tag of route
I can’t match my route-map directly to IP SLA so we’ll have to be creative here. Think about IP SLA for a moment…we can tie it to a static route using object tracking. We will create a match statement here that matches a certain prefix, and for this prefix we will create a static route that is tracked by IP SLA. It doesn’t matter what prefix we use as long as it is in the routing table:
R2(config-route-map)#match ip address prefix-list DUMMY_PREFIX
I will call the prefix-list DUMMY_PREFIX. Let’s create that prefix-list:
R2(config)#ip prefix-list DUMMY_PREFIX permit 11.11.11.0/24
I will use prefix 11.11.11.0 /24. This prefix is not in use for this topology…now we will create a static route for this prefix:
R2(config)#ip route 11.11.11.0 255.255.255.0 null0 track 1
Above is where the magic happens. I created a static route for 11.11.11.0 /24 and I’ll point it to the null0 interface to get it in the routing table. The track 1 keyword enables object tracking. Whenever object 1 fails we will remove this static route from the routing table. Let’s link object 1 to IP SLA 1:
R2(config)#track 1 ip sla 1
This will link object 1 to IP SLA 1. Whenever our ping to R3 fails, the static route that we just created will be removed from the routing table. Let’s verify our work here:
R1#show ip route rip 
R*   0.0.0.0/0 [120/1] via 192.168.12.2, 00:00:12, FastEthernet0/0
The default route is in the routing table of R1. Now let’s take a look what happens when we shut the interface to R3:
R2#debug ip sla error 
 IP SLAs ERROR debugging for all operations is on
R2#debug track
R2#debug ip routing
IP routing debugging is on
R1#debug ip rip
RIP protocol debugging is on
R1#debug ip routing
IP routing debugging is on
We will enable some debugs to see the action in real-time:
R2(config)#interface fastEthernet 0/1
R2(config-if)#shutdown
First you will see that IP SLA is failing:
R2#
Track: 1 Change #2 rtr 1, state Up->Down
%TRACKING-5-STATE: 1 rtr 1 state Up->Down
This causes our dummy prefix to be removed from the routing table:
R2#
RT: del 11.11.11.0/24 via 0.0.0.0, static metric [1/0]
RT: delete subnet route to 11.11.11.0/24
And as a result R1 will remove the default route from its routing table:
R1#
RIP: received v2 update from 192.168.12.2 on FastEthernet0/0
      0.0.0.0/0 via 0.0.0.0 in 16 hops  (inaccessible)
RT: del 0.0.0.0 via 192.168.12.2, rip metric [120/1]
RT: delete network route to 0.0.0.0
As you can see here, there is no default route anymore:
R1#show ip route rip

That’s all there is to it. I hope you enjoyed reading this lesson, if you have any questions feel free to leave a comment.

RIP Timers Debug

RIP uses a couple of timers to do its work:
  • Update: this is how often we send routing updates, the default is 30 seconds.
  • Invalid: the number of seconds since we received the last valid update, once this timer expires the route goes into holddown, the default is 180 seconds.
  • Holddown: the number of seconds that we wait before we accept any new updates for the route that is in holddown, the default is 180 seconds,
  • Flush: how many seconds since we received the last valid update until we throw the route away, the default is 240 seconds.
In this lesson, we’ll take a look at these times in action. We will use the following topology for this:
R1 R2 R3 with loopback
Above we have three routers that are running RIP. On R1 we have a loopback interface that will be advertised in RIP.

Configuration

Here’s the configuration of all three routers:
R1#show running-config | section rip
router rip
 version 2
 network 1.0.0.0
 network 192.168.12.0
 no auto-summary
R2#show running-config | section rip
router rip
 version 2
 network 192.168.12.0
 network 192.168.23.0
 no auto-summary
R3#show running-config | section rip
router rip
 version 2
 network 192.168.23.0
 no auto-summary
You can see the default RIP times with the show ip protocols command:
R2#show ip protocols | include seconds
  Sending updates every 30 seconds, next due in 21 seconds
  Invalid after 180 seconds, hold down 180, flushed after 240
Before we start messing around, let’s enable some debugging on R2 and R3:
R2 & R3
#debug ip rip                       
RIP protocol debugging is on

#debug ip routing
IP routing debugging is on
The RIP debugs will give us information about incoming and outgoing updates, the IP routing debug will tell us when something is installed or remove from the routing table.
Let’s mess around now!

Default Behavior

We will start with a pretty straight forward example where we use default timers. At the moment R1 is advertising 1.1.1.0 /24 to R2, here is the output of the routing tables:
R2#show ip route rip

      1.0.0.0/24 is subnetted, 1 subnets
R        1.1.1.0 [120/1] via 192.168.12.1, 00:00:15, FastEthernet0/0
R3#show ip route rip 

      1.0.0.0/24 is subnetted, 1 subnets
R        1.1.1.0 [120/2] via 192.168.23.2, 00:00:06, FastEthernet0/0
R     192.168.12.0/24 [120/1] via 192.168.23.2, 00:00:06, FastEthernet0/0
Let’s wreak some havoc and take down R1:
R1(config)#interface FastEthernet 0/0
R1(config-if)#shutdown
Once we do this, R2 will no longer receive any updates from R1. At this moment the invalid and flush timer will increase. In the first 180 seconds, nothing will happen:
R2#show ip route 1.1.1.0
Routing entry for 1.1.1.0/24
  Known via "rip", distance 120, metric 1
  Redistributing via rip
  Last update from 192.168.12.1 on FastEthernet0/0, 00:01:12 ago
  Routing Descriptor Blocks:
  * 192.168.12.1, from 192.168.12.1, 00:01:12 ago, via FastEthernet0/0
      Route metric is 1, traffic share count is 1
After 180 seconds the invalid timer will have expired and the holddown timer starts. We can see this in the debug:
R2#
Sep  3 15:42:58.235: RT: delete route to 1.1.1.0 via 192.168.12.1, rip metric [120/1]
Sep  3 15:42:58.235: RT: no routes to 1.1.1.0, entering holddown
Now when you look at the routing table, here’s what you will see:
R2#show ip route rip

      1.0.0.0/24 is subnetted, 1 subnets
R        1.1.1.0/24 is possibly down,
The 1.1.1.0 /24 will remain in the routing table of R2 but it says it’s “possibly down”. At this moment, R2 will send an update (route poison) to R3:
R2#
Sep  3 15:43:00.235: RIP: build flash update entries
Sep  3 15:43:00.235:  1.1.1.0/24 via 0.0.0.0, metric 16, tag 0
Sep  3 15:43:00.235: RIP: sending v2 flash update to 224.0.0.9 via FastEthernet0/1 (192.168.23.2)
Sep  3 15:43:00.235: RIP: build flash update entries
Sep  3 15:43:00.235:  1.1.1.0/24 via 0.0.0.0, metric 16, tag 0
R2 is informing R3 that this network is gone, here’s what R3 thinks of it:
R3#
Sep  3 15:42:58.147: RIP: received v2 update from 192.168.23.2 on FastEthernet0/0
Sep  3 15:42:58.147:      1.1.1.0/24 via 0.0.0.0 in 16 hops  (inaccessible)
Sep  3 15:42:58.147: RT: del 1.1.1.0 via 192.168.23.2, rip metric [120/2]
Sep  3 15:42:58.147: RT: delete subnet route to 1.1.1.0/24
When R3 receives the update it will remove 1.1.1.0 /24 immediately from the routing table:
R3#show ip route rip

R     192.168.12.0/24 [120/1] via 192.168.23.2, 00:00:07, FastEthernet0/0
R3 will also send an update to R2 (poison reverse):
R3#
Sep  3 15:43:00.147: RIP: sending v2 flash update to 224.0.0.9 via FastEthernet0/0 (192.168.23.3)
Sep  3 15:43:00.147: RIP: build flash update entries
Sep  3 15:43:00.147:  1.1.1.0/24 via 0.0.0.0, metric 16, tag 0
We can verify that R2 receives the poison reverse:
R2#
Sep  3 15:43:02.239: RIP: received v2 update from 192.168.23.3 on FastEthernet0/1
Sep  3 15:43:02.239:      1.1.1.0/24 via 0.0.0.0 in 16 hops  (inaccessible)
60 seconds later after the route went in holddown, we will see something on the console of R2:
R2#
Sep  3 15:43:58.235: RT: delete subnet route to 1.1.1.0/24
And the 1.1.1.0/24 is now finally gone from the routing table…
R2#show ip route rip
Wait a minute…how come this route got removed after 60 seconds? Shouldn’t it be 180 seconds (the default holddown timer)? This is very confusing indeed. What happens is that the invalid (180 seconds) and the flush timer (240 seconds) start at the same time. Once the invalid timer expires, the holddown timer starts running…60 seconds later, the flush timer is expired and the route is removed from the routing table.
Because of this, the holddown timer is only active for 60 seconds, not 180 seconds. Here’s an image to help you visualize this:
RIP Invalid Flush Holddown Timer
So now you have seen what happens when R2 stops receiving updates from R1. What do you think happens when R1 comes during the holddown timer period? Let’s find out…

Lower metric from R1 during holddown time

There are a number of different scenarios. When 1.1.1.0 /24 is in holddown, R1 can come back online and advertise the same, a higher or lower metric. Let’s see what happens when it comes back with a lower metric than before. To test this, we’ll use an offset-list on R1:
R1(config)#interface FastEthernet 0/0
R1(config-if)#no shutdown

R1(config)#router rip
R1(config-router)#offset-list 0 out 10
We’ll bring R1 back online with a higher metric. Here’s what R2 looks like now:
R2#show ip route rip

      1.0.0.0/24 is subnetted, 1 subnets
R        1.1.1.0 [120/11] via 192.168.12.1, 00:00:10, FastEthernet0/0
Now we will shut the interface on R1 again and we’ll wait till the route goes in holddown:
R1(config)#interface FastEthernet 0/0
R1(config-if)#shutdown
After 180 seconds, we’ll see the holddown message again:
R2#
Sep  3 15:54:58.263: RT: delete route to 1.1.1.0 via 192.168.12.1, rip metric [120/11]
Sep  3 15:54:58.263: RT: no routes to 1.1.1.0, entering holddown
While the route is in holddown, I quickly enable the interface on R1 again and reduce the metric:
R1(config)#interface FastEthernet0/0
R1(config-if)#no shutdown

R1(config)#router rip
R1(config-router)#offset-list 0 out 5
Let’s see what R2 thinks of this…
R2#
Sep  3 15:55:38.555: RIP: received v2 update from 192.168.12.1 on FastEthernet0/0
Sep  3 15:55:38.555:      1.1.1.0/24 via 0.0.0.0 in 6 hops
Sep  3 15:55:38.555: RT: updating rip 1.1.1.0/24 (0x0): via 192.168.12.1 Fa0/0
R2 has received the update from R1 and sees the new hop count. Does it install it in the routing table?
R2#show ip route rip 

      1.0.0.0/24 is subnetted, 1 subnets
R        1.1.1.0/24 is possibly down,
Unfortunately not, R2 doesn’t care about it at all…the route remains in holddown. In most textbooks you will read that when RIP receives an update for a route that has an equal or lower metric then it should use this information and get the route out of holddown, this seems not to be the case. I did some research on this and it seems some ancient IOS versions have this behavior. I tested this on IOS 15 and this is how it behaves…the router won’t budge…
60 seconds later, the flush timer will expire and the route will be flushed:
R2#
Sep  3 15:55:58.263: RT: delete subnet route to 1.1.1.0/24
A few seconds later, the route will be installed again in the routing table:
R2#show ip route rip 

      1.0.0.0/24 is subnetted, 1 subnets
R        1.1.1.0 [120/6] via 192.168.12.1, 00:00:01, FastEthernet0/0
Whatever R1 advertises during the holddown, R2 just doesn’t care…it will flush it anyway.

Lower metric from R3 during holddown time

What if the source is different? What if R3 advertises 1.1.1.0 /24 while it’s in holddown on R2? Only one way to find out…
R1(config)#interface FastEthernet 0/0
R1(config-if)#shutdown
We will have to wait until the route goes into holddown:
R2#
Sep  3 16:03:48.263: RT: delete route to 1.1.1.0 via 192.168.12.1, rip metric [120/6]
Sep  3 16:03:48.263: RT: no routes to 1.1.1.0, entering holddown
While the route is in holddown, I’ll quickly add a loopback on R3 and advertise it in RIP:
R3(config)#interface loopback 0
R3(config-if)#ip address 1.1.1.1 255.255.255.0

R3(config)#router rip
R3(config-router)#network 1.0.0.0
Here we can see that R3 is advertising it to R2:
R3#
Sep  3 16:04:07.291: RT: updating connected 1.1.1.0/24 (0x0): via 0.0.0.0 Lo0
Sep  3 16:04:07.291: RT: add 1.1.1.0/24 via 0.0.0.0, connected metric [0/0]
Sep  3 16:04:07.291: RT: interface Loopback0 added to routing table
Sep  3 16:04:07.291: RIP: sending request on Loopback0 to 224.0.0.9
Sep  3 16:04:07.291: RT: updating connected 1.1.1.1/32 (0x0): via 0.0.0.0 Lo0
Sep  3 16:04:07.291: RT: network 1.0.0.0 is now variably masked
Sep  3 16:04:07.291: RT: add 1.1.1.1/32 via 0.0.0.0, connected metric [0/0]
Sep  3 16:04:07.299: RIP: ignored v2 packet from 1.1.1.1 (sourced from one of our addresses)
Sep  3 16:04:09.295: RIP: sending v2 flash update to 224.0.0.9 via FastEthernet0/0 (192.168.23.3)
Sep  3 16:04:09.295: RIP: build flash update entries
Sep  3 16:04:09.295:  1.1.1.0/24 via 0.0.0.0, metric 1, tag 0
What does R2 think of this very attractive route?
R2#
Sep  3 16:04:17.759: RIP: received v2 update from 192.168.23.3 on FastEthernet0/1
Sep  3 16:04:17.759:      1.1.1.0/24 via 0.0.0.0 in 1 hops
Sep  3 16:04:17.759: RT: updating rip 1.1.1.0/24 (0x0): via 192.168.23.3 Fa0/1
R2 receives it but really doesn’t care about it..the route will remain in holddown:
R2#show ip route rip 

      1.0.0.0/24 is subnetted, 1 subnets
R        1.1.1.0/24 is possibly down,
Once another 60 seconds have expired, the flush timer will be expired and the route is flushed:
R2#
Sep  3 16:04:48.263: RT: delete subnet route to 1.1.1.0/24
Only then R2 will install the information from R3 in its routing table:
R2#show ip route rip 

R        1.1.1.0 [120/1] via 192.168.23.3, 00:00:14, FastEthernet0/1
Now we know that nothing will stop the holddown timer, lower metrics and different sources don’t matter.

Increase the flush timer

What will happen when the holddown timer expires while the flush timer is still active? So far we haven’t been able to see this since the holddown timer doesn’t have enough time to expire, the flush timer kills it.
To test this, I will increase the flush timer to 400 seconds (reducing the holddown timer will also do the job). Let’s do this:
R2(config)#router rip
R2(config-router)#timers basic 30 180 180 400
Let’s shut R3 so that the route goes in holddown again:
R3(config)#interface FastEthernet 0/0
R3(config-if)#shutdown
180 seconds later the invalid timer expires and we go in holddown:
R2#
Sep  3 16:20:38.263: RT: delete route to 1.1.1.0 via 192.168.23.3, rip metric [120/1]
Sep  3 16:20:38.263: RT: no routes to 1.1.1.0, entering holddown
Now we can enjoy 180 seconds of holddown time…let’s enable the interface on R3 again:
R3(config)#interface FastEthernet 0/0
R3(config-if)#no shutdown
During this time, R2 will receive updates from R3:
R2#
Sep  3 16:22:12.375: RIP: received v2 update from 192.168.23.3 on FastEthernet0/1
Sep  3 16:22:12.375:      1.1.1.0/24 via 0.0.0.0 in 1 hops
Like we have seen before, it doesn’t care about these updates as long as it’s in holddown:
R2#show ip route rip 

      1.0.0.0/24 is subnetted, 1 subnets
R        1.1.1.0/24 is possibly down,
180 seconds later, the holddown timer is expired. The router doesn’t produce a message when it expires but you will see something happen when we receive another update from R3:
R2#
Sep  3 16:24:00.671: RIP: received v2 update from 192.168.23.3 on FastEthernet0/1
Sep  3 16:24:00.671:      1.1.1.0/24 via 0.0.0.0 in 1 hops
Sep  3 16:24:00.671: RT: updating rip 1.1.1.0/24 (0x0): via 192.168.23.3 Fa0/1
Sep  3 16:24:00.671: RT: 1.1.1.0 came out of holddown
Sep  3 16:24:00.675: RT: add 1.1.1.0/24 via 192.168.23.3, rip metric [120/1]
We haven’t seen this before…since we are not in holddown anymore, R2 decides to use the information that it receives from R3. This entry is added in the routing table and the route is no longer in holddown:
R2#show ip route rip 

R        1.1.1.0 [120/1] via 192.168.23.3, 00:00:01, FastEthernet0/1
Above we can find the route in the routing table.

Higher metric during Flush timer

There is one more question that we could ask ourselves…what if we receive a routing update with a higher metric during the flush timer (after the holddown timer has expired)? Will R2 accept it?
Let’s give this a try:
R3(config)#interface FastEthernet 0/0
R3(config-if)#shutdown
Once again 180 seconds is what we need to get the route in holddown:
R2#
Sep  3 16:28:58.263: RT: delete route to 1.1.1.0 via 192.168.23.3, rip metric [120/1]
Sep  3 16:28:58.263: RT: no routes to 1.1.1.0, entering holddown
Quickly I will increase the hop count on R3 and activate the interface again:
R3(config)#router rip
R3(config-router)#offset-list 0 out 10

R3(config)#interface FastEthernet 0/0
R3(config-if)#no shutdown
We know we can forget about the first 180 seconds during the holddown timer…what happens once it expires?
R2#
Sep  3 16:30:04.691: RIP: received v2 update from 192.168.23.3 on FastEthernet0/1
Sep  3 16:30:04.691:      1.1.1.0/24 via 0.0.0.0 in 11 hops
R2 receives the routing update and decides to use it:
R2#
Sep  3 16:31:58.515: RT: 1.1.1.0 came out of holddown
Sep  3 16:31:58.515: RT: add 1.1.1.0/24 via 192.168.23.3, rip metric [120/11]
And you will find it in the routing table:
R2#show ip route rip

      1.0.0.0/24 is subnetted, 1 subnets
R        1.1.1.0 [120/11] via 192.168.23.3, 00:00:08, FastEthernet0/1
Once the holddown timer is no longer running, it doesn’t matter what the source or metric is…the router will use the information and installs it in the routing table.

Conclusion

You have now seen how the different RIP timers work in action. The confusing part is that with the default timers, the holddown timer only runs for 60 seconds because it is killed by the flush timer.
I hope you enjoyed this lesson, if you have any questions feel free to leave a comment.

How to configure RIP on a Cisco router

RIP (Routing Information Protocol) is one of the routing protocols you need to understand if you want to pass the Cisco CCNA exam. If you have no idea how RIP works I suggest to read this lesson first where I explain how RIP works. In this lesson I’ll show you how to configure RIP on a Cisco router. This is the topology that I will use:
rip 3 routers
Above we see 3 routers called R1, R2 and R3. There are a couple of networks so we’ll have something to advertise in RIP. First let’s configure all the interfaces:
R1>enable 
R1#configure terminal 
R1(config)#interface fastEthernet 0/0
R1(config-if)#no shutdown
R1(config-if)#ip address 172.16.1.1 255.255.255.0
R1(config-if)#exit
R1(config)#interface fastEthernet 1/0
R1(config-if)#ip address 192.168.12.1 255.255.255.0
R1(config-if)#no shutdown
R2>enable
R2#configure terminal
R2(config)#interface fastEthernet 0/0
R2(config-if)#no shutdown
R2(config-if)#ip address 192.168.12.2 255.255.255.0
R2(config-if)#exit
R2(config)#interface FastEthernet 1/0
R2(config-if)#no shutdown
R2(config-if)#ip address 192.168.23.2 255.255.255.0
R2(config-if)#exit

R3>enable
R3#configure terminal
R3(config)#interface fastEthernet 0/0
R3(config-if)#no shutdown
R3(config-if)#ip address 172.16.2.3 255.255.255.0
R3(config-if)#exit
R3(config)#interface fastEthernet 1/0
R3(config-if)#no shutdown
R3(config-if)#ip address 192.168.23.3 255.255.255.0
R3(config-if)#exit
Before we continue RIP we’ll check the routing tables:
R1#show ip route     
Codes: C - connected, S - static, R - RIP, M - mobile, B - BGP
       D - EIGRP, EX - EIGRP external, O - OSPF, IA - OSPF inter area 
       N1 - OSPF NSSA external type 1, N2 - OSPF NSSA external type 2
       E1 - OSPF external type 1, E2 - OSPF external type 2
       i - IS-IS, su - IS-IS summary, L1 - IS-IS level-1, L2 - S-IS level-2
       ia - IS-IS inter area, * - candidate default, 
       o - ODR, P - periodic downloaded static route

Gateway of last resort is not set

C    192.168.12.0/24 is directly connected, FastEthernet1/0
     172.16.0.0/24 is subnetted, 1 subnets
C       172.16.1.0 is directly connected, FastEthernet0/0
R2#show ip route 
Codes: C - connected, S - static, R - RIP, M - mobile, B - BGP
       D - EIGRP, EX - EIGRP external, O - OSPF, IA - OSPF inter area 
       N1 - OSPF NSSA external type 1, N2 - OSPF NSSA external type 2
       E1 - OSPF external type 1, E2 - OSPF external type 2
       i - IS-IS, su - IS-IS summary, L1 - IS-IS level-1, L2 - S-IS level-2
       ia - IS-IS inter area, * - candidate default, 
       o - ODR, P - periodic downloaded static route

Gateway of last resort is not set

C    192.168.12.0/24 is directly connected, FastEthernet0/0
C    192.168.23.0/24 is directly connected, FastEthernet1/0
R3#show ip route 
Codes: C - connected, S - static, R - RIP, M - mobile, B - BGP
       D - EIGRP, EX - EIGRP external, O - OSPF, IA - OSPF inter area 
       N1 - OSPF NSSA external type 1, N2 - OSPF NSSA external type 2
       E1 - OSPF external type 1, E2 - OSPF external type 2
       i - IS-IS, su - IS-IS summary, L1 - IS-IS level-1, L2 - S-IS level-2
       ia - IS-IS inter area, * - candidate default, 
       o - ODR, P - periodic downloaded static route

Gateway of last resort is not set

     172.16.0.0/24 is subnetted, 1 subnets
C       172.16.2.0 is directly connected, FastEthernet0/0
C    192.168.23.0/24 is directly connected, FastEthernet1/0
Our routers only know 1 thing…their directly connected interfaces. Let’s configure RIP and see what happens:
R1(config)#router rip
R1(config-router)#network 192.168.12.0
R1(config-router)#network 172.16.1.0
R2(config)#router rip
R2(config-router)#network 192.168.12.0
We use the router rip command to go to the RIP configuration. Next step is to use the network command which does two things:
Let’s zoom in on R1 and R2 so I can explain this a bit more…
rip send updates both ways
  1. All networks that fall in the range of the network command will be advertised in RIP to other routers.
  2. RIP updates will be sent on the interface that falls in the range of the network command.
R1(config-router)#network 192.168.12.0
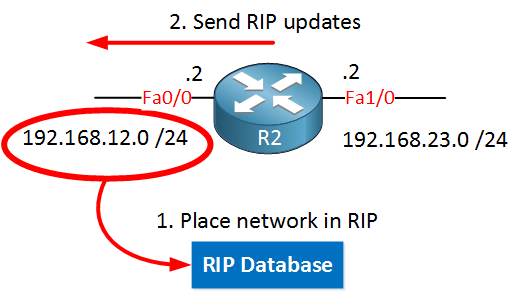
When I type “network 192.168.12.0” I will put all networks that fall within the 192.168.12.0 range in the RIP database. The FastEthernet1/0 interface has network 192.168.12.0 /24 so this will be placed in the RIP database. It will also send RIP updates on this interface.
R1(config-router)#network 172.16.1.0
172.16.1.0 /24 that is configured on FastEthernet 0/0 falls within the 172.16.1.0 range so it will be placed in the RIP database.
We will also send RIP updates on the FastEthernet 0/0 interface. This might sound a bit silly since there is no other router connected to this interface, there’s no point in sending RIP updates this direction. I’ll show you how to deal with this later.
Let’s take a look at R2:
rip advertise one network
R2(config-router)#network 192.168.12.0
On R2 I only used the network command above. This means that it will put 192.168.12.0 /24 in the RIP database and send RIP updates on its FastEthernet 0/0 interface. At this moment it won’t advertise network 192.168.23.0 /24 in RIP and it won’t send RIP updates on the FastEthernet 1/0 interface.
Let’s check the routing tables of R1 and R2!
R1#show ip route rip 
R2#show ip route rip 
R    172.16.0.0/16 [120/1] via 192.168.12.1, 00:00:21, FastEthernet0/0
Instead of typing “show ip route” you can also use show ip route rip. This will show you only the RIP information in the routing table. As you can see R1 didn’t learn anything from R2. This is because network 192.168.23.0 /24 isn’t advertised on R2.
R2 has learned network 172.16.0.0 /16. Why do we see 172.16.0.0 /16 and not 172.16.1.0 /24? Keep in mind that by default RIP is running version 1 which is classful. It does NOT send a subnet mask along with the routing updates. Since 172.16.1.0 /24 is in the class B range it will be advertised as 172.16.0.0 /16.
I’ll configure RIP version 2 later so you can see the difference between classless and classful.
Anyway let’s see if we can make R1 learn about 192.168.23.0 /24:
R2(config)#router rip
R2(config-router)#network 192.168.23.0
I’ll use this network command; let me show you another picture of R2:
rip advertise two networks
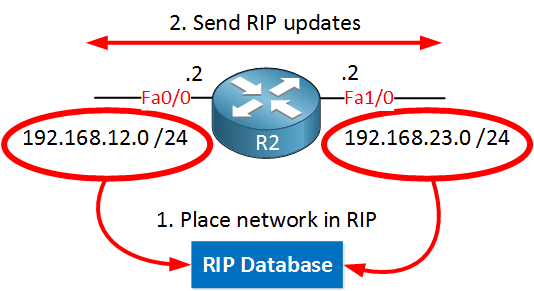
When I use the “network 192.168.23.0” command it will place 192.168.23.0 /24 in the RIP database AND it will send RIP updates on the FastEthernet 1/0 interface. Let’s check R1:
R1#show ip route rip 
R    192.168.23.0/24 [120/1] via 192.168.12.2, 00:00:16, FastEthernet1/0
Now R1 knows how to reach this network. Let’s take a closer look at this entry…
R    192.168.23.0/24
The “R” means that this entry was learned through RIP and 192.168.23.0 /24 is the network that we learned.
[120/1]
The first number (120) is the administrative distance. The second number (1) is the metric. RIP uses “hop count” as the metric so network 192.168.23.0/24 is 1 hop away.
via 192.168.12.2
This is the next hop IP address. If we want to reach network 192.168.23.0 /24 we’ll send IP packets to 192.168.12.2.
00:00:16
This is the time since the last update for this entry. RIP sends an update each 30 seconds so this value will never be higher than 29 seconds.
FastEthernet1/0
This is the outgoing interface. When we want to reach network 192.168.23.0 /24 we’ll use this interface for outgoing traffic.
There is one last thing I want to share with you about the network command. Let me show you R2 one more time:
router two interfaces
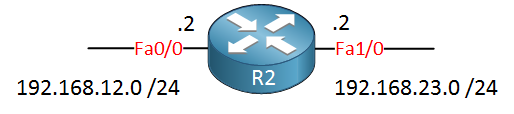
R2 has these two interfaces and I used these network commands:
R2(config-router)#network 192.168.12.0
R2(config-router)#network 192.168.23.0
I also could use:
R2(config-router)#network 0.0.0.0
All networks that fall under the 0.0.0.0 range are advertised in RIP. In other words, every interface that has an IP address that falls under this range will have RIP activated on it. Network 0.0.0.0 basically means “enable RIP on all interfaces and advertise everything”. This is what we call the “shotgun approach”. I sometimes like to use it in labs when I quickly want to advertise all networks on my router.
Don’t use anything like “network 0.0.0.0” on a production network. It will work but it means that whenever someone adds a new interface and configures an IP address on it that it will be advertised in RIP. This is something you probably don’t want to happen “automagically”.
We still have one router to configure so let’s enable RIP on R3 shall we?
R3(config)#router rip
R3(config-router)#network 172.16.2.0
R3(config-router)#network 192.168.23.0
First I’ll enable the network commands. Now let’s see what we find in our routing tables:
R1#show ip route rip 
R    192.168.23.0/24 [120/1] via 192.168.12.2, 00:00:21, FastEthernet1/0
R2#show ip route rip 
R    172.16.0.0/16 [120/1] via 192.168.23.3, 00:00:15, FastEthernet1/0
                   [120/1] via 192.168.12.1, 00:00:11, FastEthernet0/0
R3#show ip route rip 
R    192.168.12.0/24 [120/1] via 192.168.23.2, 00:00:26, FastEthernet1/0
Now, this is an interesting output. There are a couple of interesting things here:
  • R1 didn’t learn about network 172.16.2.0 /24.
  • R3 didn’t learn about network 172.16.1.0 /24.
  • R2 has 172.16.0.0 /16 in its routing table with two next hop IP addresses:
    • 192.168.23.3.
    • 192.168.12.1.
At this moment we are running RIP version 1 which is classful. This means that R1 advertises 172.16.1.0 /24 as 172.16.0.0 and R3 advertises 172.16.2.0 /24 as 172.16.0.0.
So what does R2 do with this information? Whenever you learn about a network from two different sources with the same metric, your router will do load-balancing. For example when R2 receives an IP packet meant for 172.16.1.1 it might send it to R3 and it will be dropped.
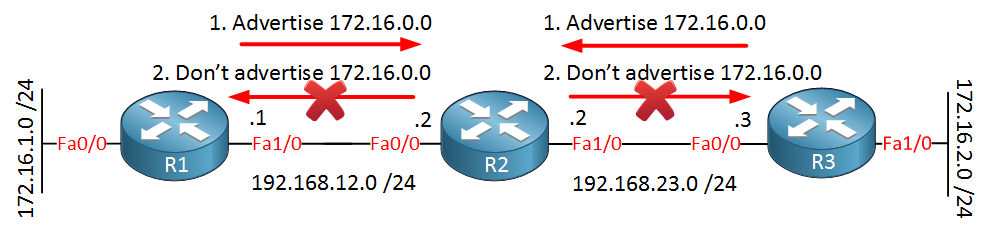
R1 and R3 are not learning about network 172.16.1.0 /24 or 172.16.2.0 /24 but why is this happening? Let me show you a picture:
rip classful advertisement
R1 and R3 both advertise 172.16.0.0 to R2. R2 stores this information in its routing table but doesn’t advertise 172.16.0.0 to R1 or R3 because of split-horizon. You don’t advertise to your neighbor what you learned from them…
So how to fix this? We need to make sure that R1 and R3 send a subnet mask with their RIP updates….it’s time for RIP version 2 because it’s classless.
There is a very useful command to verify what routing protocols you are using, let me show you:
R1#show ip protocols 
Routing Protocol is "rip"
  Outgoing update filter list for all interfaces is not set
  Incoming update filter list for all interfaces is not set
  Sending updates every 30 seconds, next due in 21 seconds
  Invalid after 180 seconds, hold down 180, flushed after 240
  Redistributing: rip
  Default version control: send version 1, receive any version
    Interface             Send  Recv  Triggered RIP  Key-chain
    FastEthernet0/0       1     1 2                                  
    FastEthernet1/0       1     1 2                                  
  Automatic network summarization is in effect
  Maximum path: 4
  Routing for Networks:
    172.16.0.0
    192.168.12.0
  Routing Information Sources:
    Gateway         Distance      Last Update
    192.168.12.2         120      00:00:03
  Distance: (default is 120)
Show ip protocols is a very useful command so I recommend to write it down somewhere. This isn’t just for RIP but it shows you information for any other routing protocol. We can see that we are running RIP version 1 and that we are sending RIP updates on interface FastEthernet 0/0 and 1/0. You can also see the networks that we are advertising (172.16.0.0 and 192.168.12.0).
Let’s now switch our routers to RIP version 2:
R1(config)#router rip
R1(config-router)#version 2
R1(config-router)#no auto-summary
R2(config)#router rip
R2(config-router)#version 2
R2(config-router)#no auto-summary
R3(config)#router rip
R3(config-router)#version 2
R3(config-router)#no auto-summary
Just type version 2 to switch to this version. By default RIP version 2 will behave classful and won’t send a subnet mask. I need to type no auto-summary to make it behave classless and send a subnet mask with its RIP updates.
R1#show ip protocols 
Routing Protocol is "rip"
  Outgoing update filter list for all interfaces is not set
  Incoming update filter list for all interfaces is not set
  Sending updates every 30 seconds, next due in 19 seconds
  Invalid after 180 seconds, hold down 180, flushed after 240
  Redistributing: rip
  Default version control: send version 2, receive version 2
    Interface             Send  Recv  Triggered RIP  Key-chain
    FastEthernet0/0       2     2                                    
    FastEthernet1/0       2     2                                    
  Automatic network summarization is not in effect
  Maximum path: 4
  Routing for Networks:
    172.16.0.0
    192.168.12.0
  Routing Information Sources:
    Gateway         Distance      Last Update
    192.168.12.2         120      00:00:23
  Distance: (default is 120)
You can see that we are now using RIP version 2. Let’s see if there’s a difference in our routing tables:
R1#show ip route rip 
     172.16.0.0/24 is subnetted, 2 subnets
R       172.16.2.0 [120/2] via 192.168.12.2, 00:00:24, FastEthernet1/0
R    192.168.23.0/24 [120/1] via 192.168.12.2, 00:00:24, FastEthernet1/0
R2#show ip route rip 
     172.16.0.0/24 is subnetted, 2 subnets
R       172.16.1.0 [120/1] via 192.168.12.1, 00:00:08, FastEthernet0/0
R       172.16.2.0 [120/1] via 192.168.23.3, 00:00:26, FastEthernet1/0
R3#show ip route rip 
R    192.168.12.0/24 [120/1] via 192.168.23.2, 00:00:16, FastEthernet1/0
     172.16.0.0/24 is subnetted, 2 subnets
R       172.16.1.0 [120/2] via 192.168.23.2, 00:00:16, FastEthernet1/0
This is looking better. You can see that R2 has learned about network 172.16.1.0 /24 and 172.16.2.0 /24. This is because R1 and R3 are advertising 172.16.1.0 /24 and 172.16.2.0 /24, not 172.16.0.0 anymore. R1 and R3 also have learned about each other’s networks.
You now know how to configure RIP and you have seen some show commands to lookup information. We can also use a debug command to see in real-time what our router is doing. Let’s look at a RIP example!
R2#debug ip rip 
RIP protocol debugging is on
Debug IP rip is how we enable it. You will see messages like these:
R2#
RIP: received v2 update from 192.168.12.1 on FastEthernet0/0
     172.16.1.0/24 via 0.0.0.0 in 1 hops
Here’s what you see when R2 receives a RIP update from R1. We learn about network 172.16.1.0 /24.
RIP: sending v2 update to 224.0.0.9 via FastEthernet0/0 (192.168.12.2)
RIP: build update entries
 172.16.2.0/24 via 0.0.0.0, metric 2, tag 0
 192.168.23.0/24 via 0.0.0.0, metric 1, tag 0
This is the RIP update that R2 will send towards R1. It carries network 172.16.2.0 /24 and 192.168.23.0 /24. In case you are wondering what the 224.0.0.9 means…RIP version 2 doesn’t use broadcast but multicast for delivery. 224.0.0.9 is the multicast address for RIP version 2.
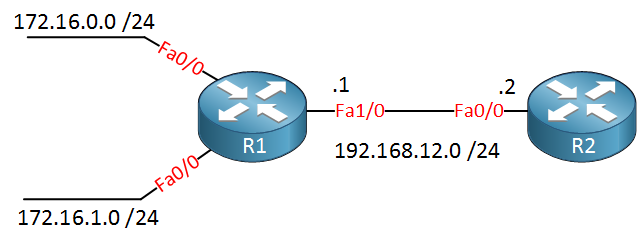
Last but not least I want to show you how to create summaries when using RIP. Here’s the topology we will use:
rip summarization
On R1 I have the 172.16.0.0 /24 and 172.16.1.0 /24 network. Here’s the RIP configuration before summarization:
R1(config-router)#version 2
R1(config-router)#no auto-summary 
R1(config-router)#network 192.168.12.0
R1(config-router)#network 172.16.0.0
R2(config-router)#version 2
R2(config-router)#no auto-summary 
R2(config-router)#network 192.168.12.0
I will use version 2 and disable auto-summary. The routing table of R2 will look like this:
R2#show ip route rip
172.16.0.0/24 is subnetted, 2 subnets
R 172.16.0.0 [120/1] via 192.168.12.1, 00:00:00, FastEthernet0/0
R 172.16.1.0 [120/1] via 192.168.12.1, 00:00:00, FastEthernet0/0
Above you see both networks. Now let’s create a summary:
R1(config)#interface fastEthernet 1/0
R1(config-if)#ip summary-address rip 172.16.0.0 255.255.0.0
Use the ip summary-address rip command to create the summary, we do this on the outgoing interface towards R2. Let’s check the routing table of R2 again:
R2#show ip route rip 
R    172.16.0.0/16 [120/1] via 192.168.12.1, 00:00:03, FastEthernet0/0
Above we now see the summary. 172.16.0.0 /16 is not very efficient because it covers everything between 172.16.0.0 and 172.16.255.255. Whenever R2 has an IP packet with a destination address that matches this summary it will forwarded to R1. For example, an IP packet with destination 172.16.99.99 will be forwarded by R2 to R1. R1 however will drop this IP packet because it doesn’t have anything in its routing table that matches 172.16.99.99. The summary below would be better:
R1(config)#interface fastEthernet 1/0
R1(config-if)#no ip summary-address rip 172.16.0.0 255.255.0.0
R1(config-if)#ip summary-address rip 172.16.0.0 255.255.254.0
Summary 172.16.0.0 /23 is more specific because it only covers 172.16.0.0 /24 and 172.16.1.0 /24. This is what it looks like on R2:
R2#show ip route rip 
     172.16.0.0/23 is subnetted, 1 subnets
R       172.16.0.0 [120/1] via 192.168.12.1, 00:00:22, FastEthernet0/0
When you create summaries, try to be a specific as possible.
That’s all I have on RIP for you, if you understand all these commands you’ll know everything you need to know for the Cisco CCNA exam. Before you move on I highly recommend you to try these commands yourself. If you enjoyed this lesson please leave a comment or share it with your friends.