Most IoT tutorials use something like a Raspberry Pi as the “thing”. The Raspberry Pi is a great device but when it comes to IoT, it feels too much like a computer to me. It has GPIO pins so you can connect different hardware but it runs a full Linux distribution (Raspbian, based on Debian).
I wanted to try a “real” IoT device and decided on an ESP32 from Espressif. The ESP32 is a small device, which has a Wi-Fi & Bluetooth Chip, and plenty of GPIO pins. It supports a range of firmwares including Mongoose OS, Zerynth, ESP Easy, FreeRTOS, and MicroPython.

To make it a true IoT device, I added a hardware button. We are going to connect this ESP32 to AWS IoT and configure the ESP32 so it sends a message to AWS IoT when we press the button.
This lesson is lengthy, especially with all the AWS IoT screenshots. If you get lost, you can use the index below:
AWS IoT
Let’s start with AWS. There are three components we need:
- Thing
- Certificate
- Policy
The thing is our ESP32 and it requires a certificate for authentication. The policy defines what our thing can do.
Things
Let’s start with the “thing” part. Head over to AWS IoT Core in the services overview:

Under Manage, choose Things:

You’ll see the following screen because you don’t have any things yet:

Select register a thing and choose create a single thing:

We’ll give our thing a name. I’ll call it “esp32”:
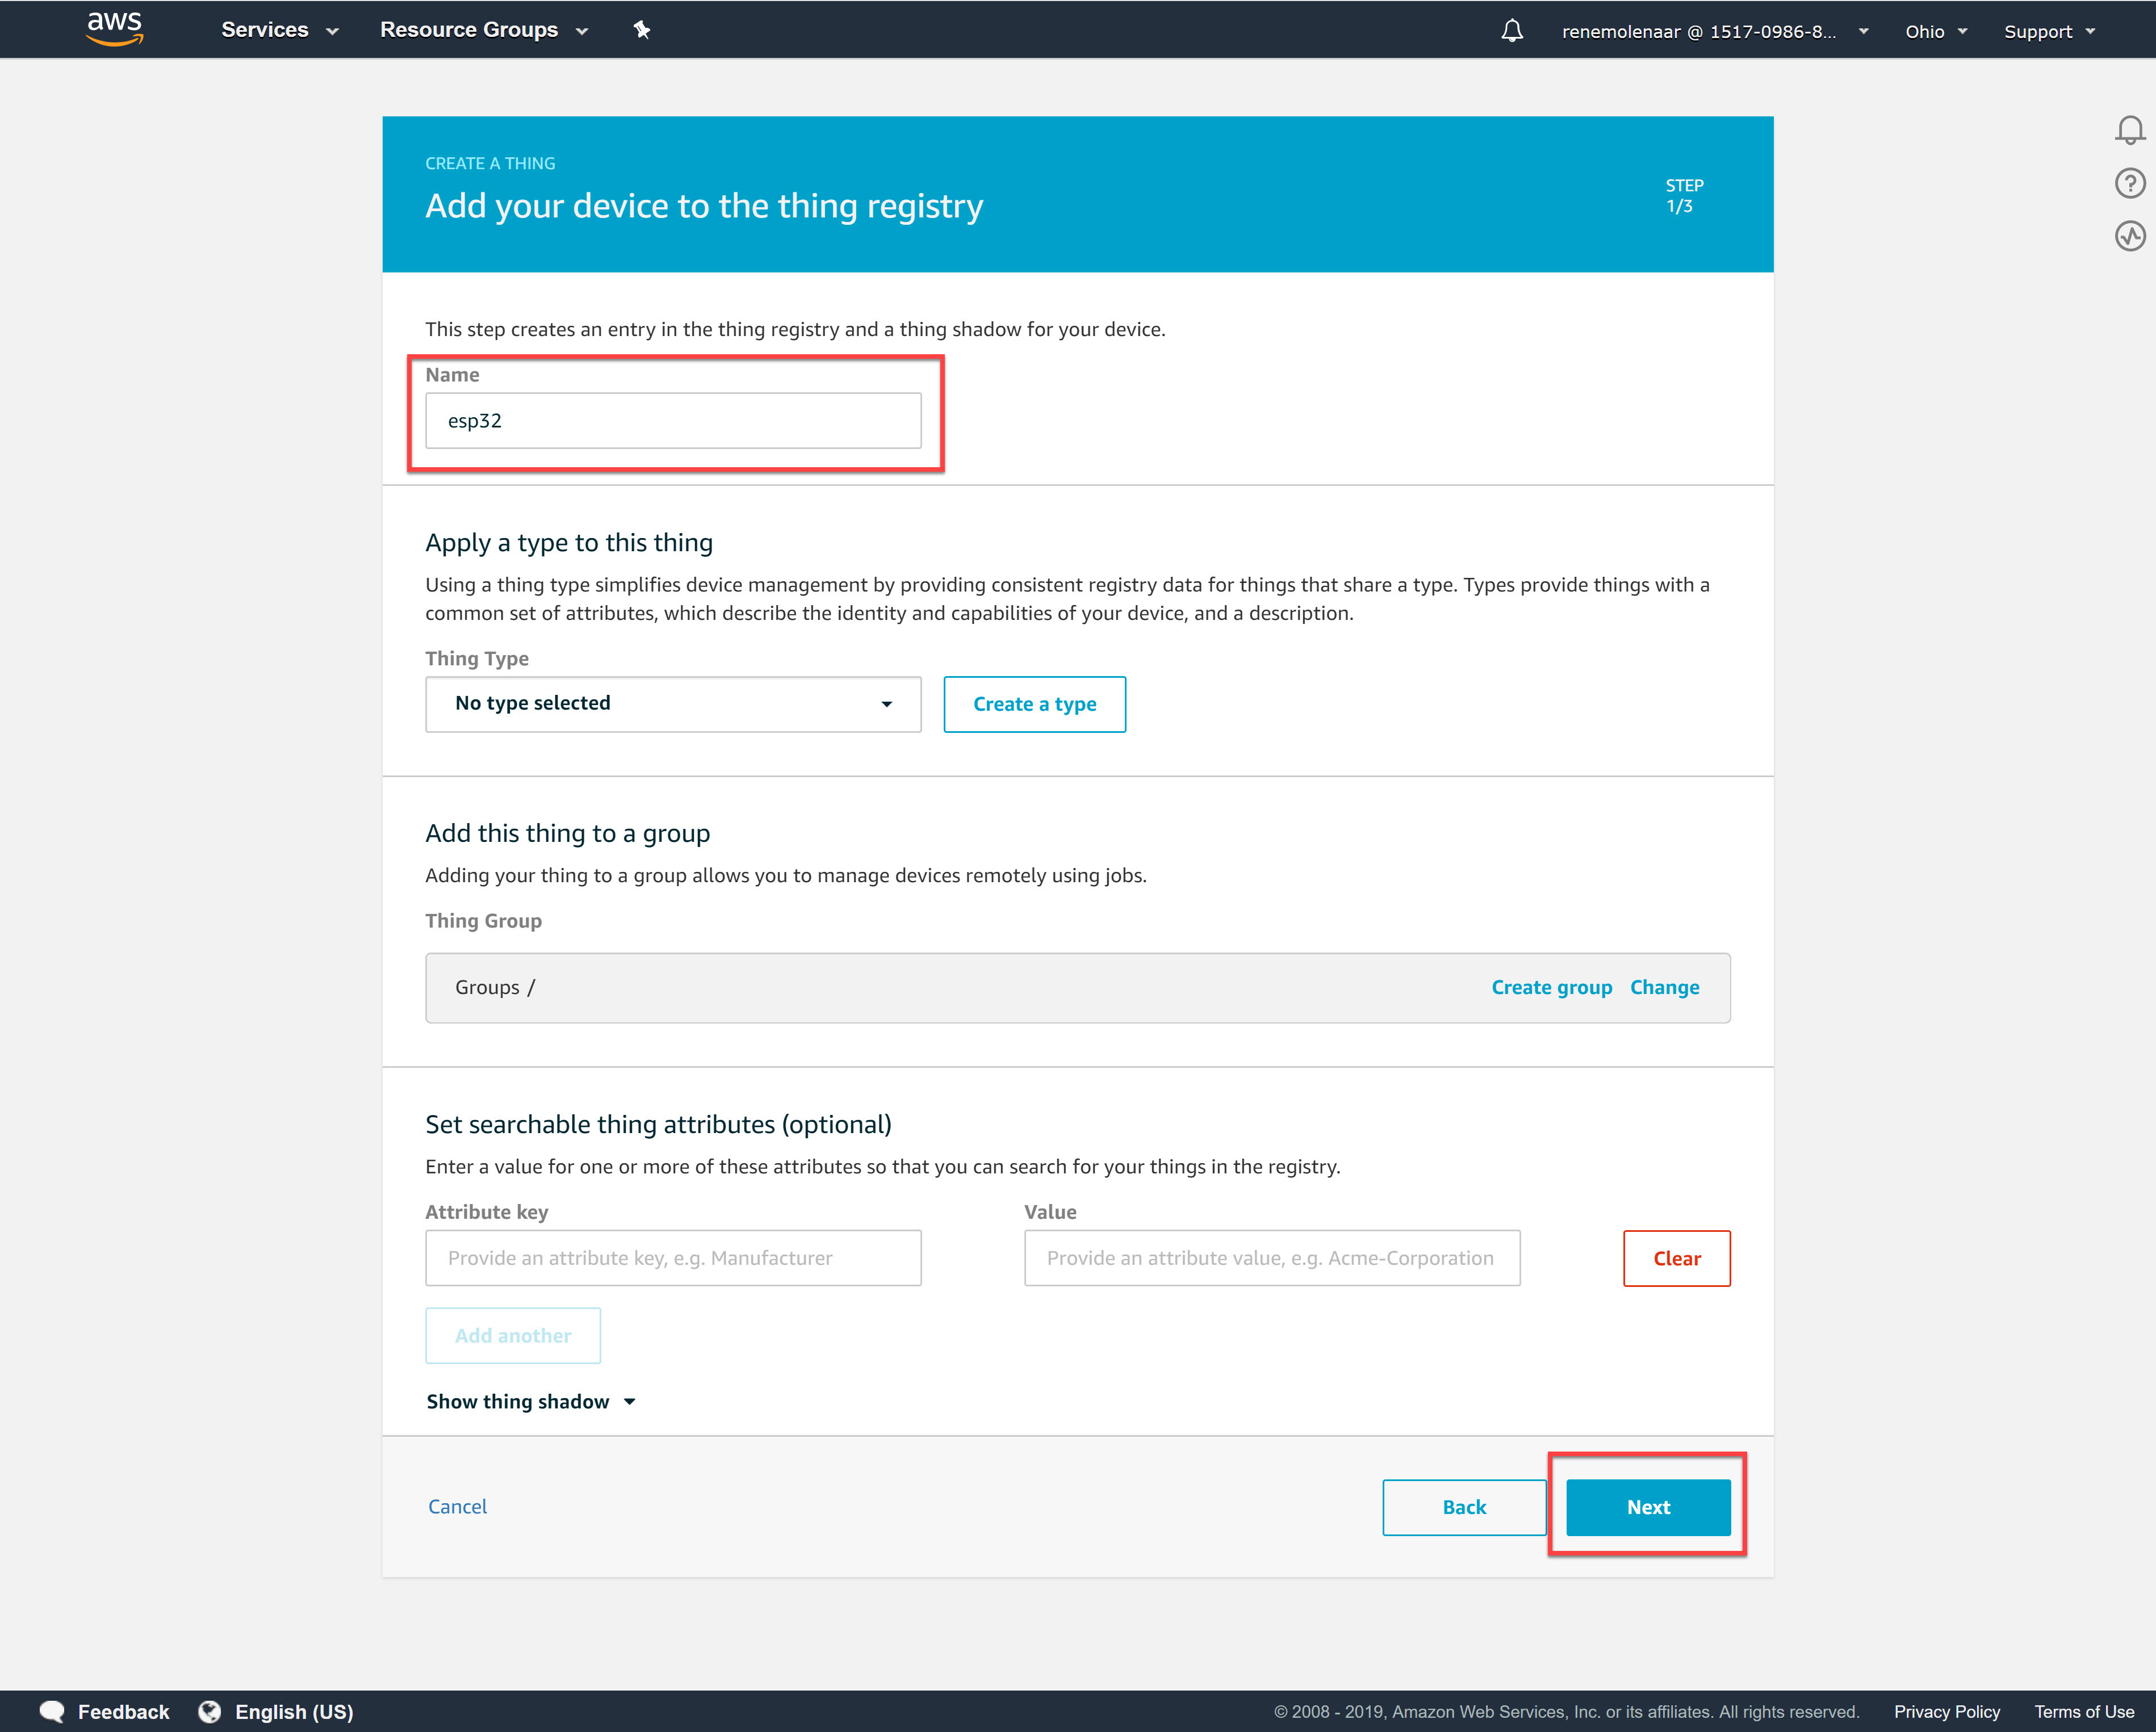
You don’t have to select any of the options. Click Next and it will ask you to create a certificate.
Certificates
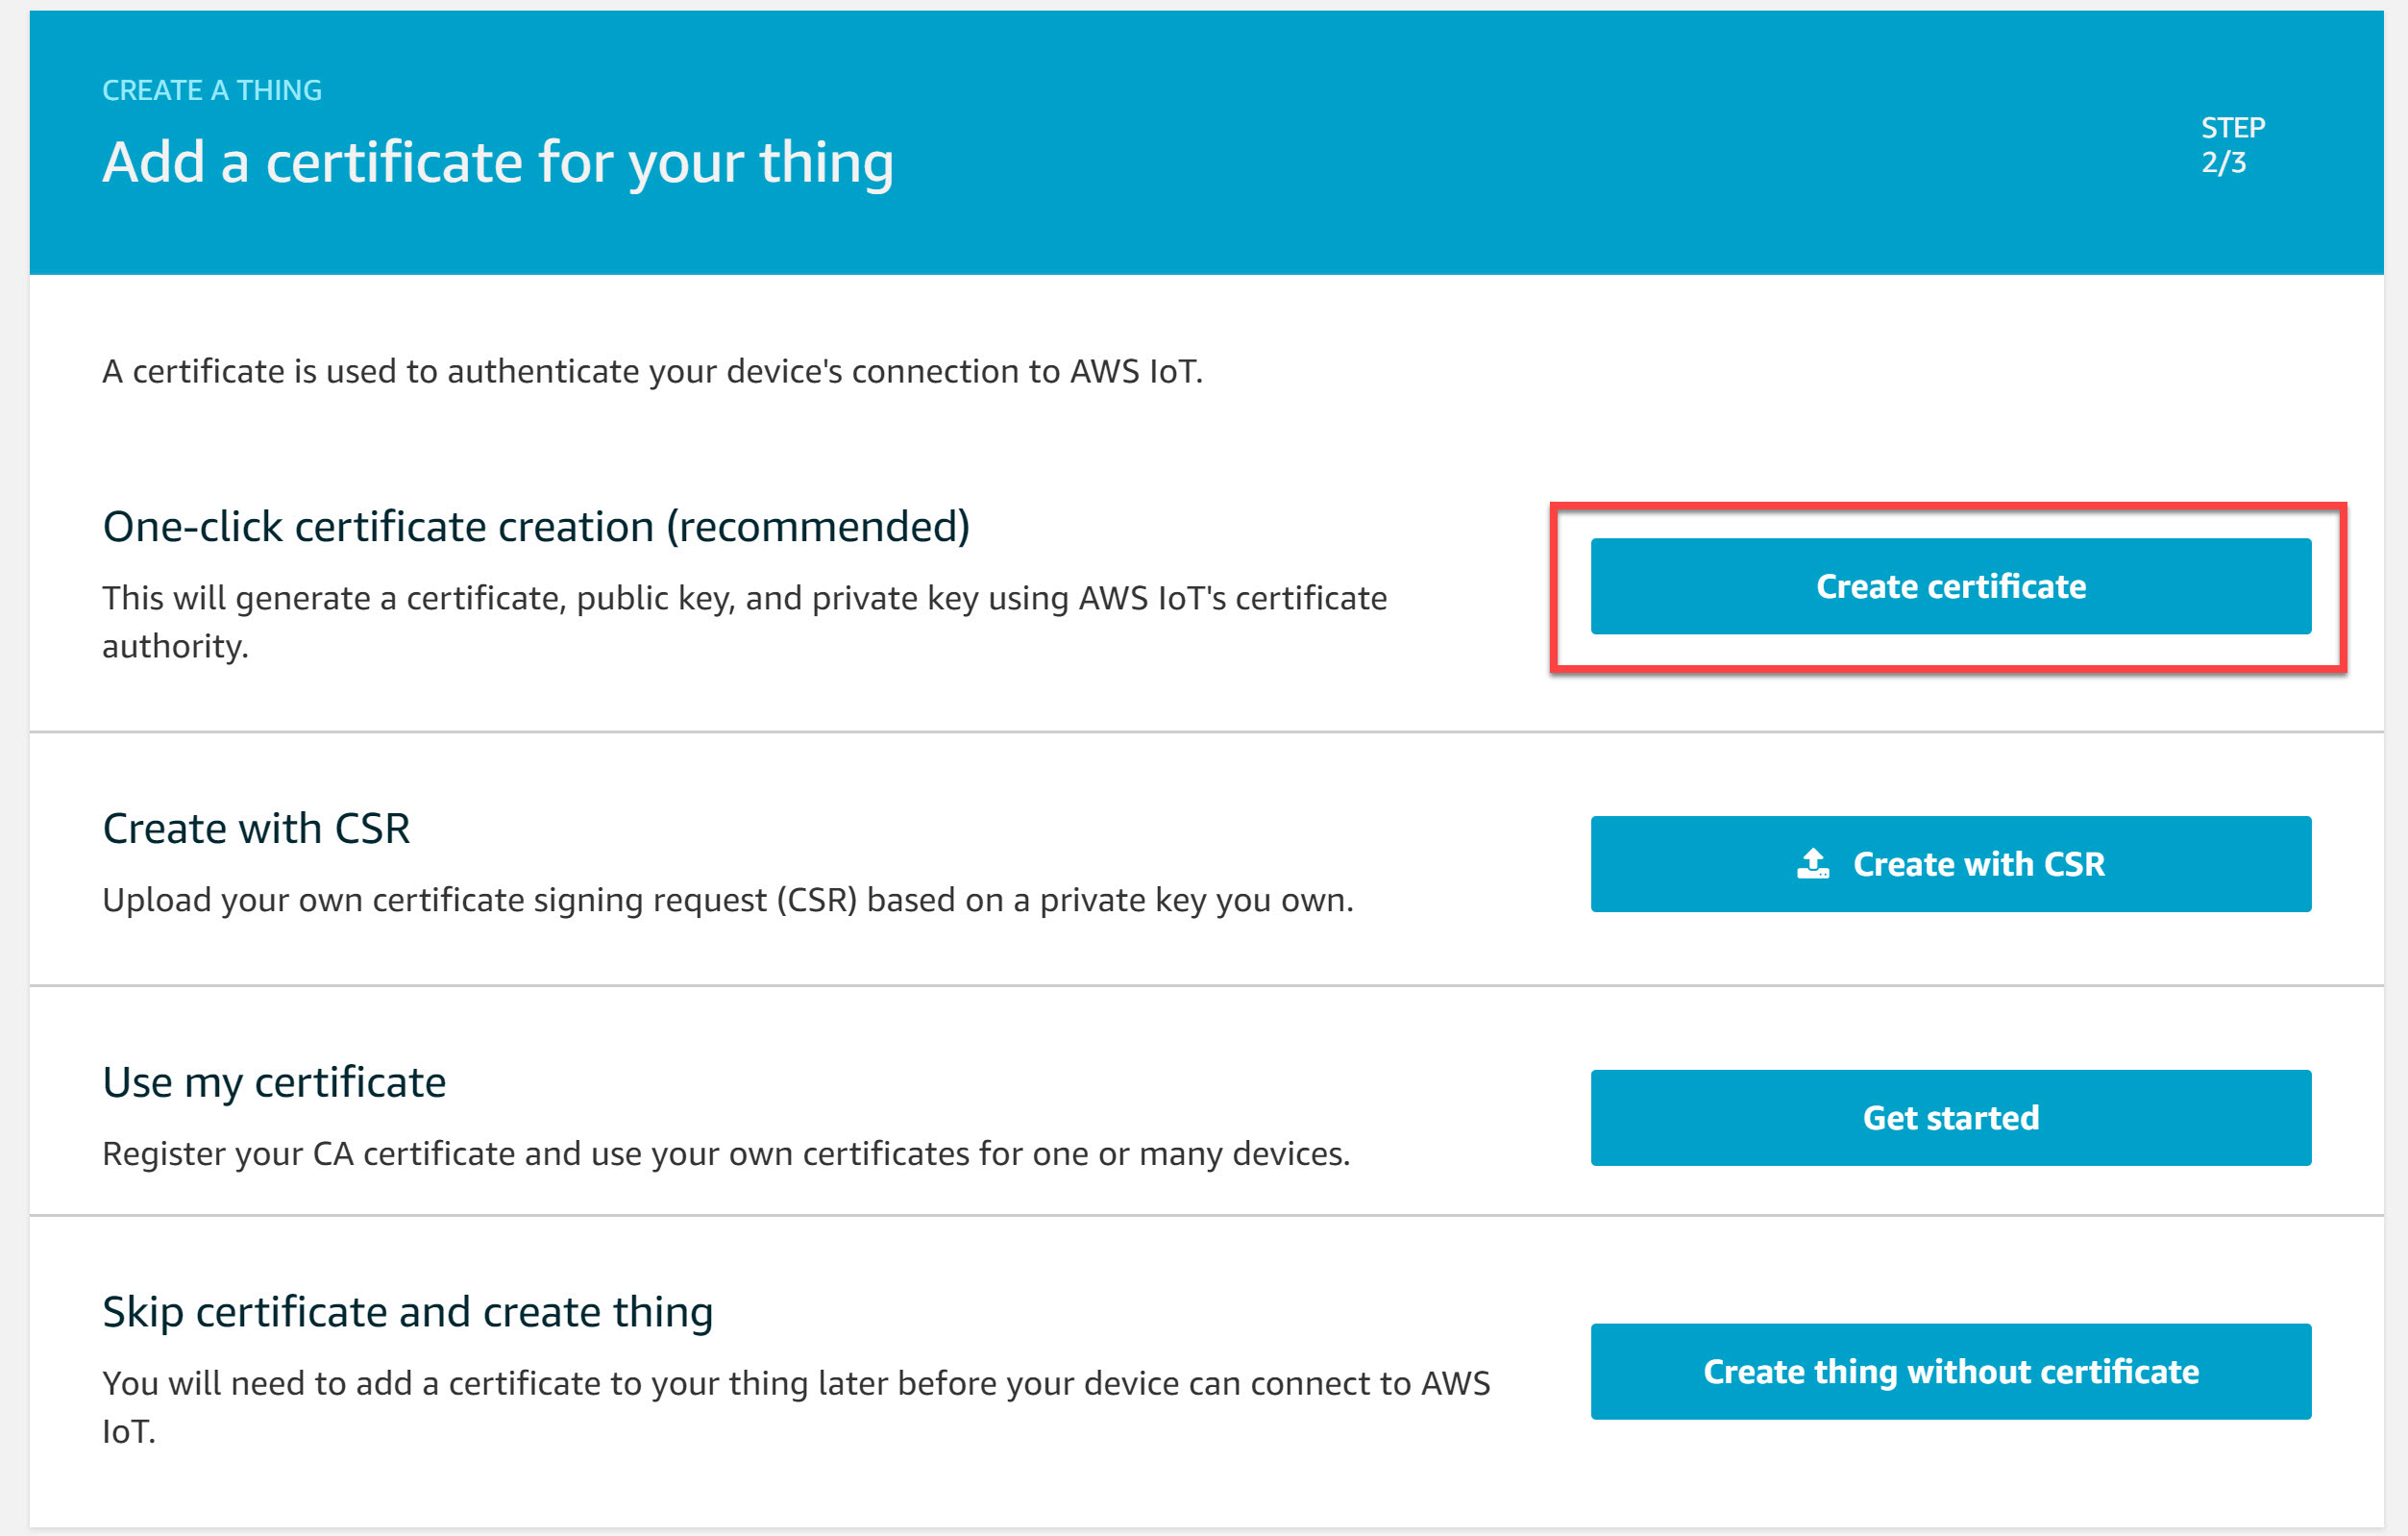
The console asks us if we want to create a certificate. We need one so select the Create certificate option:
In the following screen you will see the certificates that were created:
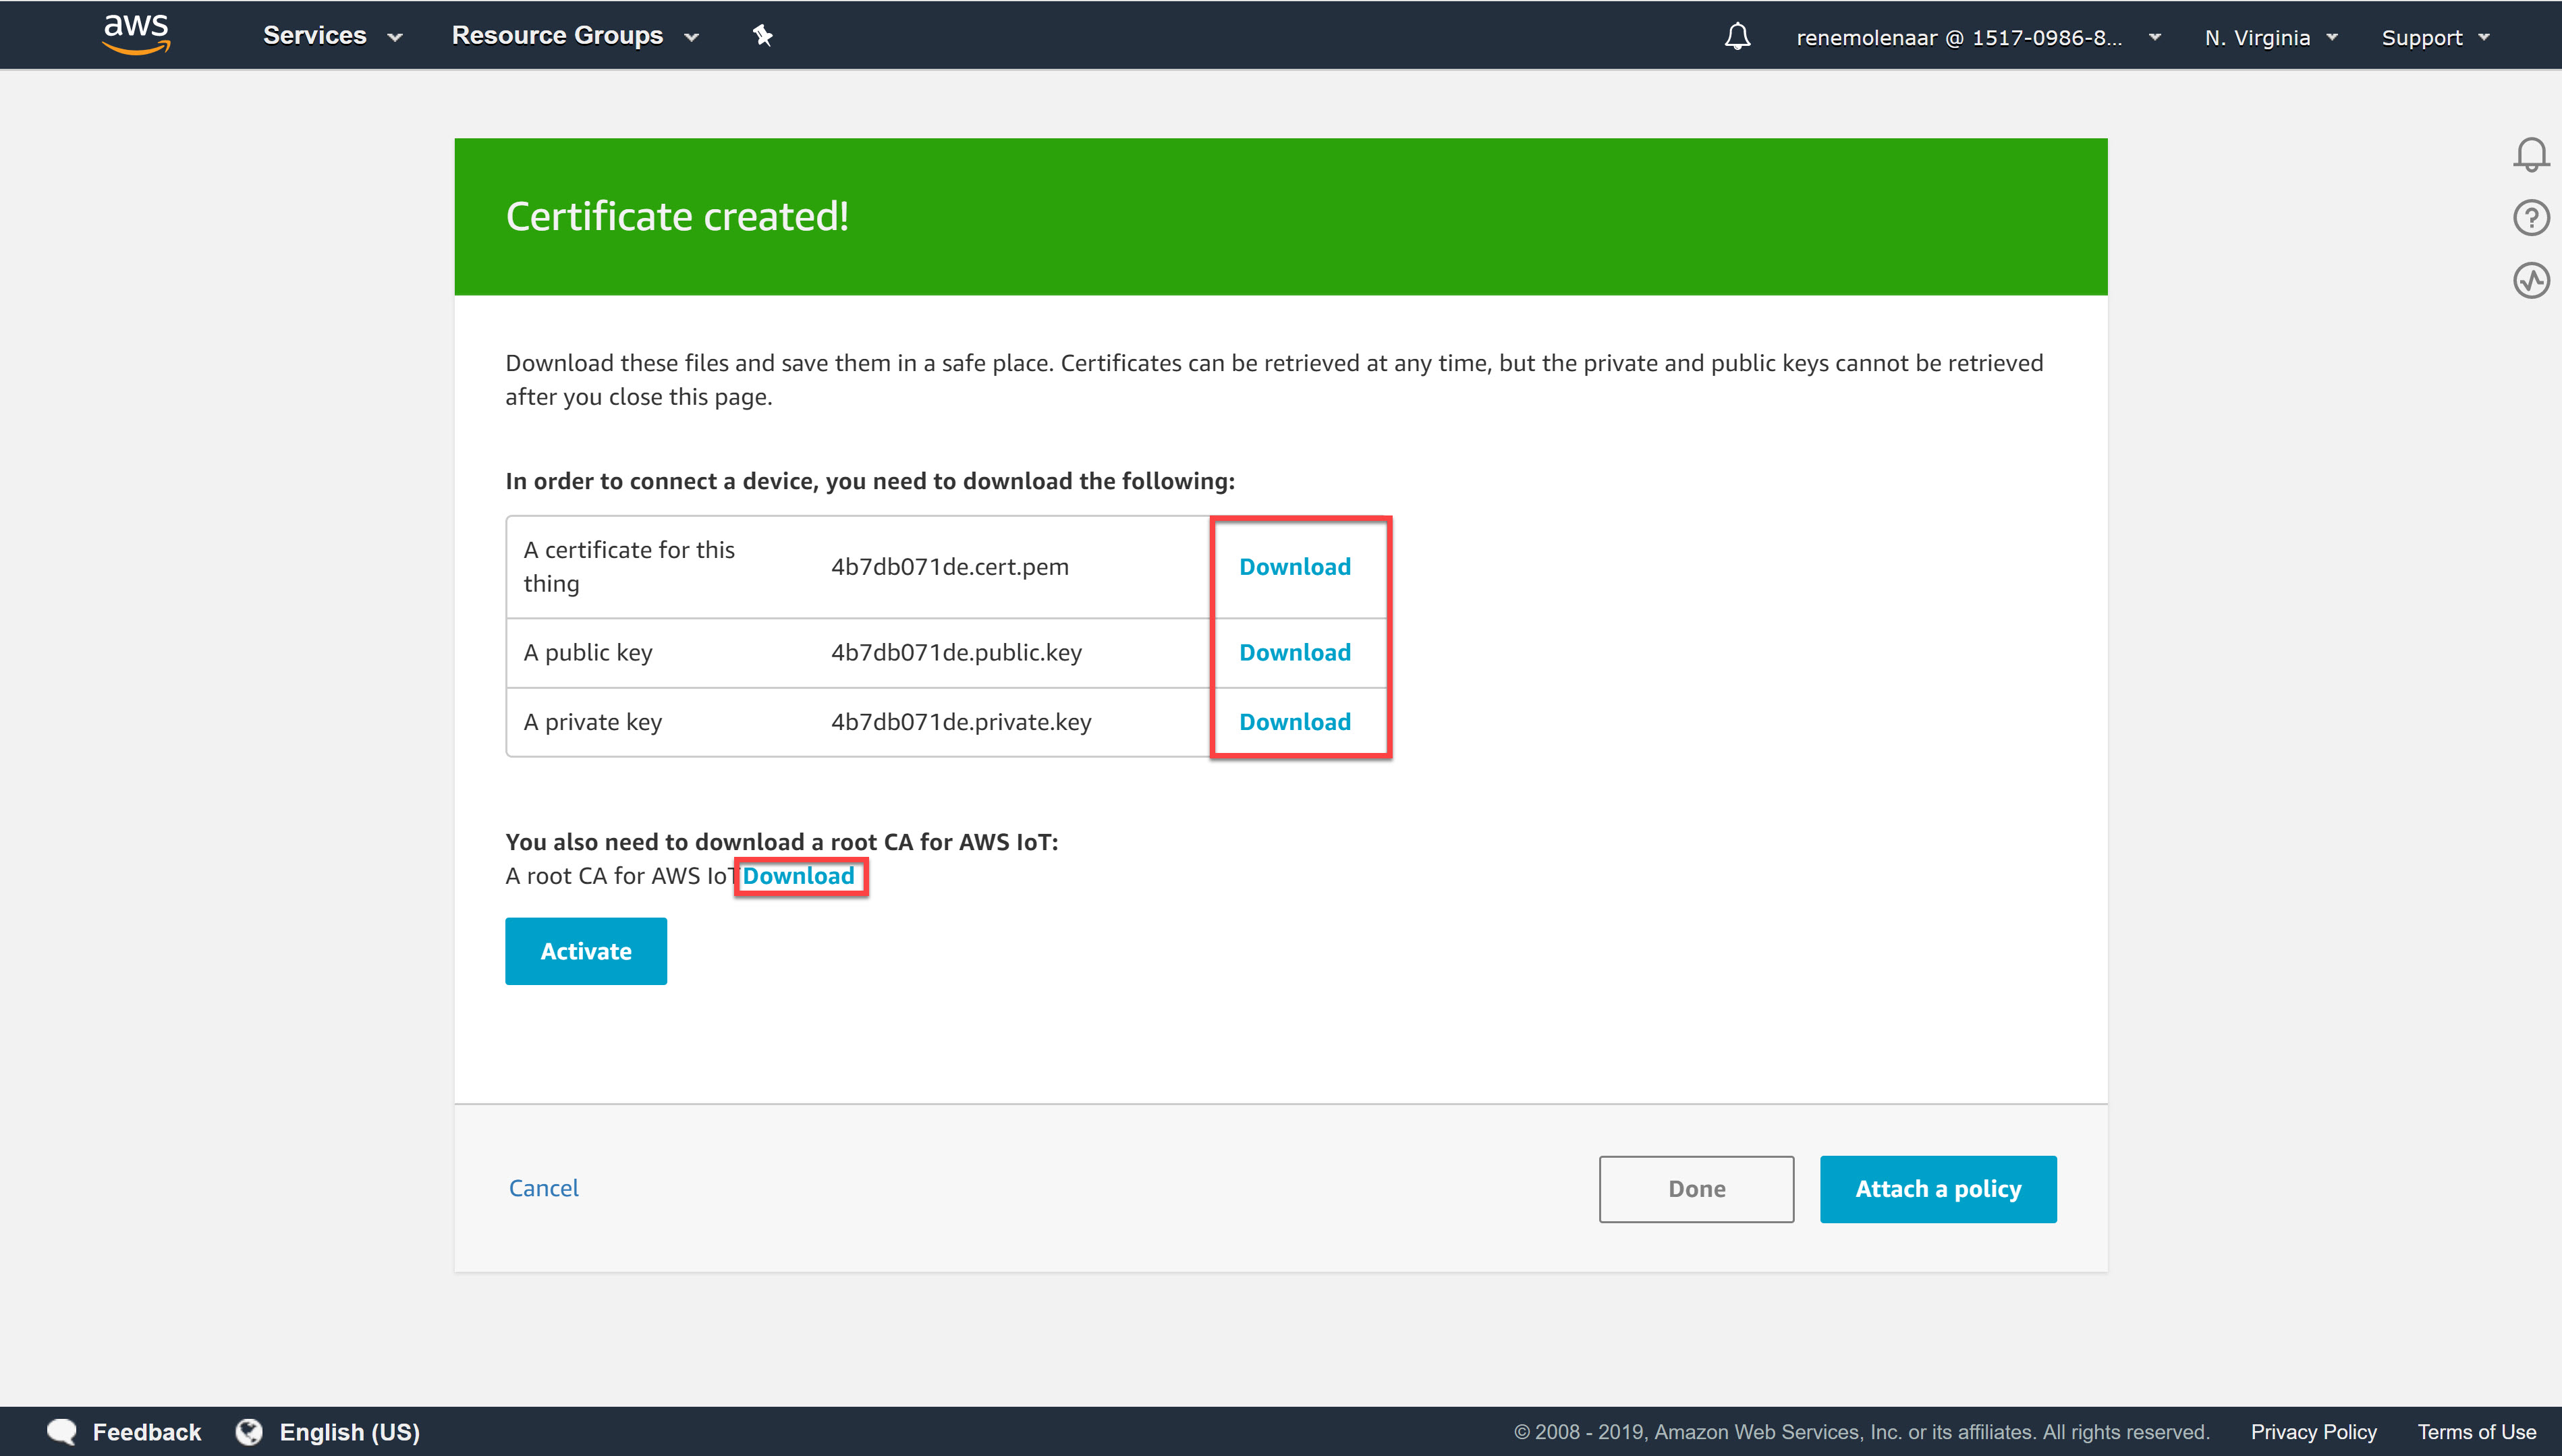
Save the certificate, public key, and private key. We’ll need them later. We’ll also need the root certificates so click on the download button next to A root CA for AWS IoT. This takes you to the X.590 Certificate and AWS IoT page:

Download all the certificates you see here. We’ll need them later.
Policy
Now we need to create a policy that defines what our thing is allowed to do. Head over to Secure and select Policies:

The console tells us we don’t have any policies yet. Click on the Create a policy button:

Our policy requires two actions:
- iot:Connect
- iot:Publish
The iot:Connect action grants permission to connect to AWS IoT with client id “esp32” and the iot:Publish action restricts the device to publishing on a topic named “esp32”.
Here’s what our actions look like:

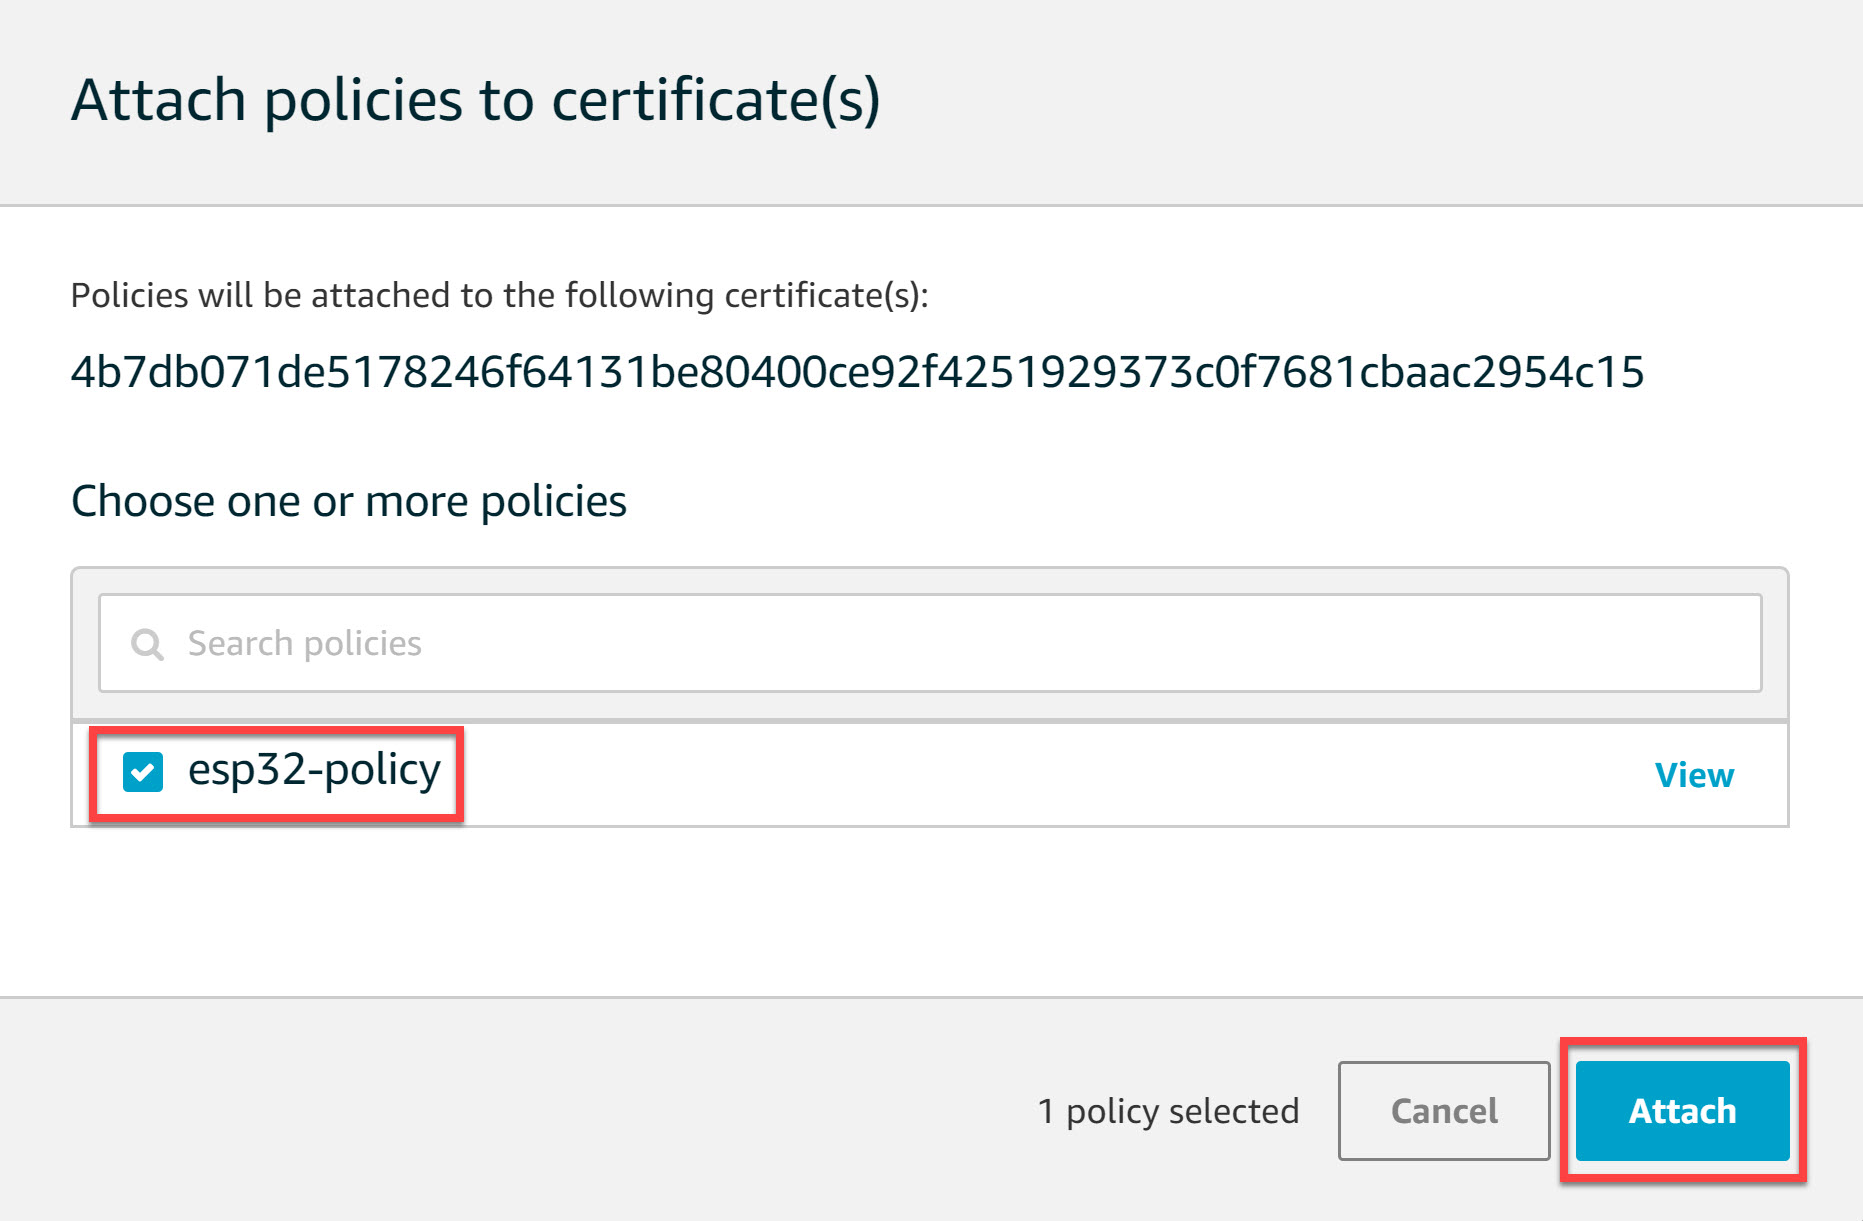
Hit the Create button and head back to Secure > Certificates:

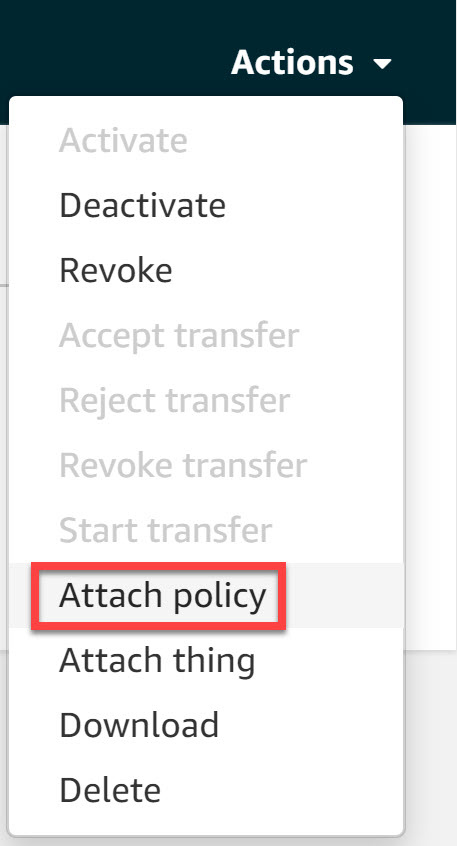
In the upper right corner, select Actions:

Now choose the Attach policy option:
Select the “esp32-policy” we created and click on the Attach button:
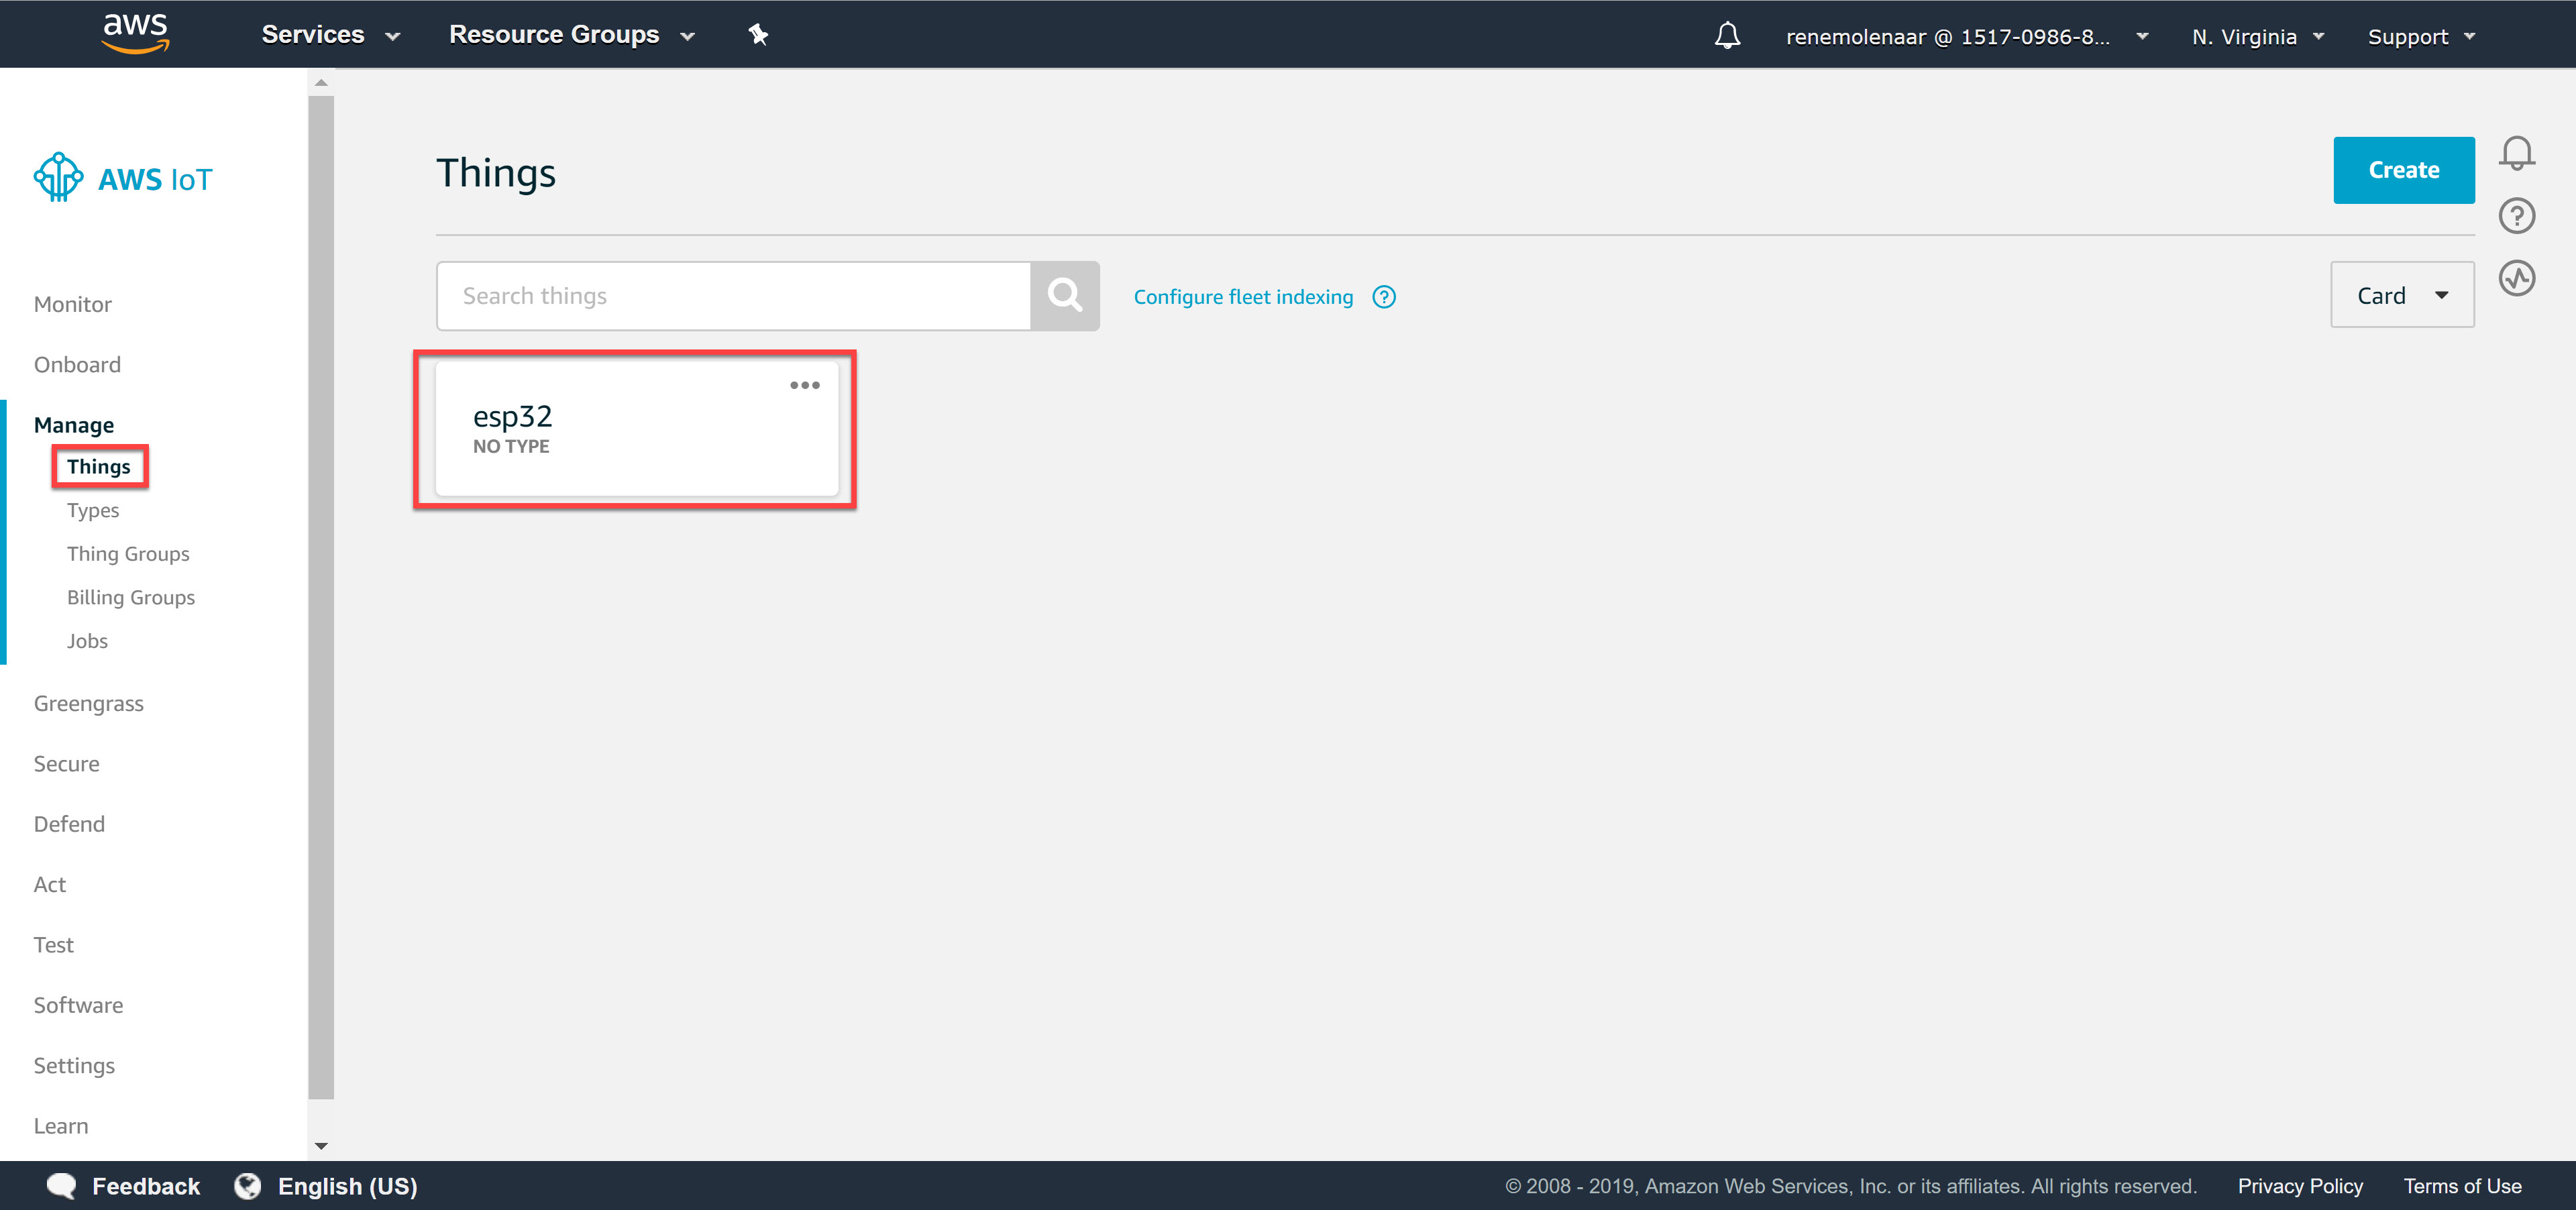
There is one more thing to do. We need the REST API Endpoint. Go to Manage > Things:
Look for the Rest API Endpoint under Interact:
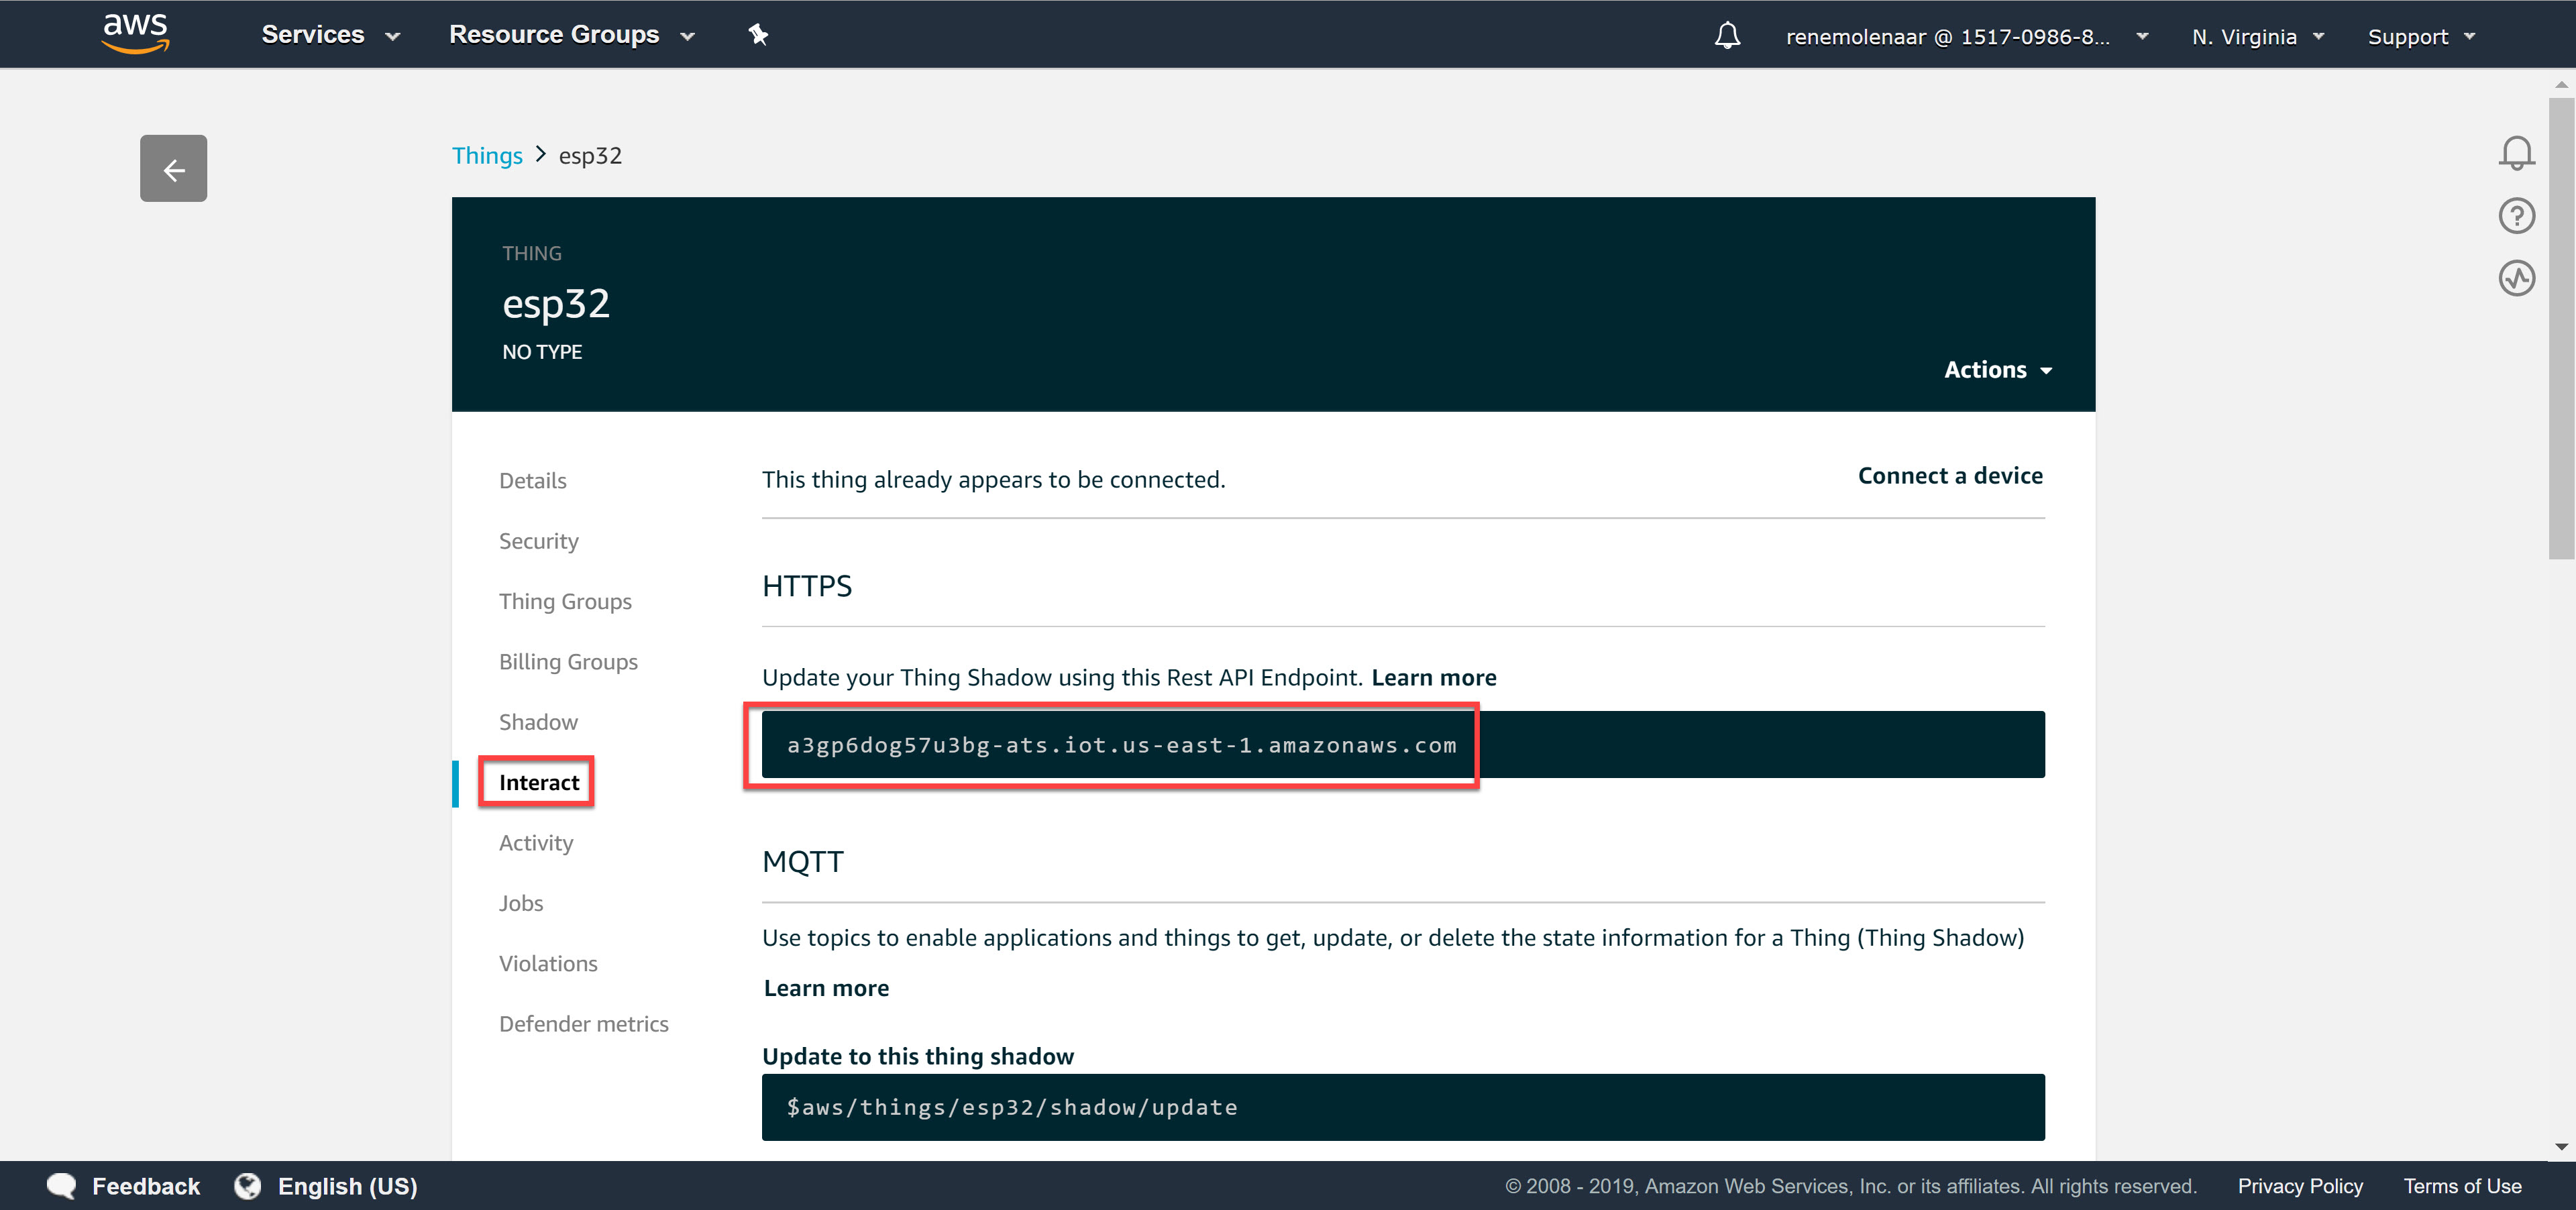
Write down the REST API Endpoint. In my case it’s:
a3gp6dog57u3bg-ats.iot.us-east-1.amazonaws.com
We’ll need it later when we configure the ESP32. This completes our AWS IoT configuration.
ESP32
Time to get our hands dirty with the ESP32.
Drivers
I’m using Windows 10. The first time you connect the ESP32 with the USB cable, your computer won’t recognize the device. Go to Device Manager and you will see an unknown device:

Double-click on the device and click on Update Driver:

Choose the first option to automatically search for the driver:
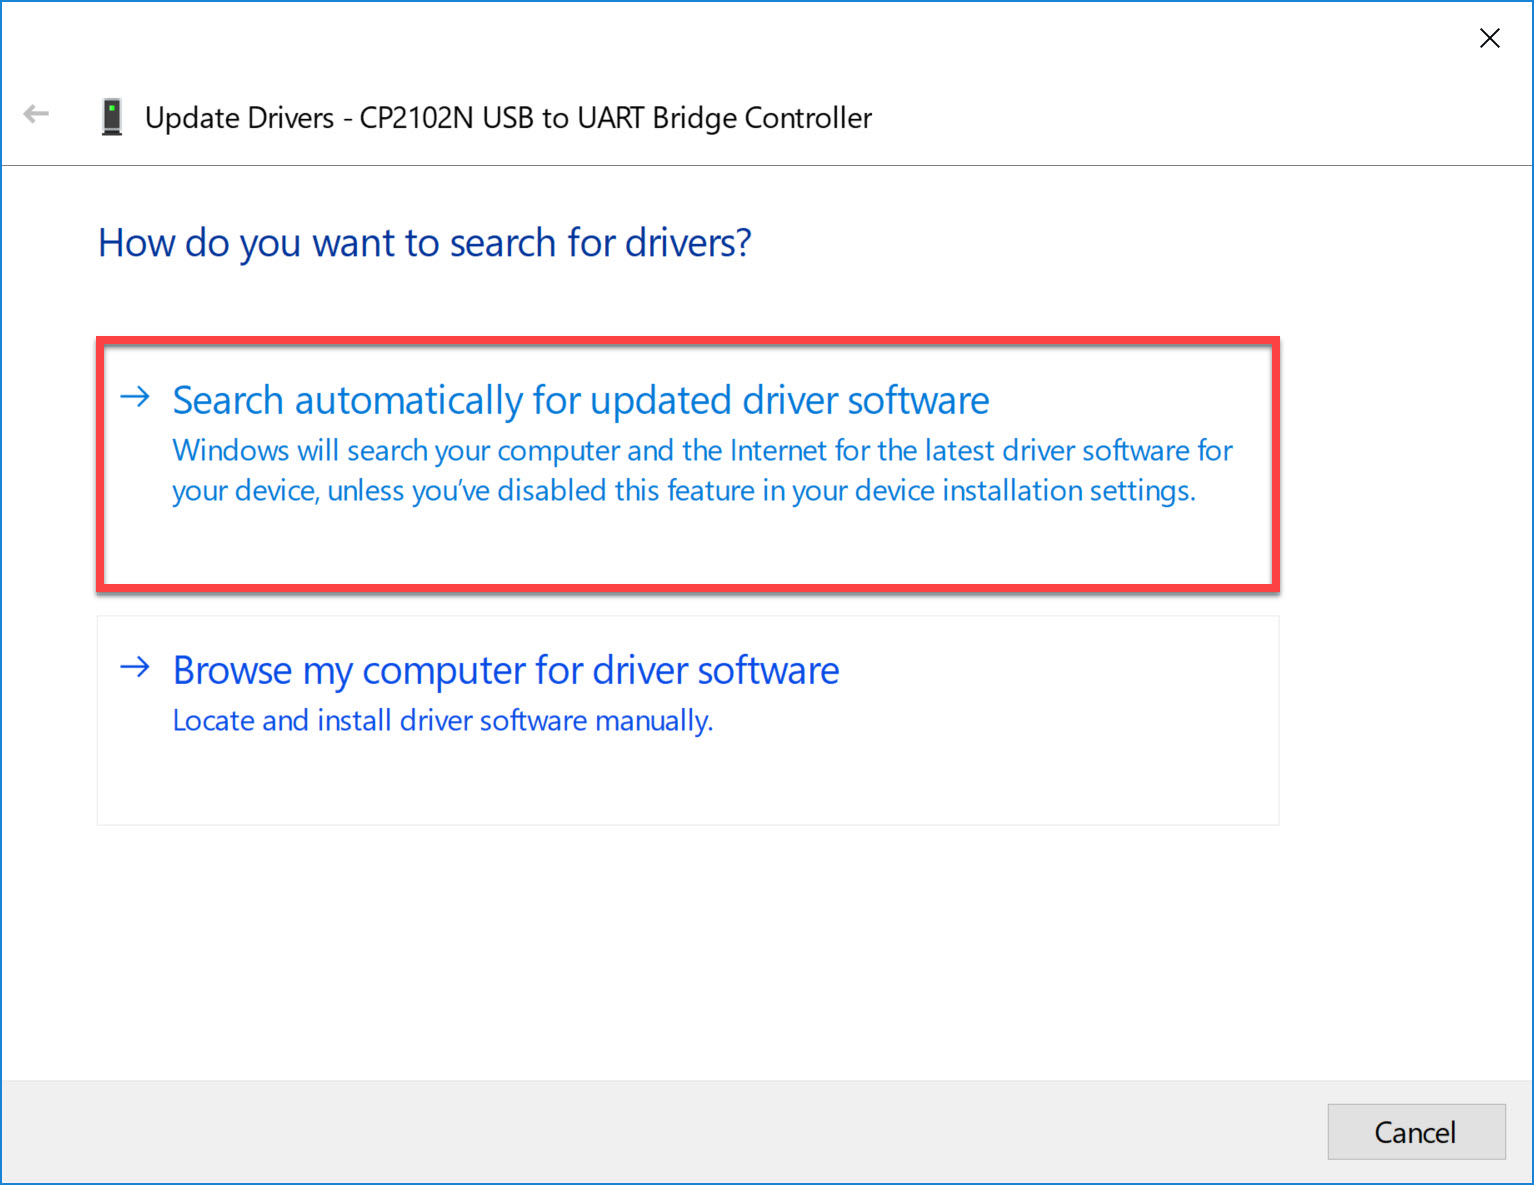
This won’t take long. Once the driver is downloaded it will also show you the COM port number:
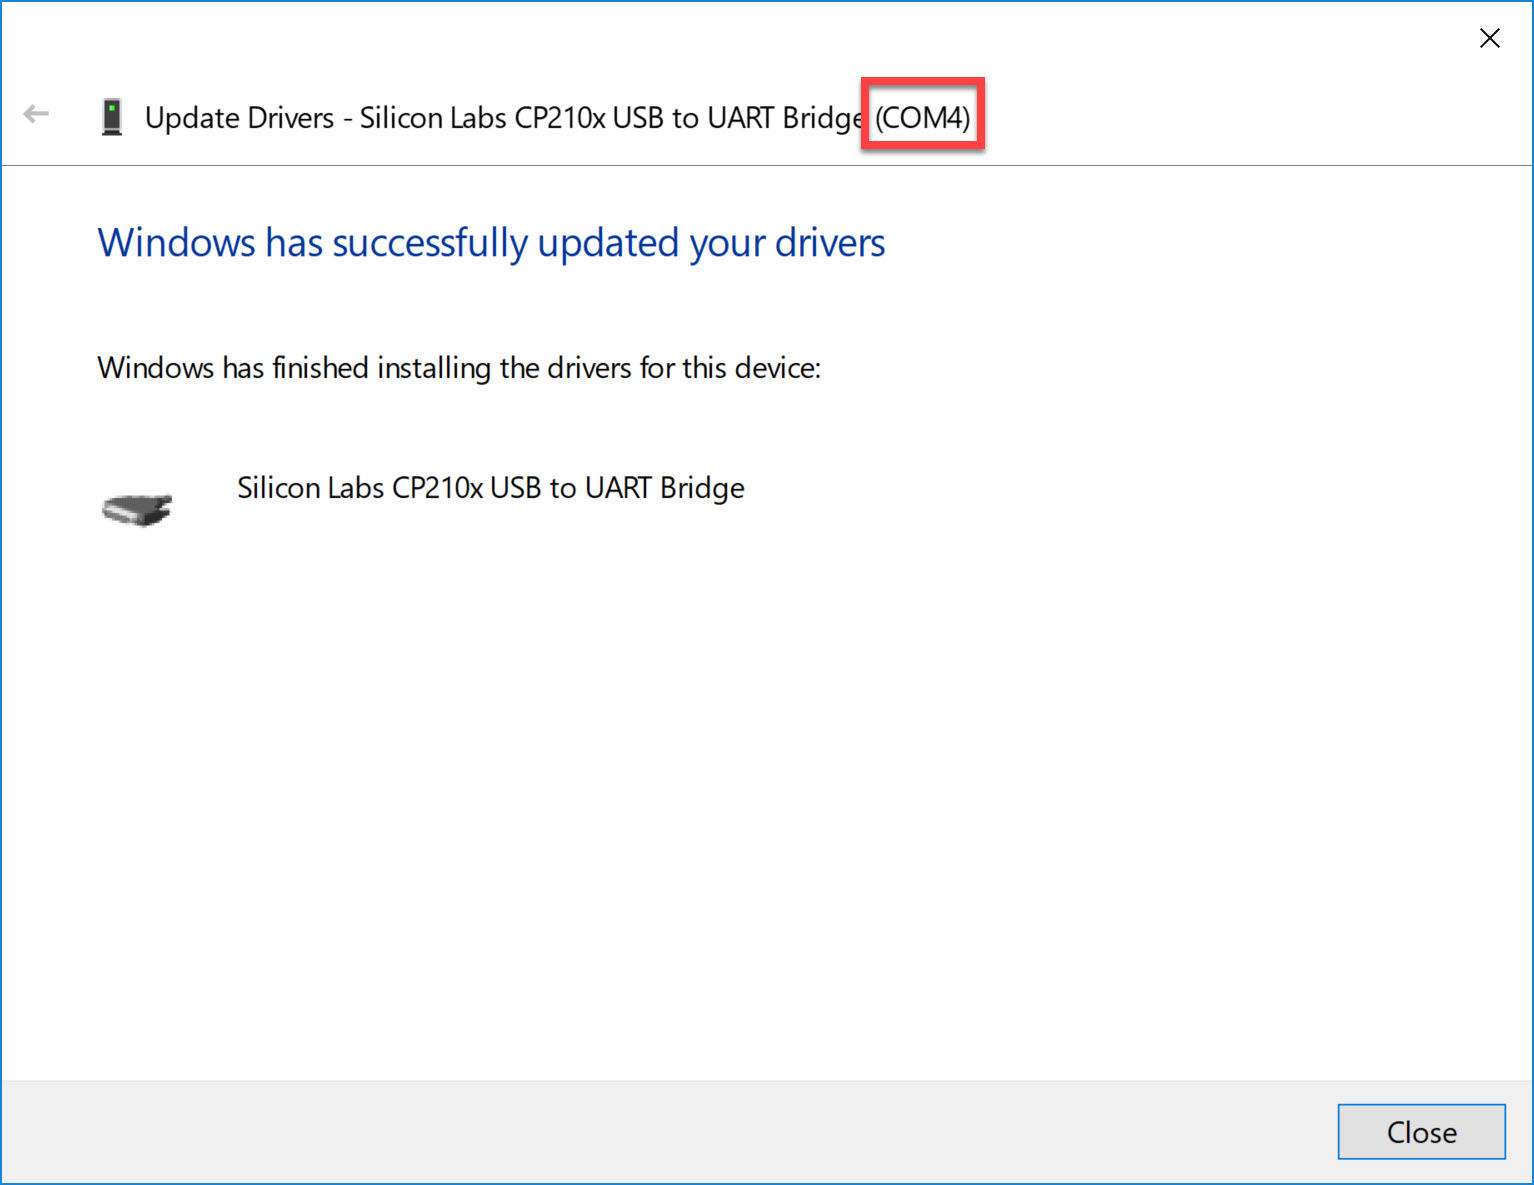
In my case, it’s COM4.
MicroPython Firmware
The ESP32 supports different firmwares. My personal favorite is MicroPython. I use Python for many things so it’s great that I can use it for the ESP32 as well.
MicroPython includes a small subset of the Python 3 standard library and is optimized to run on microcontrollers.
I downloaded the latest standard firmware (esp32-20190611-v1.11-44-g8b18cfede.bin) and saved it to my disk. To install the firmware, we need the esptool application. This tool allows us to communicate with the ROM bootloader of the ESP32.
We can install it with pip:
pip install esptoolOn Windows, this gets installed in the username folder in the following directory:
C:\Users\renemolenaar\AppData\Local\Programs\Python\Python37-32\ScriptsFirst, we need to erase the flash. We do this with the following command:
esptool.py.exe --chip esp32 -p com4 erase_flash
esptool.py v2.6
Serial port com4
Connecting.......
Chip is ESP32D0WDQ5 (revision 1)
Features: WiFi, BT, Dual Core, 240MHz, VRef calibration in efuse, Coding Scheme None
MAC: 24:0a:c4:c1:0f:50
Uploading stub...
Running stub...
Stub running...
Erasing flash (this may take a while)...
Chip erase completed successfully in 8.7s
Hard resetting via RTS pin...
Excellent. We now have an empty flash. Let’s install the firmware we just downloaded:
esptool.py.exe --chip esp32 -p com4 write_flash -z 0x1000 c:\users\renemolenaar\Downloads\esp32-20190611-v1.11-44-g8b18cfede.bin
esptool.py v2.6
Serial port com4
Connecting....
Chip is ESP32D0WDQ5 (revision 1)
Features: WiFi, BT, Dual Core, 240MHz, VRef calibration in efuse, Coding Scheme None
MAC: 24:0a:c4:c1:0f:50
Uploading stub...
Running stub...
Stub running...
Configuring flash size...
Auto-detected Flash size: 4MB
Compressed 1169696 bytes to 731891...
Wrote 1169696 bytes (731891 compressed) at 0x00001000 in 64.9 seconds (effective 144.2 kbit/s)...
Hash of data verified.

Leaving...
Hard resetting via RTS pin...
Our ESP32 now has the MicroPython firmware.
Python
Let’s see if we can connect to our ESP32. We can use Putty for this. Enter the COM port number we found in Device Manager and set the speed to 115200:

Once you open the console, you see the following prompt:
>>>Awesome. We now have access to Python on our ESP32!
Wireless
Before we can connect our ESP32 “thing” to the Internet, we need connectivity. I’ll use the Wi-Fi chip for this. First we need to activate the Wi-Fi chip:
>>> sta_if = network.WLAN(network.STA_IF)
I (268050) wifi: wifi driver task: 3ffe2d70, prio:23, stack:3584, core=0
I (285637) wifi: wifi firmware version: 38e2484
I (285637) wifi: config NVS flash: enabled
I (285637) wifi: config nano formating: disabled
I (285637) system_api: Base MAC address is not set, read default base MAC address from BLK0 of EFUSE
I (285647) system_api: Base MAC address is not set, read default base MAC address from BLK0 of EFUSE
I (285677) wifi: Init dynamic tx buffer num: 32
I (285677) wifi: Init data frame dynamic rx buffer num: 32
I (285677) wifi: Init management frame dynamic rx buffer num: 32
I (285687) wifi: Init static rx buffer size: 1600
I (285687) wifi: Init static rx buffer num: 10
I (285697) wifi: Init dynamic rx buffer num: 32
You can verify whether the interface is active or not:
>>> sta_if.active(True)
W (433087) phy_init: failed to load RF calibration data (0x1102), falling back to full calibration
I (433237) phy: phy_version: 4007, 9c6b43b, Jan 11 2019, 16:45:07, 0, 2
I (433247) wifi: mode : sta (24:0a:c4:c1:0f:50)
True
I (433247) wifi: STA_START
Above, you can see that it shows “True”. Let’s scan for wireless networks:
>>> sta_if.scan()
I (455847) network: event 1
[(b'MY_WIFI_SSID', b'\xfc\xec\xda\x17X\xcd', 1, -64, 3, False), (b'Ziggo24978', b'pZ\x9e\xa5\x0bo', 6, -67, 3, False), (b'Ziggo', b'rZ\x9e\xa5\x0b`', 6, -67, 5, False), (b'Leo Gasten', b'z\x8a q\x0bi', 1, -75, 0, False), (b'MY_WIFI_SSID', b'\xfc\xec\xda;\x89w', 11, -80, 3, False), (b'Leo', b'x\x8a q\x0bi', 1, -85, 3, False), (b'ziggo-ap-1909866', b'\xd8\xb6\xb7\xd0)\x00', 11, -88, 3, False), (b'AP_804094029', b'\xbcT\xf9\xf89\xb0', 1, -90, 3, False), (b'Seli', b'\xc0\xc1\xc0x.\xac', 1, -92, 4, False), (b'SMA1992052369', b'\xdc\xef\xca\x97\xb6\x81', 11, -94, 4, False)]
My wireless network is called “MY_WIFI_SSID”. Let’s connect to it:
>>> sta_if.connect('MY_WIFI_SSID', 'MY_WIFI_PASSWORD')
>>> I (507797) wifi: new:<1,0>, old:<1,0>, ap:<255,255>, sta:<1,0>, prof:1
I (508367) wifi: state: init -> auth (b0)
I (508367) wifi: state: auth -> assoc (0)
I (508377) wifi: state: assoc -> run (10)
I (508387) wifi: connected with MY_WIFI_SSID, channel 1, bssid = fc:ec:da:17:58:cd
I (508387) wifi: pm start, type: 1

I (508387) network: CONNECTED

I (512267) event: sta ip: 10.82.100.135, mask: 255.255.255.0, gw: 10.82.100.254
I (512267) network: GOT_IP
We are now connected to the wireless network. We can verify if the ESP32 is connected with the following command:
>>> sta_if.isconnected()
True
Our thing is now connected, great!
File Management
Our ESP32 is connected to the wireless network but every time you disconnect the USB cable, you have to type in all wireless commands again. To prevent this from happening, we can add all Python commands in a Python file and store it on the ESP32.
To do this, we need a tool that lets us send files to our ESP32. I use Ampy for this. Ampy is a simple command line tool you can use to send files from your computer to the ESP32 file system.
We can install Ampy with pip:
pip install adafruit-ampyAmpy ends up in a sub-directory of our user directory:
C:\Users\renemolenaar\AppData\Local\Programs\Python\Python37-32\ScriptsLet’s check the file system of our ESP32:
ampy -p com4 ls
/boot.py
There is only one file called “boot.py”. Let’s view its contents:
ampy -p com4 get boot.py
# This file is executed on every boot (including wake-boot from deepsleep)
#import esp
#esp.osdebug(None)
#import webrepl
#webrepl.start()
Like the comment above states, the boot.py file is executed on every boot. We can use this to include code that we want to run whenever we start our ESP32.
Let’s create a short Python function that connects to our wireless network. Save the code below in a boot.py file:
def connect():
    import network
    sta_if = network.WLAN(network.STA_IF)
    if not sta_if.isconnected():
        print('connecting to network...')
        sta_if.active(True)
        sta_if.connect('MY_WIFI_SSID', 'MY_WIFI_PASSWORD')
        while not sta_if.isconnected():
            pass
    print('network config:', sta_if.ifconfig())
Now we copy our boot.py file to the ESP32:
ampy -p com4 put c:\Users\renemolenaar\Downloads\boot.pyRestart your ESP32, open the CLI and run the connect() function:
>>> connect()
I (18115) wifi: wifi driver task: 3ffe2eb8, prio:23, stack:3584, core=0
I (18115) wifi: wifi firmware version: 38e2484
I (18115) wifi: config NVS flash: enabled
I (18115) wifi: config nano formating: disabled
I (18115) system_api: Base MAC address is not set, read default base MAC address from BLK0 of EFUSE
I (18125) system_api: Base MAC address is not set, read default base MAC address from BLK0 of EFUSE
I (18155) wifi: Init dynamic tx buffer num: 32
I (18155) wifi: Init data frame dynamic rx buffer num: 32
I (18155) wifi: Init management frame dynamic rx buffer num: 32
I (18155) wifi: Init static rx buffer size: 1600
I (18165) wifi: Init static rx buffer num: 10
I (18165) wifi: Init dynamic rx buffer num: 32
connecting to network...
I (18225) phy: phy_version: 4007, 9c6b43b, Jan 11 2019, 16:45:07, 0, 0
I (18235) wifi: mode : sta (24:0a:c4:c1:0f:50)
I (18235) wifi: STA_START
I (18355) wifi: new:<1,0>, old:<1,0>, ap:<255,255>, sta:<1,0>, prof:1
I (18925) wifi: state: init -> auth (b0)
I (18925) wifi: state: auth -> assoc (0)
I (18935) wifi: state: assoc -> run (10)
I (18945) wifi: connected with MY_WIFI_SSID, channel 1, bssid = fc:ec:da:17:58:cd
I (18955) wifi: pm start, type: 1

I (18955) network: CONNECTED
I (19555) event: sta ip: 10.82.100.135, mask: 255.255.255.0, gw: 10.82.100.254
I (19555) network: GOT_IP
network config: ('10.82.100.135', '255.255.255.0', '10.82.100.254', '10.82.100.253')
Excellent. With a single command we can now connect our ESP32 to the wireless network.
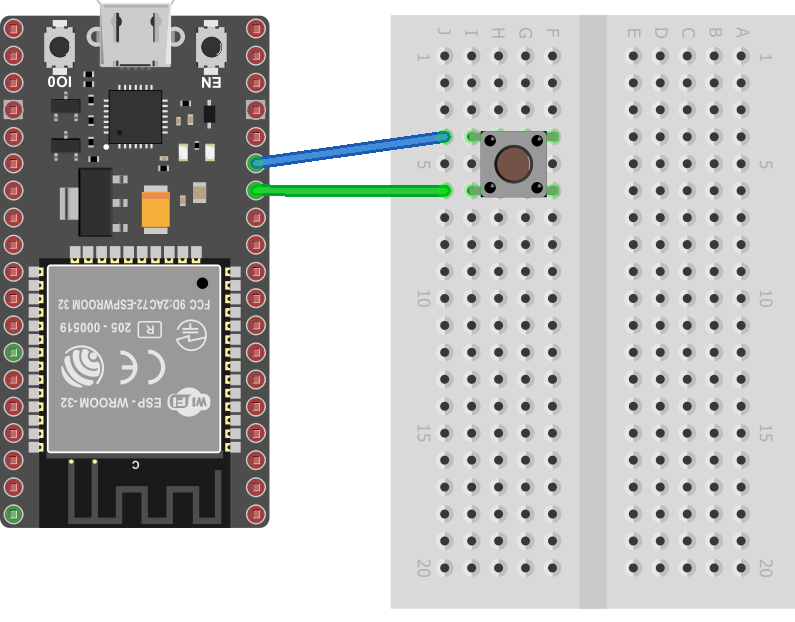
Hardware Button
I connected a hardware button to my ESP32 through a breadboard. I used GPIO pin 12 and the GND pin next to it. Here’s an overview:
Let’s create a button variable that reads the status of pin 12:
>>> import machine
>>> button = machine.Pin(12, machine.Pin.IN, machine.Pin.PULL_UP)
When we read the value of the button variable, we get the status:
>>> button.value()
1
When the button is unpressed, the value is 1. Let’s press it and re-read the value:
>>> button.value()
0
Excellent. We can read the status of our hardware button.
Install Certificate
Now we need to install the certificates we downloaded from AWS IoT. We can do this with Ampy:
ampy -p com4 put c:\users\renemolenaar\Downloads\4b7db071de-certificate.pem.crt
ampy -p com4 put c:\users\renemolenaar\Downloads\4b7db071de-private.pem.key
ampy -p com4 put c:\users\renemolenaar\Downloads\4b7db071de-public.pem.key
ampy -p com4 put c:\users\renemolenaar\Downloads\AmazonRootCA1.pem
ampy -p com4 put c:\users\renemolenaar\Downloads\AmazonRootCA3.pem
Let’s check if our files are on the ESP32 file system:
ampy -p com4 ls
/4b7db071de-certificate.pem.crt
/4b7db071de-private.pem.key
/4b7db071de-public.pem.key
/AmazonRootCA1.pem
/AmazonRootCA3.pem
/boot.py
Excellent. Our files are there.
MQTT
We now have everything we need to connect our ESP32 to AWS IoT. We’ll use MQTT for this. First, we import the MQTT library:
>>> from umqtt.robust import MQTTClient
I (197871) modsocket: Initializing
MQTT requires a number of settings:
- certificate file: the certificate we created in AWS IoT for our thing.
- private key: the private key from the certificate file.
- MQTT client ID: this matches the name of our thing in AWS IoT.
- MQTT port number: default port number
- MQTT topic: the topic we configured in AWS IoT.
- MQTT host: the restpoint API endpoint for our thing.
Let’s set all these values and read the certificate files into variables:
>>> certificate_file = "/4b7db071de-certificate.pem.crt"
>>> private_key_file = "/4b7db071de-private.pem.key"
>>> mqtt_client_id = "esp32"
>>> mqtt_port = 8883
>>> mqtt_topic = "esp32/publish"
>>> mqtt_host = "a3gp6dog57u3bg-ats.iot.us-east-1.amazonaws.com"
>>> mqtt_client = None

>>> with open(private_key_file, "r") as f:
...     private_key = f.read()
...

>>> with open(certificate_file, "r") as f:
...     certificate = f.read()
We can now configure a MQTT client that uses all the above variables:
>>> mqtt_client = MQTTClient(client_id=mqtt_client_id, server=mqtt_host, port=mqtt_port, keepalive=5000, ssl=True, ssl_params={"cert":certificate, "key":private_key, "server_side":False})Let’s try to connect through MQTT:
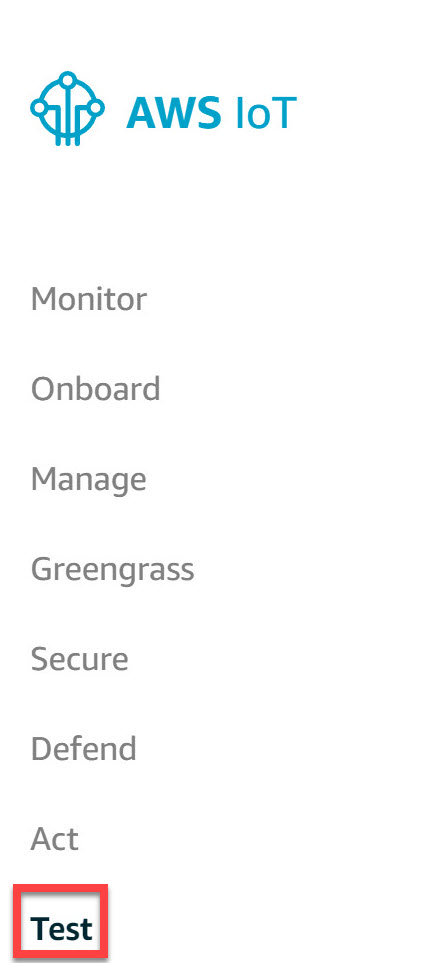
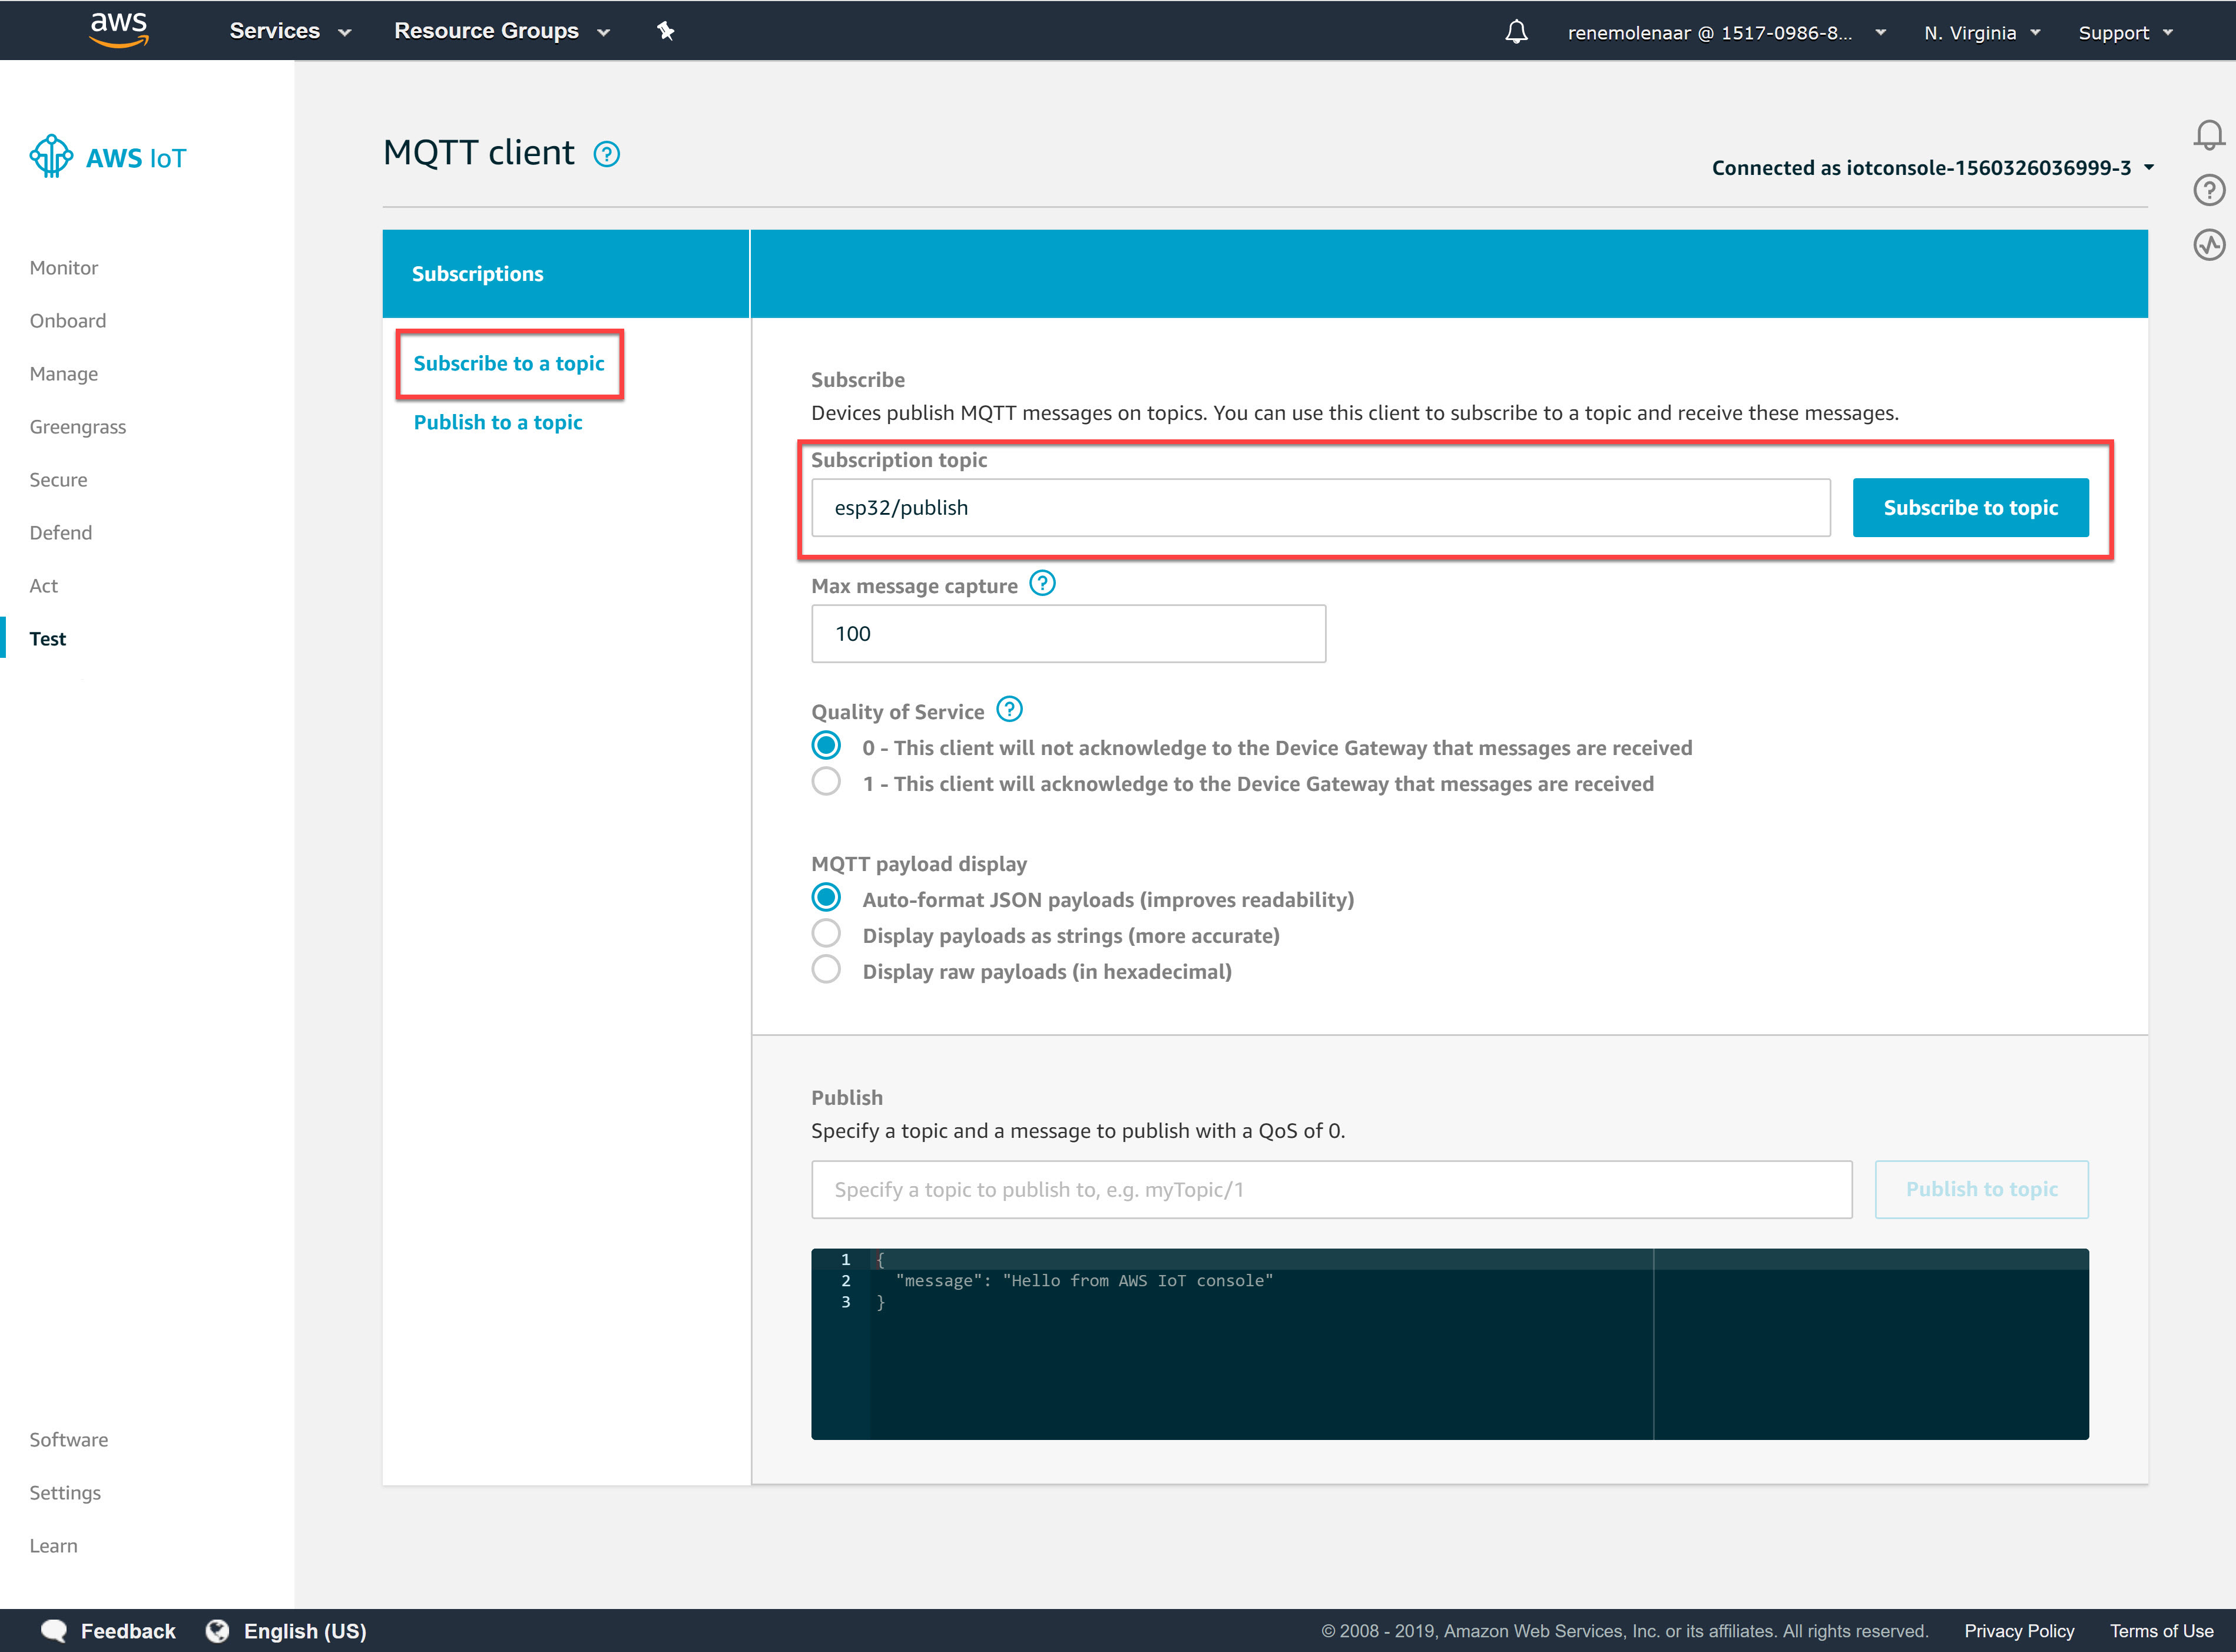
>>> mqtt_client.connect()We want to make sure AWS IoT receives our MQTT messages so head over to AWS IoT and look for the Test section:
We need to subscribe to a topic. Enter “esp32/publish” and click on the Subscribe to topic button:
Let’s do a quick test to make sure we receive a message. Try the following line:
>>> mqtt_client.publish(mqtt_topic, "test message")This sends the “test message” to AWS IoT and we should see it in the console:

Excellent. How about we go one step further? Whenever I push the button, I want to see a message. I can do this with the following code:
>>> import time

>>> while True:
...     if button.value() == 0:
...         mqtt_client.publish(mqtt_topic, "button pushed!")
...         time.sleep(1)
Whenever I push the button, the value is 0. When that happens, I want to send the “button pushed!” message. The time.sleep(1) part is a quick fix to add a one-second delay. If I don’t add this, we will spam AWS IoT non-stop with MQTT messages.
I can see my messages in the console:
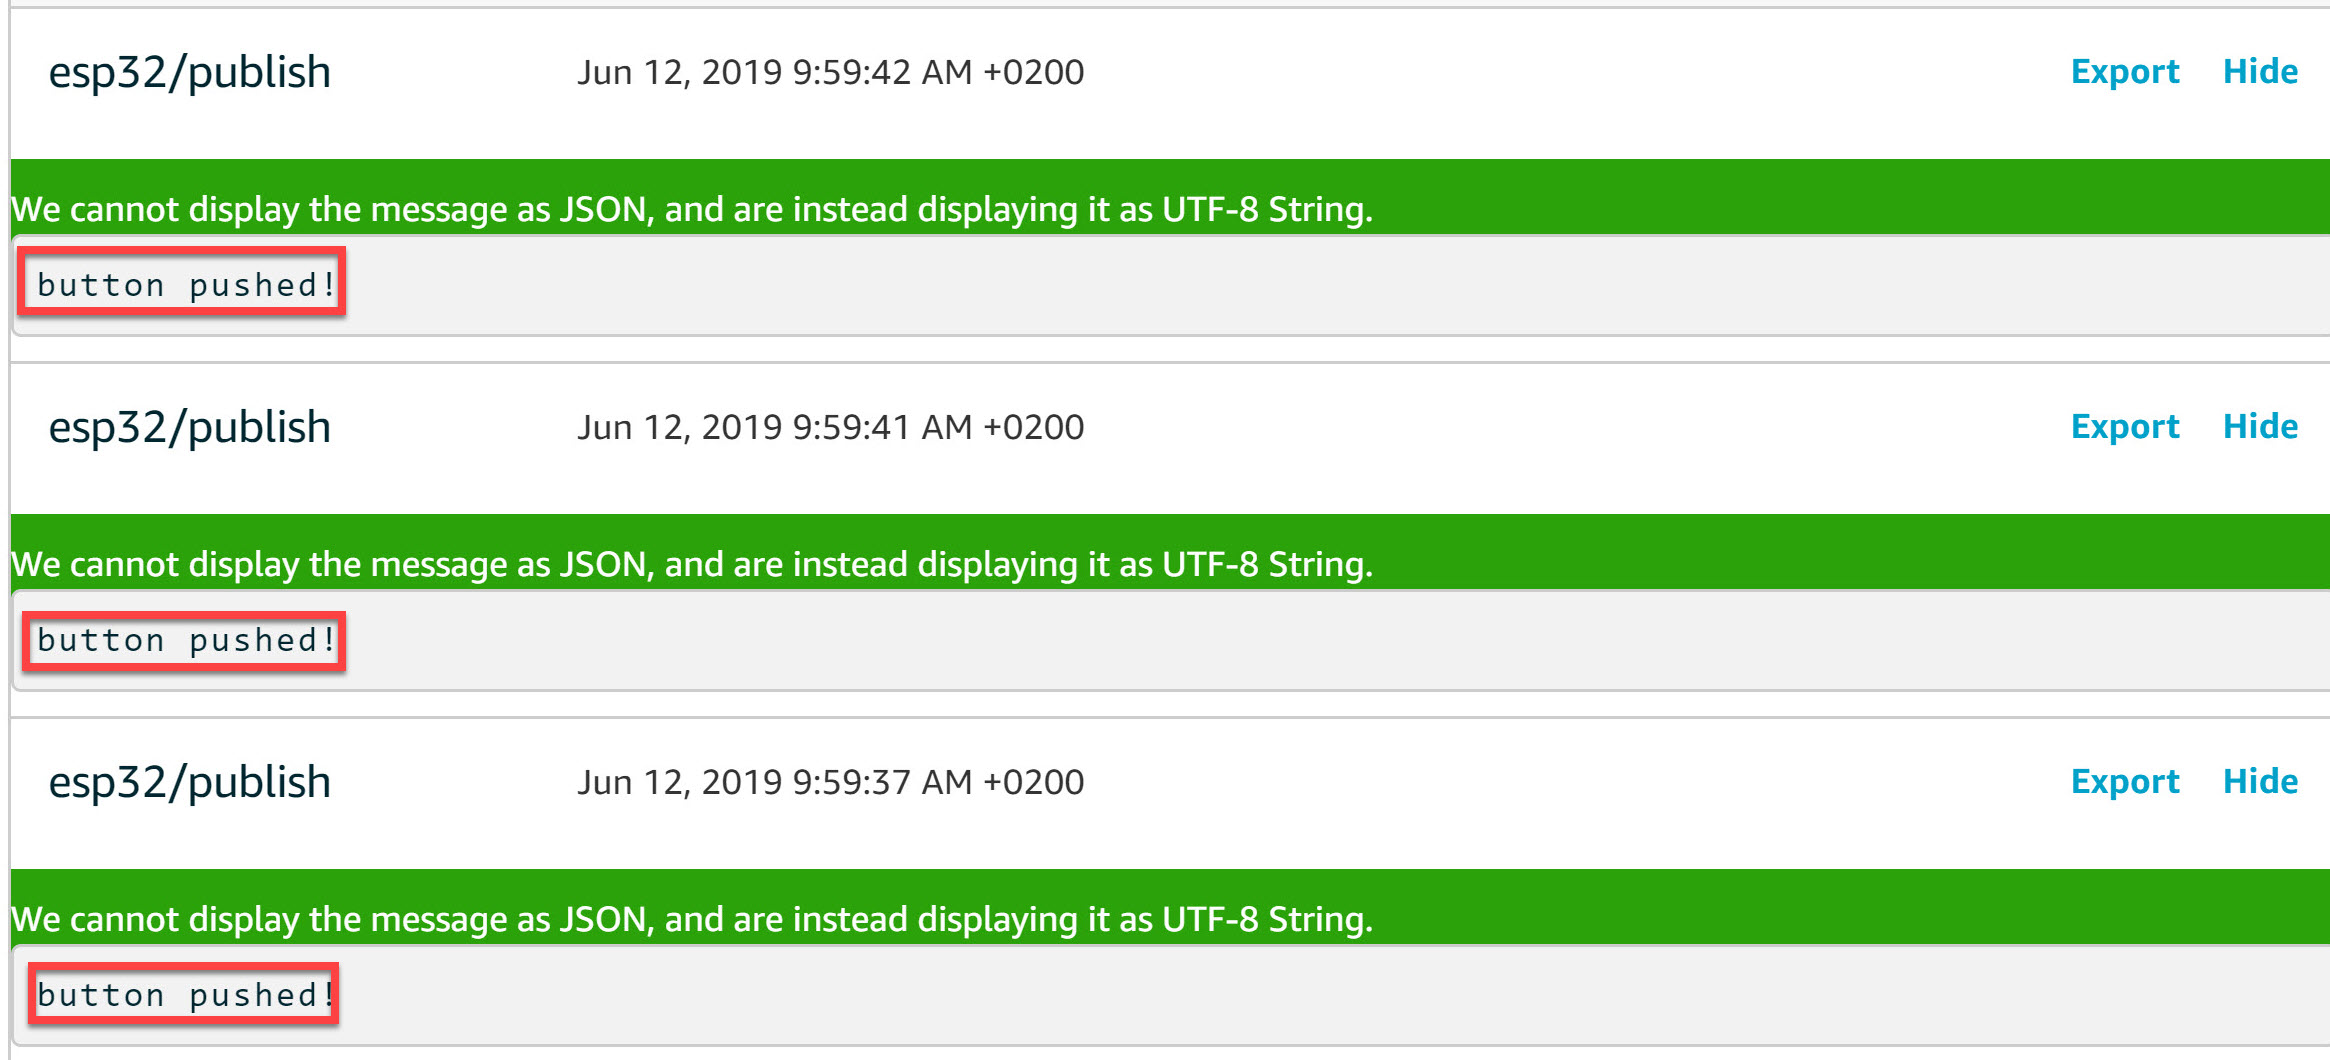
This is looking great. A press of the button on our thing and the data ends up in AWS IoT.
Act
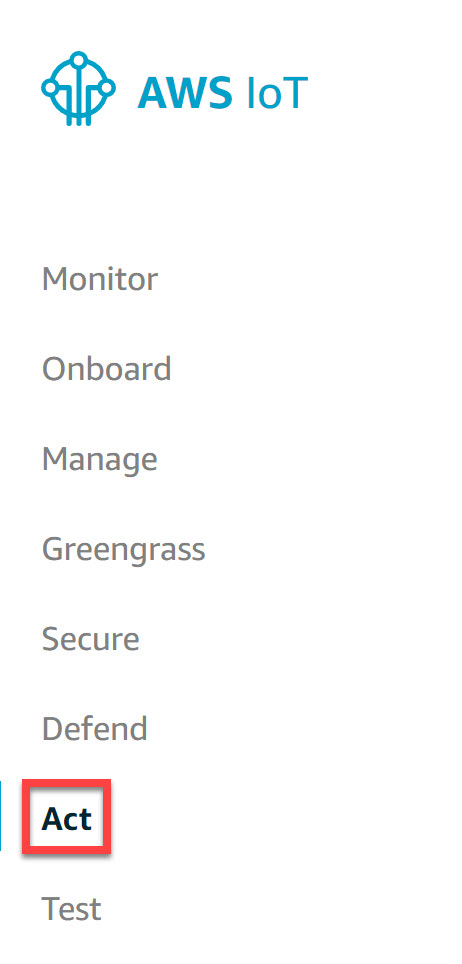
Our data is in AWS but it doesn’t do anything yet. With your data in Amazon’s cloud platform, there are so many options to choose from. I’ll give you a quick overview of the possibilities. Look in the Act section of AWS IoT:
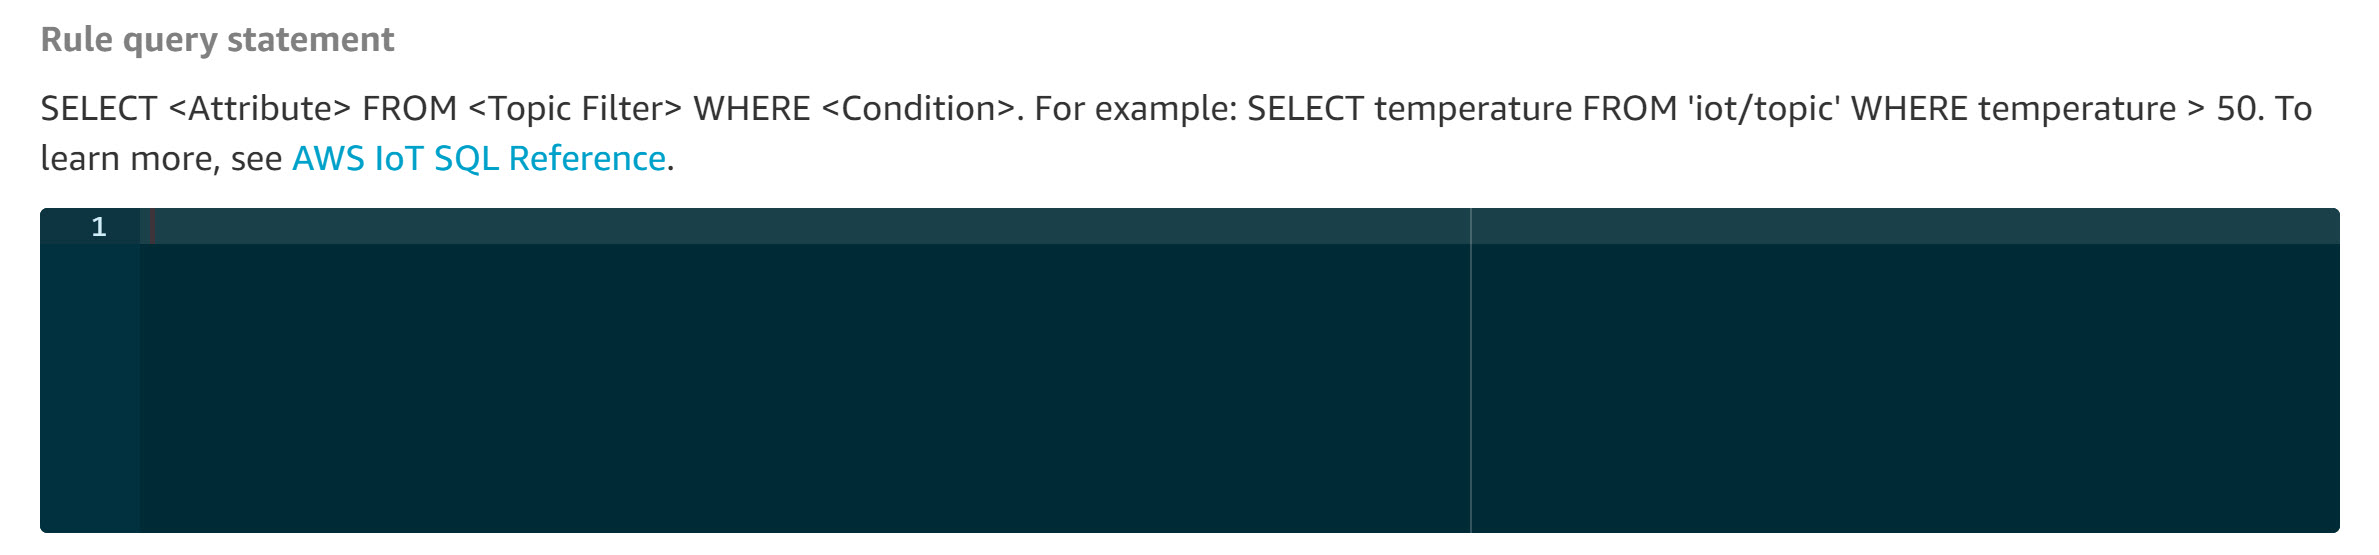
Here, you could use an SQL SELECT query to define the data you want to use:
And then pick one of the possible actions:
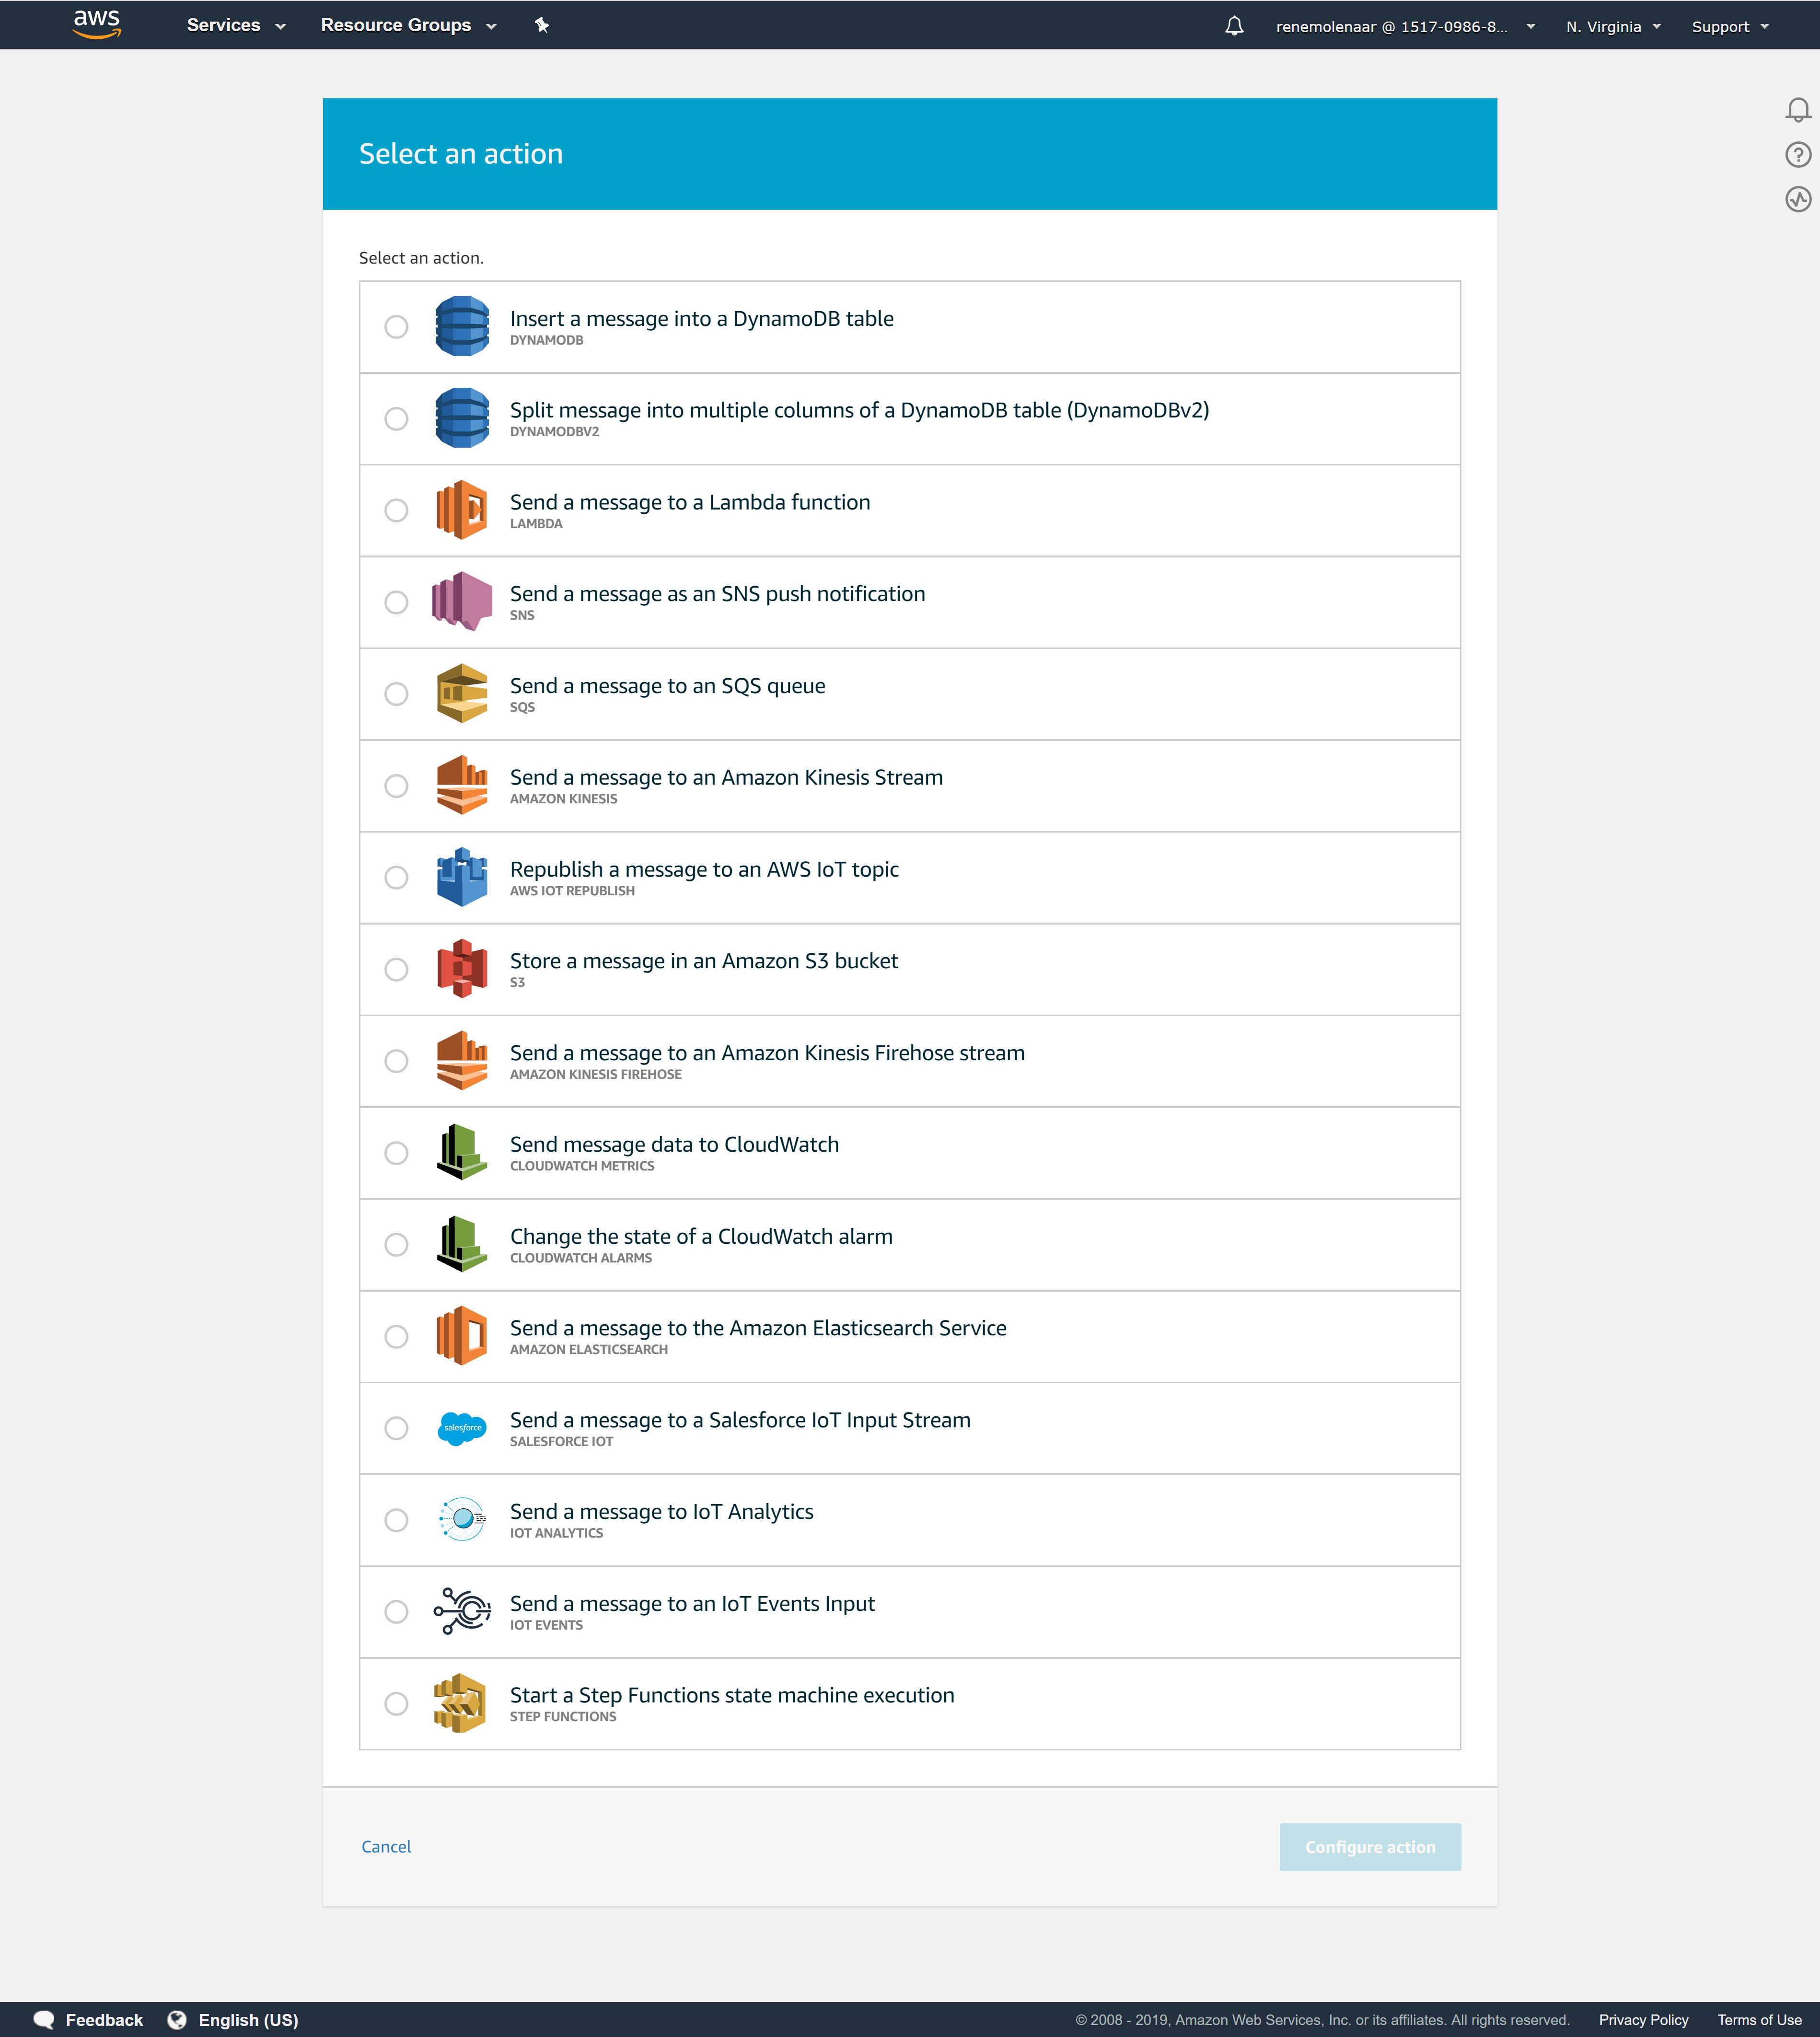
For example, you could:
- Store your data in DynamoDB.
- Send a text message or e-mail through SNS.
- Run a serverless application through AWS Lambda.
Conclusion
You have now learned:
- How to upload the MicroPython firmware to your ESP32.
- How to connect your ESP32 to a wireless network.
- How to create a “thing” in Amazon AWS IoT with certificates and a policy.
- How to send data from your ESP32 to AWS IoT.
I hope you enjoyed this lesson. If you have any questions feel free to leave a comment!
No comments:
Post a Comment