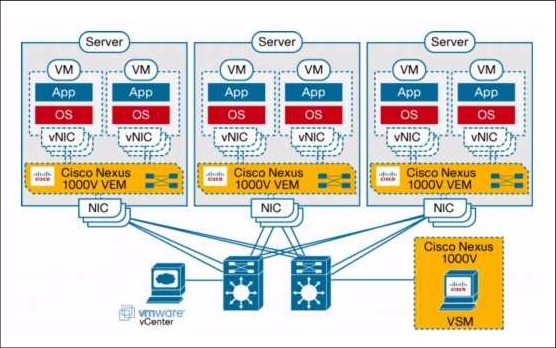
Nexus 1000V是Cisco推出的第一款纯软件的虚拟交换机产品,可以在VMware虚拟化环境中提供Cisco Catalyst交换机的功能,如QoS、ACL、SPAN等。
Cisco Nexus 1000V包含VEM和VSM两部分,其中VEM运行在ESXi服务器上取代VMware原有的虚拟交换机,VSM是一个单独运行的虚拟机,提供CLI接口,用于管理和配置整个虚拟交换机。
安装环境:
ESXi 4.0 x 1 ip address: 192.168.0.10
vCenter Server x 1 ip address: 192.168.0.20
vSphere Client and RCLI x 1 ip address: 192.168.0.30
(Cisco Nexus 1000V management ip: 192.168.0.50)
1、 从www.cisco.com下载Nexus 1000V安装包,将安装包解压得到VSM和VEM安装程序。
2、 在ESXi服务器上安装并验证VEM。
将VEM目录中的cisco-vem-v100-4.0.4.1.1.27-0.4.2.zip复制到C:\Program Files\VMware\VMware vSphere CLI\bin\ 目录中,选择开始菜单中的All programs > VMware >VMware vSphere CLI > Command Prompt
C:\Program Files\VMware\VMware vSphere CLI>cd bin
C:\Program Files\VMware\VMware vSphere CLI\bin>vihostupdate.pl -i -b cisco-vem-v100-4.0.4.1.1.27-0.4.2.zip --server 192.168.0.20
C:\Program Files\VMware\VMware vSphere CLI\bin>vihostupdate.pl -q --server 192.168.0.20
3、 在vSphere Client中,选择File > Deploy OVF Template,选中VSM目录中的Nexus1000v-4.0.4.SV1.1.ova,导入VSM虚拟机。
4、 启动虚拟机,选择安装Nexus 1000V,HA模式设定为standalone,定义管理地址及网关。
5、 查看虚拟机的host-id,并根据此id在www.cisco.com上申请60天试用License。
#show license host-id
6、 将下载的License文件放在TFTP服务器,并上传到虚拟机的bootflash中。
#copy tftp://192.168.0.30/cisco.lic bootflash:
#install license bootflash:cisco.lic
#show license usage
#copy run start
7、 在vCenter Server上安装Cisco Nexus 1000V Plug-in。
用浏览器打开虚拟机管理地址,如http://192.168.0.50,下载cisco_nexus1000v_extension.xml,在vSphere Client中选择Manage Plug-in,右键点击空白处选择新建Plug-in,选择下载的xml文件并点击注册。如果注册失败,可以删除此plug-in然后重新尝试注册,具体方法见如下的Nexus 1000V安装故障解决指南。
8、 从VSM虚拟机连接vCenter Server,如果连接失败通常是第6步没有成功注册Plug-in。
n1000v# config t
n1000v(config)# svs connection VC
n1000v((config-svs-conn)# vmware dvs datacenter-name DC-1
n1000v((config-svs-conn)# protocol vmware-vim
n1000v((config-svs-conn)# remote ip address 192.168.0.20
n1000v(config-svs-conn)# connect
n1000v# show svs connections
9、 定义VSM和VEM通讯使用的Port Profile。
n1000v(config)# port-profile system-uplink
n1000v(config-port-prof)# switchport mode trunk
n1000v(config-port-prof)# switchport trunk allowed vlan 1
n1000v(config-port-prof)# no shut
n1000v(config-port-prof)# system vlan 1
n1000v(config-port-prof)# vmware port-group
n1000v(config-port-prof)# capability uplink
n1000v(config-port-prof)# state enabled
10、 定义其他虚拟机数据和上联通讯的Port Profile。
n1000v$ config t
n1000v(config)# port-profile vm-uplink
n1000v(config-port-prof)# switchport mode access
n1000v(config-port-prof)# capability uplink
n1000v(config-port-prof)# switchport access vlan 262
n1000v(config-port-prof)# vmware port-group
n1000v(config-port-prof)# no shut
n1000v(config-port-prof)# state enabled
n1000v(config)# port-profile data262
n1000v(config-port-prof)# switchport mode access
n1000v(config-port-prof)# switchport access vlan 262
n1000v(config-port-prof)# vmware port-group data262
n1000v(config-port-prof)# no shut
n1000v(config-port-prof)# state enabled
n1000v(config-port-prof)# copy run start
[########################################]
11、 完成上述步骤后就可以在vSphere Client中的Inventory > Networking中看到Nexus 1000V,在Nexus 1000V上点右键,选择add host,把ESXi主机添加到分布式虚拟交换机(DVS)。
12、 验证安装是否成功
n1000v# show module
Mod Ports Module-Type Model Status
--- ----- -------------------------------- ------------------ ------------
1 0 Virtual Supervisor Module Nexus1000V active *
3 248 Virtual Ethernet Module NA ok
参考资料:
http://www.cisco.com/en/US/products/ps9902/prod_installation_guides_list.html
No comments:
Post a Comment