Sunday, April 28, 2019

Rommon bug Please reset before continuing

Please reset before continuing

Symptom:
When interrupting the boot sequence of an ASR1k with 'send break', the ASR1k is unable to access the file systems :

rommon 5 > dir bootflash:
Please reset before continuing

rommon 8 > boot bootflash:/asr1001-universalk9.03.02.02.S.151-1.S2.bin
Please reset before booting

Conditions:
Boot sequence interrupted.

Workaround:
1)
2) confreg 0x2100 (disable autoboot)
3) reset
4) wait for rommon prompt
5) confreg 0x2102 (enable autoboot)
6) dir bootflash:
7) boot bootflash:

Wednesday, April 17, 2019

Cisco ASR 1000 Series Router Hardware Installation Guide

https://www.cisco.com/c/en/us/td/docs/routers/asr1000/install/guide/asr1routers/asr-1000-series-hig/asr-hig-fru.html#con_1060675

ASR and ISR error log : Maximum Tx Bandwidth limit of 85000 Kbps reached for Crypto functionality with securityk9 technology package license.


May 13 10:42:56.436 UTC: %CERM-4-TX_BW_LIMIT: Maximum Tx Bandwidth limit of 85000 Kbps reached for Crypto functionality with securityk9 technology package license.
May 13 10:43:56.852 UTC: %CERM-4-TX_BW_LIMIT: Maximum Tx Bandwidth limit of 85000 Kbps reached for Crypto functionality with securityk9 technology package license.
May 13 10:44:58.466 UTC: %CERM-4-TX_BW_LIMIT: Maximum Tx Bandwidth limit of 85000 Kbps reached for Crypto functionality with securityk9 technology package license.
May 13 10:46:01.679 UTC: %CERM-4-TX_BW_LIMIT: Maximum Tx Bandwidth limit of 85000 Kbps reached for Crypto functionality with securityk9 technology package license.
May 13 10:47:22.114 UTC: %CERM-4-TX_BW_LIMIT: Maximum Tx Bandwidth limit of 85000 Kbps reached for Crypto functionality with securityk9 technology package license.


I understand that you are seeing CERM Maximum Tx bandwidth messages.  If you are seeing these messages, it means you running into these two scenarios:

  1.  You are hitting the limitation of the k9 license.  The k9 license has an 85Mbps limitation where it only allows you to pass 85Mbps of traffic at one time.  Any crypto traffic that goes over the limitation will get dropped.  The only way to remove that limitation is to purchase the HSEC license and then enable it on your ISR.
  2.  You are running into he 30 week bug.  All ISR 4k devices are susceptible  to this bug.  If you were running into this, it would stop passing all crypto traffic and you would be in a network down state.  The only work around for this bug is to reload the router.  Then you would need to upgrade to a fixed version of code.

I looked at the show tech you attached to the case and I see that the router has only been up for 2 days so you are not hitting the 30 week bug.
So in this case you are hitting the k9 limitation. 


By nature crypto traffic is bursty.  So what is happening is you are sending and receiving enough crypto traffic at the same time that make you go over the k9 limitation of 85Mbps.The 85Mbps limitation includes traffic being sent and received.  If you are sending 50Mbps of encrypted traffic and receiving 35Mbps of encrypted traffic, then any traffic (being sen tor received) will be dropped because you will go over the 85Mbps limitation.

Tuesday, April 16, 2019

IOS/ IOS-XE 路由器 SNMP相关OID

QoS 部分

 Service-policy output: BRANCH_4M_QOS

    Class-map: class-default (match-any) 
      446269 packets, 50984442 bytes
      5 minute offered rate 676000 bps, drop rate 0000 bps
      Match: any
      Queueing
      queue limit 64 packets
      (queue depth/total drops/no-buffer drops) 0/0/0
      (pkts output/bytes output) 445685/50806715
      shape (average) cir 4096000, bc 127488, be 127488
      target shape rate 4096000
      police:
         cir 4096000 bps, bc 4096000 bytes
        conformed 446269 packets, 50984442 bytes; actions:
          transmit
        exceeded 0 packets, 0 bytes; actions:
          drop

        conformed 676000 bps, exceeded 0000 bps

OID: 1.3.6.1.4.1.9.9.166.1.15.1.1.11 

Class-map: class-default (match-any) 
      446269 packets, 50984442 bytes
      5 minute offered rate 676000 bps, drop rate 0000 bps
      Match: any
      Queueing
      queue limit 64 packets
      (queue depth/total drops/no-buffer drops) 0/0/0
      (pkts output/bytes output) 445685/50806715
      shape (average) cir 4096000, bc 127488, be 127488
      target shape rate 4096000
      police:
         cir 4096000 bps, bc 4096000 bytes
        conformed 446269 packets, 50984442 bytes; actions:
          transmit
        exceeded 0 packets, 0 bytes; actions:
          drop

        conformed 676000 bps, exceeded 0000 bps

OID : 1.3.6.1.4.1.9.9.166.1.15.1.1.18


Class-map: class-default (match-any) 
      446269 packets, 50984442 bytes
      5 minute offered rate 676000 bps, drop rate 0000 bps
      Match: any
      Queueing
      queue limit 64 packets
      (queue depth/total drops/no-buffer drops) 0/0/0
      (pkts output/bytes output) 445685/50806715
      shape (average) cir 4096000, bc 127488, be 127488
      target shape rate 4096000
      police:
         cir 4096000 bps, bc 4096000 bytes
        conformed 446269 packets, 50984442 bytes; actions:
          transmit
        exceeded 0 packets, 0 bytes; actions:
          drop

        conformed 676000 bps, exceeded 0000 bps

OID : 1.3.6.1.4.1.9.9.166.1.15.1.1.14

接口部分

GigabitEthernet0/0/0 is up, line protocol is up 
  Hardware is ISR4331-3x1GE, address is 00bf.77c7.5690 (bia 00bf.77c7.5690)
  Description: --To SW2 G3/9--
  MTU 1500 bytes, BW 1000000 Kbit/sec, DLY 10 usec, 
     reliability 255/255, txload 2/255, rxload 2/255
  Encapsulation 802.1Q Virtual LAN, Vlan ID  1., loopback not set
  Keepalive not supported 
  Full Duplex, 1000Mbps, link type is auto, media type is RJ45
  output flow-control is off, input flow-control is off
  ARP type: ARPA, ARP Timeout 04:00:00
  Last input 00:00:00, output 00:00:09, output hang never
  Last clearing of "show interface" counters never
  Input queue: 0/375/0/0 (size/max/drops/flushes); Total output drops: 11663378
  Queueing strategy: Class-based queueing
  Output queue: 0/40 (size/max)
  30 second input rate 9675000 bits/sec, 2017 packets/sec
  30 second output rate 7998000 bits/sec, 1591 packets/sec
     55706205 packets input, 33350296693 bytes, 0 no buffer
     Received 153 broadcasts (0 IP multicasts)
     0 runts, 0 giants, 0 throttles 
     0 input errors, 0 CRC, 0 frame, 0 overrun, 0 ignored
     0 watchdog, 133490 multicast, 0 pause input
     43951129 packets output, 27595615755 bytes, 0 underruns
     0 output errors, 0 collisions, 2 interface resets
     0 unknown protocol drops
     0 babbles, 0 late collision, 0 deferred
     2 lost carrier, 0 no carrier, 0 pause output

     0 output buffer failures, 0 output buffers swapped out

OID:1.3.6.1.4.1.9.2.2.1.1.8


GigabitEthernet0/0/0 is up, line protocol is up 
  Hardware is ISR4331-3x1GE, address is 00bf.77c7.5690 (bia 00bf.77c7.5690)
  Description: --To SW2 G3/9--
  MTU 1500 bytes, BW 1000000 Kbit/sec, DLY 10 usec, 
     reliability 255/255, txload 2/255, rxload 2/255
  Encapsulation 802.1Q Virtual LAN, Vlan ID  1., loopback not set
  Keepalive not supported 
  Full Duplex, 1000Mbps, link type is auto, media type is RJ45
  output flow-control is off, input flow-control is off
  ARP type: ARPA, ARP Timeout 04:00:00
  Last input 00:00:00, output 00:00:09, output hang never
  Last clearing of "show interface" counters never
  Input queue: 0/375/0/0 (size/max/drops/flushes); Total output drops: 11663378
  Queueing strategy: Class-based queueing
  Output queue: 0/40 (size/max)
  30 second input rate 9675000 bits/sec, 2017 packets/sec
  30 second output rate 7998000 bits/sec, 1591 packets/sec
     55706205 packets input, 33350296693 bytes, 0 no buffer
     Received 153 broadcasts (0 IP multicasts)
     0 runts, 0 giants, 0 throttles 
     0 input errors, 0 CRC, 0 frame, 0 overrun, 0 ignored
     0 watchdog, 133490 multicast, 0 pause input
     43951129 packets output, 27595615755 bytes, 0 underruns
     0 output errors, 0 collisions, 2 interface resets
     0 unknown protocol drops
     0 babbles, 0 late collision, 0 deferred
     2 lost carrier, 0 no carrier, 0 pause output
     0 output buffer failures, 0 output buffers swapped out

OID : 1.3.6.1.4.1.9.2.2.1.1.6


Here is the ISR4451 OID for CPU,Memory,FAN,temperature,power asked by the Engineer Chen.

FAN,POWER,TEMPERATURE
sensor data type
1.3.6.1.4.1.9.9.91.1.1.1.1.1

senor name
1.3.6.1.2.1.47.1.1.1.1.2

value
1.3.6.1.4.1.9.9.91.1.1.1.1.4

status:
1.3.6.1.4.1.9.9.91.1.1.1.1.5


CPU:
CPU usage:
>> cpmCPUTotal5sec
>> 1.3.6.1.4.1.9.9.109.1.1.1.1.3
>> cpmCPUTotal1min
>> 1.3.6.1.4.1.9.9.109.1.1.1.1.4
>> cpmCPUTotal5min
>> 1.3.6.1.4.1.9.9.109.1.1.1.1.5

Memory:
Steven$ snmpwalk -v 2c -c cisco 10.124.36.43 1.3.6.1.4.1.9.9.48.1.1.1
SNMPv2-SMI::enterprises.9.9.48.1.1.1.2.1 = STRING: "Processor"
SNMPv2-SMI::enterprises.9.9.48.1.1.1.3.1 = INTEGER: 0
SNMPv2-SMI::enterprises.9.9.48.1.1.1.4.1 = INTEGER: 1
SNMPv2-SMI::enterprises.9.9.48.1.1.1.5.1 = Gauge32: 361894208     Used
SNMPv2-SMI::enterprises.9.9.48.1.1.1.6.1 = Gauge32: 1326466576   Free
SNMPv2-SMI::enterprises.9.9.48.1.1.1.7.1 = Gauge32: 1048575908   LargestFree


Sunday, April 14, 2019

ESXi 上安装Nexus 1000V

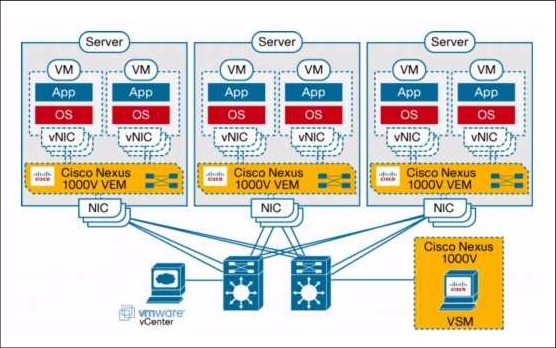
   Nexus 1000V是Cisco推出的第一款纯软件的虚拟交换机产品,可以在VMware虚拟化环境中提供Cisco Catalyst交换机的功能,如QoS、ACL、SPAN等。
        Cisco Nexus 1000V包含VEMVSM两部分,其中VEM运行在ESXi服务器上取代VMware原有的虚拟交换机,VSM是一个单独运行的虚拟机,提供CLI接口,用于管理和配置整个虚拟交换机。


Cisco Nexus 1000V的具体安装步骤如下:
 
安装环境:
ESXi 4.0 x 1            ip address:      192.168.0.10
vCenter Server x 1      ip address:      192.168.0.20
vSphere Client and RCLI x 1   ip address:      192.168.0.30
Cisco Nexus 1000V        management ip 192.168.0.50
 
1、  www.cisco.com下载Nexus 1000V安装包,将安装包解压得到VSMVEM安装程序。
 
2、  ESXi服务器上安装并验证VEM
VEM目录中的cisco-vem-v100-4.0.4.1.1.27-0.4.2.zip复制到C:\Program Files\VMware\VMware vSphere CLI\bin\ 目录中,选择开始菜单中的All programs > VMware >VMware vSphere CLI > Command Prompt
C:\Program Files\VMware\VMware vSphere CLI>cd bin
C:\Program Files\VMware\VMware vSphere CLI\bin>vihostupdate.pl -i -b cisco-vem-v100-4.0.4.1.1.27-0.4.2.zip --server 192.168.0.20
C:\Program Files\VMware\VMware vSphere CLI\bin>vihostupdate.pl -q --server 192.168.0.20
 
3、  vSphere Client选择File > Deploy OVF Template选中VSM目录中的Nexus1000v-4.0.4.SV1.1.ova导入VSM虚拟机。
4、  启动虚拟机,选择安装Nexus 1000VHA模式设定为standalone,定义管理地址及网关。
5、  查看虚拟机的host-id,并根据此idwww.cisco.com上申请60天试用License
#show license host-id
6、  将下载的License文件放在TFTP服务器,并上传到虚拟机的bootflash中。
#copy tftp://192.168.0.30/cisco.lic bootflash:
       #install license bootflash:cisco.lic
       #show license usage
       #copy run start
7、  vCenter Server上安装Cisco Nexus 1000V Plug-in
用浏览器打开虚拟机管理地址http://192.168.0.50下载cisco_nexus1000v_extension.xmlvSphere Client中选择Manage Plug-in,右键点击空白处选择新建Plug-in,选择下载的xml文件并点击注册。如果注册失败,可以删除此plug-in然后重新尝试注册,具体方法见如下的Nexus 1000V安装故障解决指南
8、  VSM虚拟机连接vCenter Server,如果连接失败通常是第6步没有成功注册Plug-in
n1000v# config t
n1000v(config)# svs connection VC
n1000v((config-svs-conn)# vmware dvs datacenter-name DC-1
n1000v((config-svs-conn)# protocol vmware-vim
n1000v((config-svs-conn)# remote ip address 192.168.0.20
n1000v(config-svs-conn)# connect
n1000v# show svs connections
9、  定义VSMVEM通讯使用的Port Profile
n1000v(config)# port-profile system-uplink
n1000v(config-port-prof)# switchport mode trunk
n1000v(config-port-prof)# switchport trunk allowed vlan 1
n1000v(config-port-prof)# no shut
n1000v(config-port-prof)# system vlan 1
n1000v(config-port-prof)# vmware port-group
n1000v(config-port-prof)# capability uplink
n1000v(config-port-prof)# state enabled
10、              定义其他虚拟机数据和上联通讯的Port Profile
n1000v$ config t
n1000v(config)# port-profile vm-uplink
n1000v(config-port-prof)# switchport mode access
n1000v(config-port-prof)# capability uplink
n1000v(config-port-prof)# switchport access vlan 262
n1000v(config-port-prof)# vmware port-group
n1000v(config-port-prof)# no shut
n1000v(config-port-prof)# state enabled
 
n1000v(config)# port-profile data262
n1000v(config-port-prof)# switchport mode access
n1000v(config-port-prof)# switchport access vlan 262
n1000v(config-port-prof)# vmware port-group data262
n1000v(config-port-prof)# no shut
n1000v(config-port-prof)# state enabled
n1000v(config-port-prof)# copy run start
[########################################]
 
11、              完成上述步骤后就可以在vSphere Client中的Inventory > Networking中看到Nexus 1000VNexus 1000V上点右键选择add hostESXi主机添加到分布式虚拟交换机DVS
12、              验证安装是否成功
n1000v# show module
Mod Ports Module-Type Model Status
--- ----- -------------------------------- ------------------ ------------
1 0 Virtual Supervisor Module Nexus1000V active *
3 248 Virtual Ethernet Module NA ok
 
参考资料:

http://www.cisco.com/en/US/products/ps9902/prod_installation_guides_list.html