Thursday, December 31, 2020

Linux online Expansion Harddisk

step 1 

Frist edit harddisk on ESXi or VCSA


setp 2

then login the Linux server, check “fdisk -l” command.


root@eve-ng:~# fdisk -l

Disk /dev/sdb: 800 GiB, 858993459200 bytes, 1677721600 sectors

Units: sectors of 1 * 512 = 512 bytes

Sector size (logical/physical): 512 bytes / 512 bytes

I/O size (minimum/optimal): 512 bytes / 512 bytes


if Disk /dev/sdx eq your set harddisk, please go to setp 3.

if disk not eq set harddisk, please use "partprobe /dev/sdx" command tell kernel re-read the harddisk.

root@eve-ng:~# partprobe /dev/sdb

root@eve-ng:~# fdisk -l

Disk /dev/sdb: 900 GiB, 966367641600 bytes, 1887436800 sectors

Units: sectors of 1 * 512 = 512 bytes

Sector size (logical/physical): 512 bytes / 512 bytes

I/O size (minimum/optimal): 512 bytes / 512 bytes


setp 3

Expansion PV

root@eve-ng:~# pvdisplay /dev/sdb
  --- Physical volume ---
  PV Name               /dev/sdb
  VG Name               eve-ng-vg
  PV Size               <800.00 GiB / not usable 3.00 MiB
  Allocatable           yes (but full)
  PE Size               4.00 MiB
  Total PE              204799
  Free PE               0
  Allocated PE          204799
  PV UUID               KqNZmM-AvG0-68yt-WBXa-DMvO-jorh-nCUzyH
   
         
root@eve-ng:~# pvresize /dev/sdb
  Physical volume "/dev/sdb" changed
  1 physical volume(s) resized / 0 physical volume(s) not resized
root@eve-ng:~# pvdisplay /dev/sdb
  --- Physical volume ---
  PV Name               /dev/sdb
  VG Name               eve-ng-vg
  PV Size               <900.00 GiB / not usable 3.00 MiB
  Allocatable           yes 
  PE Size               4.00 MiB
  Total PE              230399
  Free PE               25600
  Allocated PE          204799
  PV UUID               KqNZmM-AvG0-68yt-WBXa-DMvO-jorh-nCUzyH
   
root@eve-ng:~# 


step 4 

Check VG

root@eve-ng:~# vgdisplay eve-ng-vg           
  --- Volume group ---
  VG Name               eve-ng-vg
  System ID             
  Format                lvm2
  Metadata Areas        2
  Metadata Sequence No  11
  VG Access             read/write
  VG Status             resizable
  MAX LV                0
  Cur LV                2
  Open LV               2
  Max PV                0
  Cur PV                2
  Act PV                2
  VG Size               949.99 GiB
  PE Size               4.00 MiB
  Total PE              243198
  Alloc PE / Size       217598 / 849.99 GiB
  Free  PE / Size       25600 / 100.00 GiB
  VG UUID               M1Jx3e-XvsF-HMDR-HOi5-9vur-FakF-GWfMMl
   

Setp 5
extend LV

root@eve-ng:~#  lvextend -l +100%FREE /dev/eve-ng-vg/root
  Size of logical volume eve-ng-vg/root changed from <849.04 GiB (217353 extents) to <949.04 GiB (242953 extents).
  Logical volume eve-ng-vg/root successfully resized.
root@eve-ng:~# lvdisplay /dev/eve-ng-vg/root 
  --- Logical volume ---
  LV Path                /dev/eve-ng-vg/root
  LV Name                root
  VG Name                eve-ng-vg
  LV UUID                X7yq2F-TVJR-58Tw-mOt2-3RVi-CegE-4hZjZn
  LV Write Access        read/write
  LV Creation host, time eve-ng, 2020-06-26 04:21:37 +0800
  LV Status              available
  # open                 1
  LV Size                <949.04 GiB
  Current LE             242953
  Segments               2
  Allocation             inherit
  Read ahead sectors     auto
  - currently set to     256
  Block device           253:0
   
root@eve-ng:~# 

Step 6
resize LV

root@eve-ng:~# df -h
Filesystem                    Size  Used Avail Use% Mounted on
udev                           63G     0   63G   0% /dev
tmpfs                          13G   20M   13G   1% /run
/dev/mapper/eve--ng--vg-root  836G  801G  470M 100% /
tmpfs                          63G     0   63G   0% /dev/shm
tmpfs                         5.0M     0  5.0M   0% /run/lock
tmpfs                          63G     0   63G   0% /sys/fs/cgroup
overlay                       836G  801G  470M 100% /var/lib/docker/overlay2/17794a2f84f5ddf30ed690cc8b0e50753b385c0d845fd60bf9fc5e3a3f037aeb/merged
tmpfs                          13G     0   13G   0% /run/user/0
root@eve-ng:~# resize2fs /dev/eve-ng-vg/root
resize2fs 1.44.1 (24-Mar-2018)
Filesystem at /dev/eve-ng-vg/root is mounted on /; on-line resizing required
old_desc_blocks = 107, new_desc_blocks = 119
The filesystem on /dev/eve-ng-vg/root is now 248783872 (4k) blocks long.

root@eve-ng:~# df -h
Filesystem                    Size  Used Avail Use% Mounted on
udev                           63G     0   63G   0% /dev
tmpfs                          13G   20M   13G   1% /run
/dev/mapper/eve--ng--vg-root  934G  801G   95G  90% /
tmpfs                          63G     0   63G   0% /dev/shm
tmpfs                         5.0M     0  5.0M   0% /run/lock
tmpfs                          63G     0   63G   0% /sys/fs/cgroup
overlay                       934G  801G   95G  90% /var/lib/docker/overlay2/17794a2f84f5ddf30ed690cc8b0e50753b385c0d845fd60bf9fc5e3a3f037aeb/merged
tmpfs                          13G     0   13G   0% /run/user/0
root@eve-ng:~# 

Done


Sunday, December 6, 2020

Friday, November 20, 2020

Cisco Manual Specific License Registration (SLR) Procedure.

 1. Purpose

2. Problem description

3. Pre-requisites

4. SLR description

5. Manual SLR Procedure

6. Further reading


1. Purpose

Describe the procedure for complete offline Smart License registration.


2. Problem description:

In case of other Smart License registration methods there are limitations if we don't Internet connectivity.

  • Smart-licensing requires product to connect to CSSM (cisco cloud) or SSM satellite (VM on customer premises)
  • SSM satellite requires to connect to CSSM periodically (at least once in 90 days or so).
  • License reservation-mechanism to reserve node-locked licenses and install on product.

3.Pre-requisites:

  • Smart Licensing supported on the ios version.
  • Minimum requirement 16.9.x Trains.

4. SLR Description: 

Specific License Reservation (SLR) is a feature used in highly secure networks. It provides a method for Customers to deploy a Software License on a Device (Product Instance) without communicating usage information to Cisco. The advantage of this approach is that it provides Product Activation Key (PAK) / License file-like functionality while also retaining most of the benefits of full communication Smart Licensing.


  • A highly secure network allows users to exchange initial information electronically, consume entitlements normally, and track entitlement usage. 
  • Specific license reservation (SLR) allows for entitlements, perpetual or term, to be reserved on Product Instances if users have an excess of licenses. 
  • A Product Instance generates a reservation request code and then you can enter that code in Smart Software Manager (SSM). 
  • Anyone with a Smart Account can use the SLR feature if they have the devices (product instances) that support it. If SLR is enabled for the Smart Account and if they have entitlements in surplus (only those entitlements which map to the product requesting reservation) for the reservation.


  • To improve user experience with license reservations, the Specific License Reservation (SLR) authorization codes for an end product can be pre-installed at the factory. 
  • Going forward, Customers may not need to reserve licenses manually by generating authorization code in Smart Software Manager, as they can choose to have the authorization Code pre-installed with the Factory Install capability.
  • Factory Install is available for any customer for whom this capability is enabled and a related order is placed. 
  • SLR workflow remains as-is where user could enter the reservation request code generated from the device in SSM, select licenses to reserve and generate Authorization code, which then needs to be entered manually on the device.

4. Manual SLR procedure:


Step 1: You need to first get SLR enabled(approval).


Please follow the instruction below for enabling SLR:

1.Send an E-mail to request to enable SLR with justification: sa-adoption-support@external.cisco.com

2. Provide Smart Account Name & Domain ID along with justification below:

2.1 Reason you need to enable SLR (i.e. Datacenter security policy, etc.)

2.2 We understand the demerits of using SLR – Cisco may contact you to confirm. Cisco Global Team will confirm the above,  approve, and enable SLR.


Step 2: Enable SLR on device.


              Switch(Config)# License Smart reservation


Step 3: Generate a request code from the device


              Switch# License smart reservation request local

              Enter this request code in the Cisco Smart Software Manager (CSSM) Portal.


1.jpg


Step 4: Go to CSSM and click on Licenses à License Reservation


2.png


Step 5: Enter the request code and click ‘Next’


3.png


Step 6.1: Check “Reserve a specific license “ and  select license to reserve.


4.png


Step 6.2: Select the quantity of licenses to reserve and click “Next”


5.png


Step 7: Confirm the licenses and click on “Generate authorization Code”


6.png


Step 8: Click on “Copy to clipboard” or “Download as file” and save this authorization code in a file. Copy it to the device.


7.png


Step 9.1: Install the authorization code file.

 Switch# License smart reservation install file flash: Authcode.txt

 Reservation install file successful

                                        OR

Step 9.2:Install the authorization code

Switch# License smart reservation install WORD authorization_code


5. Further reading:

How to use 25G ports in 1/10G mode on Cisco NCS (540, 55A2, etc)

Quad configuration:

RP/0/RP0/CPU0:NCS-540(config)#hw-module quad 0 location 0/0/CPU0 ?
  mode  select mode 10g or 25g for a quad(group of 4 ports).
  <cr>
RP/0/RP0/CPU0:NCS-540(config)#hw-module quad 0 location 0/0/CPU0 mode ?
  WORD  10g or 25g


Config Snippet:  
 
hw-module quad 0 location 0/0/CPU0
 mode 10g
!
hw-module quad 1 location 0/0/CPU0
 mode 25g             


  • By default all interfaces will be created as 25G interfaces, Quad cli is required to bring-up either 10G/1G interface.
  • We cannot combine both 1G/10G and 25G in the same quad, which is a limitation.
  • If we insert 25G optics, then this CLI is not required and link will be coming up by default.
  • User can use both the quads as either 10G/1G or 25G or each in one quad. Only the mix of 1G/10G and 25G is not supported.

 I've recently been test driving a Cisco NCS 55A2, which has 24 x 1/10 Gbps and 16 x 1/10/25 Gbps ports. However, I ran into a problem where the 1/10/25 Gbps ports would not rate adapt down to 10 Gbps. There is no "speed" configuration under the port and seemingly nothing useful under controllers relevant to 25G ports.


I eventually got the answer from Cisco engineering but since I couldn't find this documented anywhere on the Internet I thought it might be worth preserving it here for prosperity!

Theory


Unlike 1/10G operation where the device just detects what optic is inserted then presents the appropriate GigabitEthernet or TenGigabitEthernet interface, 1/10/25G ports need to be hard set into either 1/10G or 25G mode. Frustratingly, when it comes to 25 Gbps ports, the NCS platforms set this in groups of four ports, each of which is referred to as a"quad". In another confusing move, Cisco has decided to put the quad config in a completely different place to very similar things such as the config to break out 40/100G ports into 10/25G members.

Configuration


As we can see here, the 1/10/25G ports default to 25G mode, reflected in their TFx/x/x/x naming:

RP/0/RP0/CPU0:55A2(config)#do show interfaces description | begin 0/0/0/24
TF0/0/0/24 admin-down admin-down
TF0/0/0/25 admin-down admin-down
TF0/0/0/26 admin-down admin-down
TF0/0/0/27 admin-down admin-down
TF0/0/0/28 admin-down admin-down
TF0/0/0/29 admin-down admin-down
TF0/0/0/30 admin-down admin-down
TF0/0/0/31 admin-down admin-down
TF0/0/0/32 admin-down admin-down
TF0/0/0/33 admin-down admin-down
TF0/0/0/34 admin-down admin-down
TF0/0/0/35 admin-down admin-down
TF0/0/0/36 admin-down admin-down
TF0/0/0/37 admin-down admin-down
TF0/0/0/38 admin-down admin-down
TF0/0/0/39 admin-down admin-down
Mg0/RP0/CPU0/0 admin-down admin-down

Now, let's configure the first four 25G ports into 1/10G mode. The configuration lives under the "hw-module" branch, and quads are numbered from 0 (up to 3 on this platform). To set the first four ports into 1/10G mode:

RP/0/RP0/CPU0:55A2(config)#hw-module quad 0 location 0/0/CPU0 mode 10g
RP/0/RP0/CPU0:55A2(config)#commit

As we can see, ports 24-27 have transformed into 1/10G ports and now appear with the Tex/x/x/x naming convention:

RP/0/RP0/CPU0:55A2(config)#do show interfaces description | begin 0/0/0/24
Te0/0/0/24 admin-down admin-down
Te0/0/0/25 admin-down admin-down
Te0/0/0/26 admin-down admin-down
Te0/0/0/27 admin-down admin-down
TF0/0/0/28 admin-down admin-down
TF0/0/0/29 admin-down admin-down
TF0/0/0/30 admin-down admin-down
TF0/0/0/31 admin-down admin-down
TF0/0/0/32 admin-down admin-down
TF0/0/0/33 admin-down admin-down
TF0/0/0/34 admin-down admin-down
TF0/0/0/35 admin-down admin-down
TF0/0/0/36 admin-down admin-down
TF0/0/0/37 admin-down admin-down
TF0/0/0/38 admin-down admin-down
TF0/0/0/39 admin-down admin-down
Mg0/RP0/CPU0/0 admin-down admin-down

Let's set the rest to 10G mode, because 25G optics are expensive and I don't have any in the lab:

RP/0/RP0/CPU0:55A2(config)#hw-module quad 1 location 0/0/CPU0 mode 10g
RP/0/RP0/CPU0:55A2(config)#hw-module quad 2 location 0/0/CPU0 mode 10g
RP/0/RP0/CPU0:55A2(config)#hw-module quad 3 location 0/0/CPU0 mode 10g
RP/0/RP0/CPU0:55A2(config)#commit
RP/0/RP0/CPU0:55A2(config)#do show interfaces description | begin 0/0/0/24
Te0/0/0/24 admin-down admin-down
Te0/0/0/25 admin-down admin-down
Te0/0/0/26 admin-down admin-down
Te0/0/0/27 admin-down admin-down
Te0/0/0/28 admin-down admin-down
Te0/0/0/29 admin-down admin-down
Te0/0/0/30 admin-down admin-down
Te0/0/0/31 admin-down admin-down
Te0/0/0/32 admin-down admin-down
Te0/0/0/33 admin-down admin-down
Te0/0/0/34 admin-down admin-down
Te0/0/0/35 admin-down admin-down
Te0/0/0/36 admin-down admin-down
Te0/0/0/37 admin-down admin-down
Te0/0/0/38 admin-down admin-down
Te0/0/0/39 admin-down admin-down
Mg0/RP0/CPU0/0 admin-down admin-down

Easy (when you know how)!

Source Link:
http://networkingbodges.blogspot.com/2019/03/how-to-use-25g-ports-in-110g-mode-on.html

Tuesday, November 10, 2020

IOS-XR Log message: %ROUTING-FIB-4-RETRYDB_NONEMPTY

 XR7/ LNT along with several other platforms are seeing the below errors: 


RP/0/RP0/CPU0:darwin1#show log | in RETRY
Fri Aug 28 02:35:15.217 UTC
RP/0/RP0/CPU0:Aug 24 07:06:43.951 UTC: fib_mgr[355]: %ROUTING-FIB-4-RETRYDB_NONEMPTY : One or more FIB object(s) have been in IPv4 retry queue for at least 120 seconds
RP/0/RP0/CPU0:Aug 24 07:10:43.951 UTC: fib_mgr[355]: %ROUTING-FIB-4-RETRYDB_NONEMPTY : One or more FIB object(s) have been in IPv4 retry queue for at least 240 seconds
RP/0/RP0/CPU0:Aug 24 07:18:43.951 UTC: fib_mgr[355]: %ROUTING-FIB-4-RETRYDB_NONEMPTY : One or more FIB object(s) have been in IPv4 retry queue for at least 480 seconds
RP/0/RP0/CPU0:Aug 24 07:34:43.951 UTC: fib_mgr[355]: %ROUTING-FIB-4-RETRYDB_NONEMPTY : One or more FIB object(s) have been in IPv4 retry queue for at least 960 seconds
RP/0/RP0/CPU0:Aug 24 08:06:43.951 UTC: fib_mgr[355]: %ROUTING-FIB-4-RETRYDB_NONEMPTY : One or more FIB object(s) have been in IPv4 retry queue for at least 1920 seconds
RP/0/RP0/CPU0:Aug 24 09:10:43.951 UTC: fib_mgr[355]: %ROUTING-FIB-4-RETRYDB_NONEMPTY : One or more FIB object(s) have been in IPv4 retry queue for at least 3840 seconds
RP/0/RP0/CPU0:Aug 24 11:18:43.951 UTC: fib_mgr[355]: %ROUTING-FIB-4-RETRYDB_NONEMPTY : One or more FIB object(s) have been in IPv4 retry queue for at least 7680 seconds
RP/0/RP0/CPU0:Aug 24 15:34:43.952 UTC: fib_mgr[355]: %ROUTING-FIB-4-RETRYDB_NONEMPTY : One or more FIB object(s) have been in IPv4 retry queue for at least 15360 seconds
RP/0/RP0/CPU0:Aug 25 00:06:43.952 UTC: fib_mgr[355]: %ROUTING-FIB-4-RETRYDB_NONEMPTY : One or more FIB object(s) have been in IPv4 retry queue for at least 30720 seconds
RP/0/RP0/CPU0:Aug 25 17:10:43.952 UTC: fib_mgr[355]: %ROUTING-FIB-4-RETRYDB_NONEMPTY : One or more FIB object(s) have been in IPv4 retry queue for at least 61440 seconds
RP/0/RP0/CPU0:Aug 26 17:10:43.952 UTC: fib_mgr[355]: %ROUTING-FIB-4-RETRYDB_NONEMPTY : One or more FIB object(s) have been in IPv4 retry queue for at least 86400 seconds
RP/0/RP0/CPU0:Aug 27 17:10:43.952 UTC: fib_mgr[355]: %ROUTING-FIB-4-RETRYDB_NONEMPTY : One or more FIB object(s) have been in IPv4 retry queue for at least 86400 seconds
RP/0/RP0/CPU0:darwin1#


This is identical to: 

https://techzone.cisco.com/t5/IOS-XR-L3FIB-Eng-Discussion/NTT-7-0-2-ROUTING-FIB-4-RETRYDB-NONEMPTY-S...


From our lab node:


RP/0/RP0/CPU0:darwin1#show cef unresolved location 0/rp0/CPU0

Fri Aug 28 02:35:33.827 UTC


IPV4:

-----


Prefix              Next Hop            Interface

------------------- ------------------- ------------------

10.0.101.1/32       10.0.101.1/32 (?)   MgmtEth0/RP0/CPU0/0

10.0.101.3/32       10.0.101.3/32 (?)   MgmtEth0/RP0/CPU0/0

10.0.101.7/32       10.0.101.7/32 (?)   MgmtEth0/RP0/CPU0/0

10.0.101.8/32       10.0.101.8/32 (?)   MgmtEth0/RP0/CPU0/0

10.0.101.15/32      10.0.101.15/32 (?)  MgmtEth0/RP0/CPU0/0

10.0.101.22/32      10.0.101.22/32 (?)  MgmtEth0/RP0/CPU0/0

10.0.101.29/32      10.0.101.29/32 (?)  MgmtEth0/RP0/CPU0/0

10.0.101.102/32     10.0.101.102/32 (?) MgmtEth0/RP0/CPU0/0


<snip>


These are the ones that are not resolved at this time.


These entries were learned via arp. They are out of the subnet range configured on the MgMtETH0 interface


CEF as a check, requires we have a route for this entry in rib before installing this.

That is why we are seeing them in the retry db.


RP/0/RP0/CPU0:darwin1#show arp mgmtEth 0/RP0/CPU0/0

Fri Aug 28 02:35:45.052 UTC


-------------------------------------------------------------------------------

0/RP0/CPU0

-------------------------------------------------------------------------------

Address         Age        Hardware Addr   State      Type  Interface

10.0.101.1      00:10:12   00de.fb6e.7281  Dynamic    ARPA  MgmtEth0/RP0/CPU0/0

10.0.101.3      00:00:44   000c.299f.2ea0  Dynamic    ARPA  MgmtEth0/RP0/CPU0/0

10.0.101.7      03:21:44   0050.56b6.ea6e  Dynamic    ARPA  MgmtEth0/RP0/CPU0/0

10.0.101.8      00:00:49   000c.29dd.58eb  Dynamic    ARPA  MgmtEth0/RP0/CPU0/0

10.0.101.15     00:39:50   000c.291f.34b9  Dynamic    ARPA  MgmtEth0/RP0/CPU0/0

10.0.101.22     02:20:15   0050.56a2.36f9  Dynamic    ARPA  MgmtEth0/RP0/CPU0/0

10.0.101.29     02:59:25   0050.56a2.2503  Dynamic    ARPA  MgmtEth0/RP0/CPU0/0

10.0.101.102    00:08:56   00de.fbf0.bddd  Dynamic    ARPA  MgmtEth0/RP0/CPU0/0

10.0.101.151    00:06:40   0025.b500.000b  Dynamic    ARPA  MgmtEth0/RP0/CPU0/0


<snip>


To address this issue, please configure the below: 


RP/0/RP0/CPU0:darwin1#conf t

Fri Aug 28 02:35:51.928 UTC

RP/0/RP0/CPU0:darwin1(config)#int mgmtEth 0/RP0/CPU0/0

RP/0/RP0/CPU0:darwin1(config-if)#arp learning local

RP/0/RP0/CPU0:darwin1(config-if)#commit

Fri Aug 28 02:36:01.404 UTC

RP/0/RP0/CPU0:darwin1(config-if)#

RP/0/RP0/CPU0:darwin1(config-if)#

RP/0/RP0/CPU0:darwin1#

RP/0/RP0/CPU0:darwin1#

RP/0/RP0/CPU0:darwin1#

RP/0/RP0/CPU0:darwin1#show run int mgmtEth 0/RP0/CPU0/0

Fri Aug 28 02:43:03.993 UTC

interface MgmtEth0/RP0/CPU0/0

 ipv4 address 10.197.241.118 255.255.254.0

 arp learning local

!


RP/0/RP0/CPU0:darwin1#

Wednesday, November 4, 2020

ESXi 更改证书

登录ESXI,进入 /etc/vmware/ssl 目录,删除rui.crt和rui.key两个文件,并讲自己的ssl文件改名后上传到该目录,完成后退出winscp 

上传证书后可以不重启ESXI,在SSH下输入这两行命令就可以让证书生效

/etc/init.d/hostd restart
/etc/init.d/vpxa restart

Sunday, November 1, 2020

ESXi安装iso镜像添加驱动(esxi6.5,6.7)

 准备工作:

1.安装 Windows PowerShell 3.0 (需要启用Windows AutoUpdate服务,安装完毕计算机需要重启)

https://www.microsoft.com/en-us/download/details.aspx?id=34595
2.VMware-PowerCLI-6.0.0-3056836.exe

http://www.pc6.com/softview/SoftView_570251.html
3.ESXi-Customizer-PS-v2.6.0.ps1 

http://vibsdepot.v-front.de/tools/ESXi-Customizer-PS-v2.6.0.ps1

4.驱动下载

https://vibsdepot.v-front.de/wiki/index.php/List_of_currently_available_ESXi_packages


集成驱动过程

1.Powershell中默认禁止执行脚本,所以先修改策略允许执行

Set-ExecutionPolicy RemoteSigned

2.定位到ESXi-Customizer-PS-v2.6.0.ps1所在目录,楼主这边是D:\

cd D:\

3.集成所需驱动

把需要的驱动先下载下来再集成到iso中去
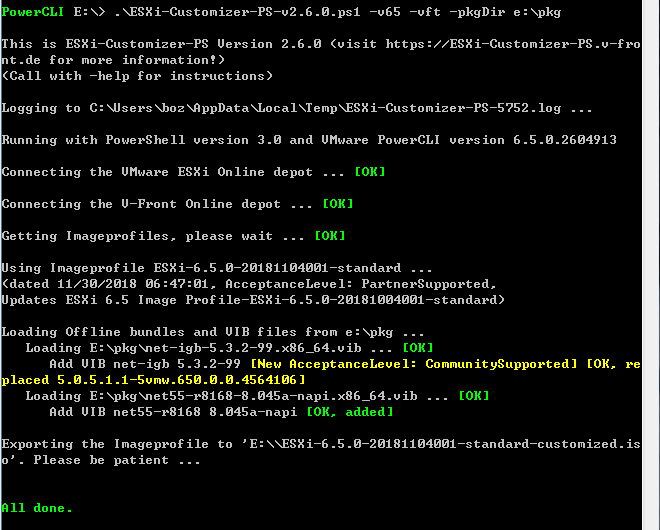
用这种方式替换ESXi 6.5的net-igb驱动,先下载好VIB驱动文件
net-igb-5.3.2-99.x86_64.vib: https://vibsdepot.v-front.de/wiki/index.php/Net-igb
然后把驱动文件放在指定位置,这边是d:\pkg

.\ESXi-Customizer-PS-v2.6.0.ps1 -v65 -vft -pkgDir d:\pkg

 注意:国内下载速度比较慢,可以用梯子,但是有可能出错。